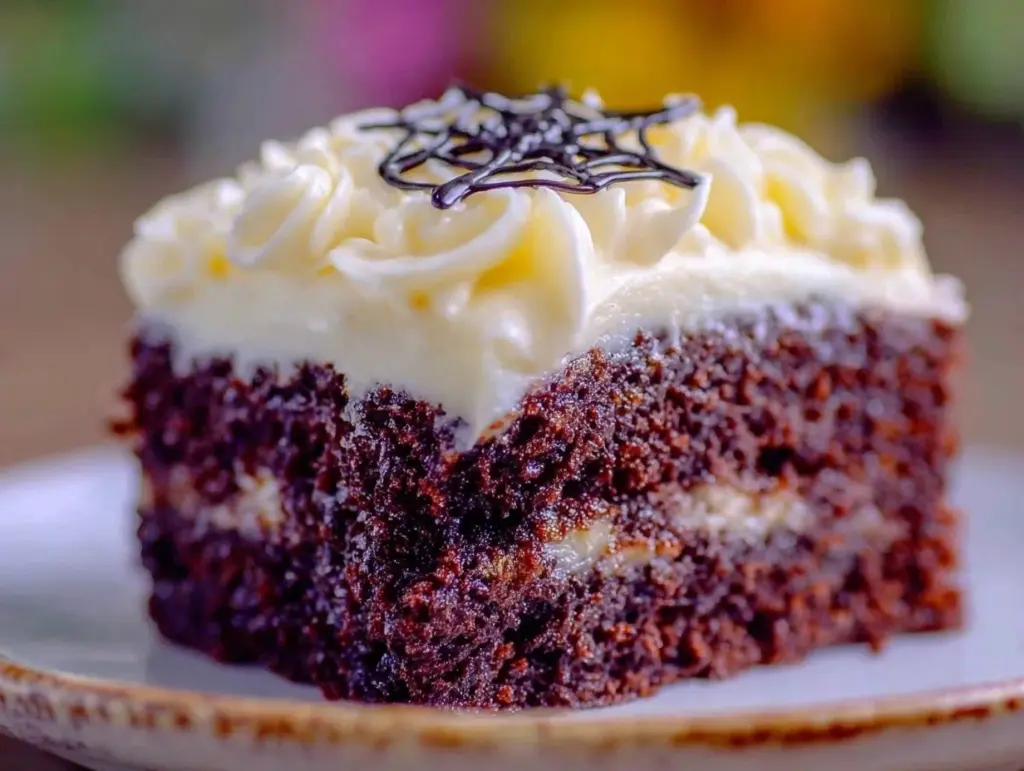
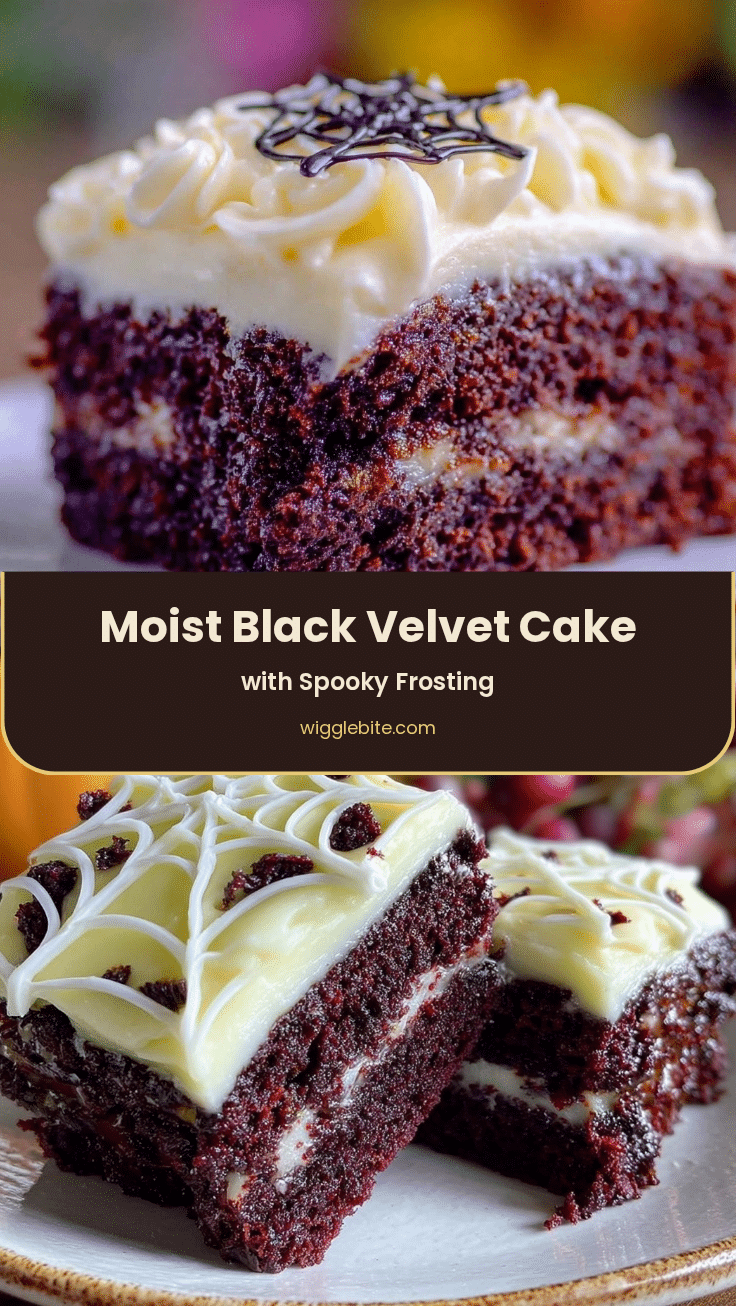
I messed up the frosting on my first three attempts at this black velvet cake before I realized the cream cheese spider web needed to be just the right consistency—not too thick, not too runny. Honestly, it was a little frustrating because I don’t even usually like super sweet frostings, but this one hit a perfect balance. The cake itself is surprisingly simple—a moist, deeply chocolatey black velvet with a hint of cocoa and a touch of buttermilk tang that I never expected to become a Halloween staple in my kitchen. I remember the first time I cut into it, the crumb was so tender it practically melted, and those spider web swirls on top? They looked spooky but inviting at the same time. The frosting wasn’t just a decoration; it added this tangy creaminess that made each bite feel like a little treat you didn’t have to feel guilty about. It’s funny how a recipe you botch a handful of times becomes one you cling to because it’s just right in the end. This black velvet cake stuck with me because it’s not about being perfect—it’s about that cozy, slightly eerie feeling Halloween brings, all wrapped up in a slice you actually want to eat. Sometimes the best recipes come from stubbornness and a bit of trial and error, and this one is exactly that.
Why You’ll Love This Recipe
Making the perfect Halloween black velvet cake with cream cheese spider web frosting isn’t just about a festive look—it’s about a dessert that delivers on every front. After several tweaks and plenty of taste tests, I’m confident this recipe stands apart because:
- Quick & Easy: While it looks fancy, this cake comes together in about 1 hour and 15 minutes from start to finish, which is perfect when you’re juggling costumes, decorations, and maybe last-minute invites.
- Simple Ingredients: You won’t need to hunt down anything exotic; all ingredients are pantry staples or easy to find at any grocery store.
- Perfect for Halloween Parties: The dramatic black color and whimsical spider web frosting make it an instant conversation starter on any spooky table.
- Crowd-Pleaser: Kids and adults alike rave about the moist texture and the cream cheese frosting’s tangy twist—plus, the cocoa flavor is rich without being overpowering.
- Unbelievably Delicious: The cake is velvety smooth, and the frosting adds just the right amount of creaminess and sweetness to balance it all.
What sets this recipe apart? The secret lies in the perfectly balanced cocoa and the way the buttermilk tenderizes the crumb. Plus, the cream cheese frosting is whipped just enough to hold its shape when piping the spider web design, making it both a visual and taste triumph. This isn’t your everyday chocolate cake; it’s got a personality that fits Halloween’s mysterious, playful vibe. I love that I can bring this cake out alongside more savory fare like creamy chicken Alfredo pasta or even something quick like one-pan garlic butter chicken with green beans to make a full celebration meal without stress.
What Ingredients You Will Need
This recipe uses simple, wholesome ingredients to deliver bold flavor and a satisfying texture without any fuss. The black velvet cake’s rich color comes from cocoa powder and black food coloring, paired with the tang and moisture of buttermilk. The cream cheese frosting is smooth and tangy, perfect for creating that spider web effect.
- For the Black Velvet Cake:
- All-purpose flour – 2 ½ cups (312g), sifted (for tender crumb)
- Cocoa powder (unsweetened) – ¾ cup (75g), preferably Dutch-processed
- Baking soda – 1 ½ teaspoons (for lift)
- Salt – 1 teaspoon (balances flavor)
- Unsalted butter – 1 cup (227g), softened (room temperature for easy blending)
- Granulated sugar – 2 cups (400g)
- Large eggs – 3, room temperature (helps with emulsification)
- Buttermilk – 1 cup (240ml), room temperature (makes the cake moist and tender)
- Vanilla extract – 2 teaspoons (adds warmth)
- Black gel food coloring – 2 tablespoons (for that classic Halloween black)
- For the Cream Cheese Spider Web Frosting:
- Cream cheese – 8 oz (227g), softened (full fat recommended for best texture)
- Unsalted butter – ½ cup (113g), softened
- Powdered sugar – 3 cups (360g), sifted (to avoid lumps)
- Vanilla extract – 1 teaspoon
- Whole milk or heavy cream – 2–3 tablespoons (to adjust consistency)
If you want to keep it dairy-free, you can swap the butter and cream cheese with plant-based alternatives, but I’d recommend a brand that whips well, like Kite Hill or Miyoko’s. For a gluten-free twist, almond flour or a gluten-free flour blend can work, but the texture will be a bit different—denser, but still delightful. I usually stick with this classic version because the combination of buttermilk and cocoa powder creates that unmistakable velvet softness you don’t get elsewhere. One tip: using gel food coloring rather than liquid keeps the batter from thinning out, which I learned the hard way after my first run.
Equipment Needed
You won’t need a lot of fancy tools to get this black velvet cake just right. Here’s what I use every time:
- Two 9-inch (23 cm) round cake pans – essential for even baking and stacking.
- Electric mixer (stand or hand) – for creaming butter and sugar smoothly and whipping the frosting to the perfect consistency.
- Mixing bowls – at least two, one for dry ingredients and one for wet.
- Sifter or fine mesh sieve – to sift flour and cocoa powder for a lump-free batter.
- Rubber spatula – for folding ingredients and scraping down the bowl.
- Piping bag with a round tip – for drawing the spider web frosting design (a zip-top bag with a small hole cut in the corner works too).
- Cooling racks – to cool the cakes evenly after baking.
If you don’t have a stand mixer, a hand mixer works just fine—just make sure the butter is soft but not melted, or you’ll struggle to get that fluffy texture. I’ve also used disposable piping bags in a pinch, but reusable ones give you better control for the intricate spider web pattern. For budget-friendly baking, you can find affordable cake pans at most stores, and I suggest lining them with parchment paper to prevent sticking. Keeping your equipment clean and dry (especially the mixing bowl and beaters) really helps when whipping the cream cheese frosting—it took me a few tries to figure that one out!
Preparation Method
- Preheat and prepare pans: Set your oven to 350°F (177°C). Grease two 9-inch cake pans with butter or non-stick spray, then line the bottoms with parchment paper circles for easy removal. This step saves you from a crumbly disaster later.
- Sift dry ingredients: Into a large bowl, sift together 2 ½ cups flour, ¾ cup cocoa powder, 1 ½ teaspoons baking soda, and 1 teaspoon salt. This ensures even distribution and avoids clumps of cocoa that can taste bitter.
- Cream butter and sugar: Using a mixer, beat 1 cup softened butter with 2 cups granulated sugar on medium speed until light and fluffy—about 3 to 5 minutes. You’ll notice the color lighten and the texture become almost mousse-like.
- Add eggs and vanilla: Beat in three large eggs one at a time, mixing well after each addition. Then add 2 teaspoons vanilla extract. This step helps emulsify the batter and adds flavor depth.
- Mix black food coloring: Stir in 2 tablespoons black gel food coloring until the batter is uniformly dark. The batter will look almost black but with a slight cocoa tint.
- Add dry and wet ingredients alternately: Reduce mixer speed to low. Add the dry ingredients in three additions, alternating with 1 cup of room temperature buttermilk in two additions. Start and end with dry ingredients. Mix just until combined—overmixing can toughen the crumb.
- Divide and bake: Pour the batter evenly into the prepared pans. Smooth tops with an offset spatula. Bake for 30–35 minutes, or until a toothpick inserted into the center comes out clean or with moist crumbs.
- Cool completely: Let cakes cool in pans for 10 minutes, then invert onto wire racks. Peel off parchment and allow to cool fully before frosting. This prevents the frosting from melting and sliding off.
- Make cream cheese frosting: Beat 8 oz softened cream cheese with ½ cup softened butter until smooth and creamy. Gradually add 3 cups powdered sugar, mixing on low speed to avoid clouds. Stir in 1 teaspoon vanilla and add 2–3 tablespoons milk or cream to reach a pipe-able consistency.
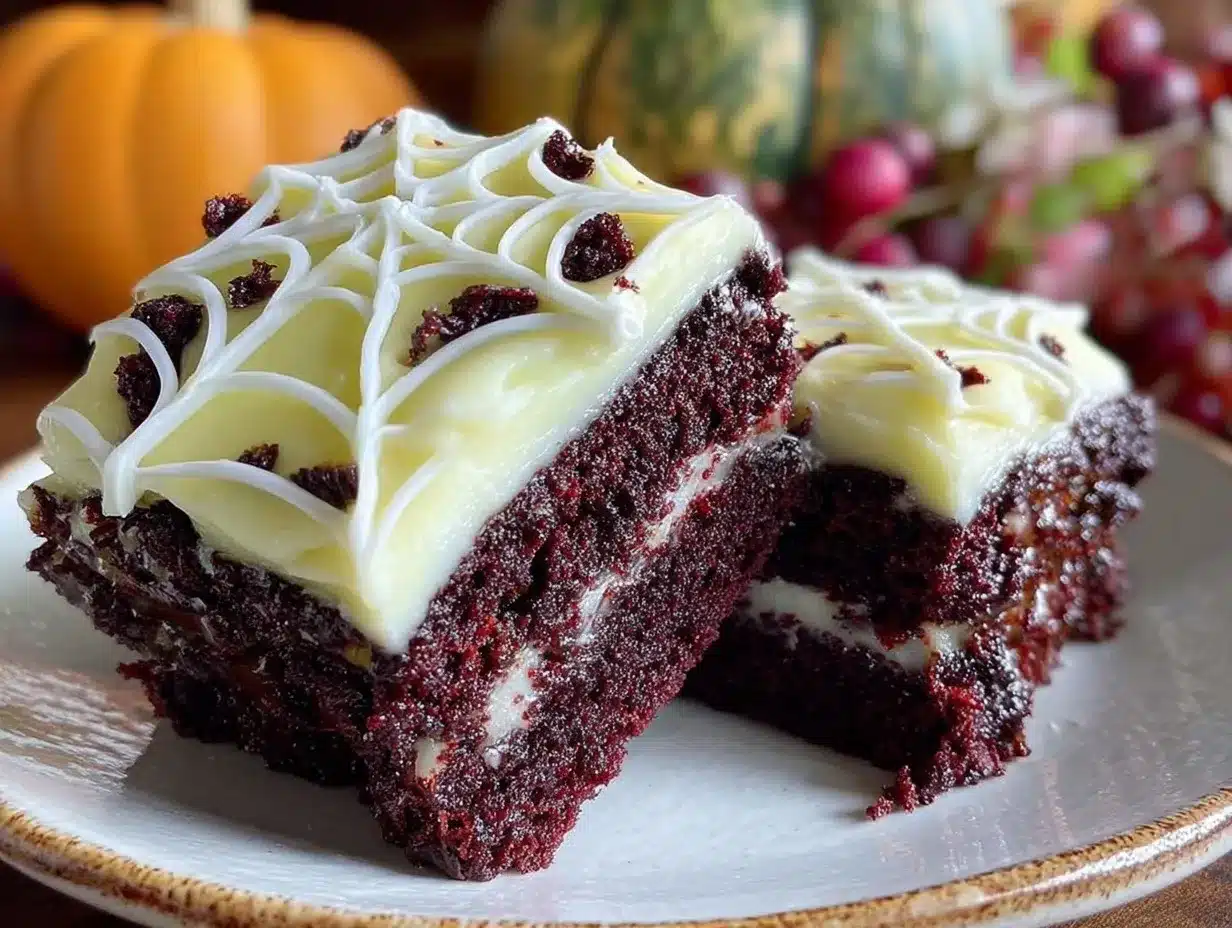
- Assemble and decorate: Place one cake layer on your serving plate. Spread a generous layer of frosting on top. Add the second layer and crumb coat the whole cake. Chill for 20 minutes, then pipe concentric circles of frosting on top to create the spider web base. Use a toothpick or skewer to drag lines from the center outwards, making the web effect.
Pro tip: If your frosting seems too thick to pipe smoothly, add a splash more milk, but be cautious—too thin and the web won’t hold. And don’t worry if your first web looks a little wonky; it still tastes great, and that homemade vibe is part of the charm.
Cooking Tips & Techniques
Getting that perfect black velvet cake with cream cheese spider web frosting took me a few kitchen mishaps, so here are some tips I swear by:
- Use room temperature ingredients: Butter, eggs, and buttermilk all work best at room temp. Cold ingredients make it harder for them to combine evenly, which can lead to a dense cake.
- Don’t skip sifting: Cocoa powder tends to clump, and lumps can leave nasty dry spots in your cake. Sifting keeps things smooth.
- Beat butter and sugar well: This step is key for a fluffy crumb. If you rush it, the cake can turn out flat.
- Choose gel food coloring: Liquid colors thin the batter and can alter baking times. Gel gives you that deep black without messing with texture.
- Alternate dry and wet ingredients carefully: This prevents overmixing flour and activating too much gluten, which makes the cake tough.
- Cool cakes completely before frosting: Otherwise, the frosting melts and smears.
- For spider web frosting: Chill your crumb coat first. Pipe slowly and steadily to get smooth circles, then use a clean toothpick for dragging lines.
I learned the hard way that piping the web with warm frosting is a no-go; it just blobs instead of forming clean lines. Also, when I first tried, I used liquid black food coloring and ended up with a purple-ish cake—so don’t repeat that mistake unless you want a “purple velvet” surprise.
Variations & Adaptations
If you want to play around with this cake, there are plenty of ways to customize it to your taste or dietary needs:
- Flavor twist: Add a teaspoon of espresso powder to the batter to deepen the chocolate notes—it really amps up the richness without making it taste like coffee.
- Seasonal variation: Swap butter for pumpkin puree (about ¾ cup) and reduce sugar by ¼ cup for a moist, autumnal black velvet pumpkin cake.
- Dairy-free adaptation: Use vegan cream cheese and dairy-free butter for the frosting, and swap buttermilk with almond milk plus a teaspoon of apple cider vinegar.
- Gluten-free option: Substitute all-purpose flour with a 1:1 gluten-free baking flour blend; expect a slightly denser texture but still delicious.
- Decor twist: Instead of the spider web, try piping little ghost shapes or bats using tinted cream cheese frosting for a different spooky look.
Personally, I once tried adding crushed peppermint candies to the frosting for a Halloween-meets-winter mashup. It was unexpected but fun—just be sure to crush finely or it’ll be hard to pipe smoothly. For a quicker dessert, you might also like my banana bread with chocolate chips, which is a great way to use up ripe bananas in fall.
Serving & Storage Suggestions
This black velvet cake is best served at room temperature so the cream cheese frosting is soft and creamy without being too cold or too melty. I like to slice it into generous wedges and serve alongside a cup of spiced tea or a glass of cold milk for the full nostalgic effect.
It pairs wonderfully with lighter sides if you’re serving it as part of a Halloween dinner spread—something like roasted pumpkin soup or even the smoky paprika chicken thighs from my crispy air fryer chicken thighs recipe balances the sweetness nicely.
For storage, keep the cake covered in the fridge, tightly wrapped or in an airtight container. It holds well for up to 4 days but honestly tastes best within 2 days before the frosting starts to firm up too much. You can freeze cake layers wrapped individually for up to 2 months—just thaw in the fridge overnight before frosting.
Reheat slices gently in a microwave for 10-15 seconds if you want that freshly-baked warmth. The flavors actually deepen a bit after a day, so sometimes I make it a day ahead for better taste and less stress on the day of the party.
Nutritional Information & Benefits
One slice (about 1/12 of the cake) contains roughly 350 calories, 18g fat, 45g carbohydrates, and 4g protein. The cream cheese adds a good dose of calcium and a bit of vitamin A, while the cocoa powder provides antioxidants and a subtle mood boost.
This cake isn’t a health food, but it’s a treat you can feel a little better about—especially with the wholesome ingredients and the option to swap in dairy-free or gluten-free versions. The buttermilk adds protein and probiotics, which I appreciate since it balances the indulgence with a slight nutritional edge.
As someone who enjoys seasonal foods, I like to think of this cake as a festive indulgence that complements a balanced diet. If you’re looking for a rich dessert that doesn’t overwhelm with sugar, this recipe strikes a good middle ground.
Conclusion
This perfect Halloween black velvet cake with cream cheese spider web frosting is one of those recipes that feels special without being complicated. Its moist crumb, deep chocolate flavor, and tangy frosting combine into a dessert that looks impressive but is surprisingly straightforward to make. I love how it brings a little spooky fun to the table without losing that cozy homemade comfort.
Feel free to customize it with your favorite twists or decorations—this cake welcomes creativity and a bit of Halloween mischief. I hope you enjoy making it as much as I’ve enjoyed perfecting it after those initial frosting mishaps! If you give it a try, I’d love to hear your variations or how your spider web turned out. Sharing your kitchen stories always makes this adventure sweeter.
FAQs
Can I make this black velvet cake without buttermilk?
Yes! You can substitute buttermilk with regular milk mixed with 1 tablespoon of lemon juice or white vinegar. Let it sit for 5 minutes before using to mimic the acidity of buttermilk.
How do I get the frosting just right for piping the spider web?
The frosting needs to be thick enough to hold shape but soft enough to pipe smoothly. If it’s too stiff, add a teaspoon of milk at a time. If too runny, add a bit more powdered sugar.
Can I prepare the cake layers ahead of time?
Absolutely! Bake the layers up to 2 days before serving. Wrap them tightly in plastic wrap and keep refrigerated. Bring to room temperature before frosting.
What if I don’t have gel food coloring?
Gel is best for vibrant black color without thinning the batter, but if you only have liquid, use sparingly and expect a slightly less intense color.
How do I store leftover cake?
Store leftovers in an airtight container in the fridge for up to 4 days. You can also freeze slices individually, wrapped tightly, for up to 2 months.
Pin This Recipe!
Perfect Halloween Black Velvet Cake Recipe with Easy Cream Cheese Spider Web Frosting
A moist, deeply chocolatey black velvet cake with a tangy cream cheese spider web frosting, perfect for Halloween celebrations. This recipe balances rich cocoa flavor with a tender crumb and festive decoration.
- Prep Time: 30 minutes
- Cook Time: 35 minutes
- Total Time: 1 hour 15 minutes
- Yield: 12 servings 1x
- Category: Dessert
- Cuisine: American
Ingredients
- 2 ½ cups (312g) all-purpose flour, sifted
- ¾ cup (75g) unsweetened cocoa powder, preferably Dutch-processed
- 1 ½ teaspoons baking soda
- 1 teaspoon salt
- 1 cup (227g) unsalted butter, softened
- 2 cups (400g) granulated sugar
- 3 large eggs, room temperature
- 1 cup (240ml) buttermilk, room temperature
- 2 teaspoons vanilla extract
- 2 tablespoons black gel food coloring
- 8 oz (227g) cream cheese, softened
- ½ cup (113g) unsalted butter, softened
- 3 cups (360g) powdered sugar, sifted
- 1 teaspoon vanilla extract
- 2–3 tablespoons whole milk or heavy cream
Instructions
- Preheat oven to 350°F (177°C). Grease two 9-inch cake pans and line bottoms with parchment paper.
- Sift together flour, cocoa powder, baking soda, and salt in a large bowl.
- Beat softened butter and granulated sugar on medium speed until light and fluffy, about 3 to 5 minutes.
- Add eggs one at a time, beating well after each addition, then mix in vanilla extract.
- Stir in black gel food coloring until batter is uniformly dark.
- Reduce mixer speed to low. Alternately add dry ingredients in three parts and buttermilk in two parts, starting and ending with dry ingredients. Mix just until combined.
- Divide batter evenly between prepared pans and smooth tops.
- Bake for 30–35 minutes or until a toothpick inserted in the center comes out clean or with moist crumbs.
- Cool cakes in pans for 10 minutes, then invert onto wire racks and cool completely.
- Beat cream cheese and softened butter until smooth and creamy.
- Gradually add powdered sugar on low speed to avoid clouds.
- Stir in vanilla extract and add milk or cream to reach pipe-able consistency.
- Place one cake layer on serving plate and spread a generous layer of frosting.
- Add second layer and crumb coat entire cake. Chill for 20 minutes.
- Pipe concentric circles of frosting on top and use a toothpick to drag lines from center outward to create spider web design.
Notes
Use room temperature ingredients for best results. Use gel food coloring to avoid thinning the batter. Chill crumb coat before piping spider web frosting. Adjust frosting consistency with milk to pipe smoothly. Cake layers can be baked up to 2 days ahead and stored refrigerated. Store leftovers in airtight container in fridge up to 4 days or freeze layers up to 2 months.
Nutrition
- Serving Size: 1 slice (1/12 of cak
- Calories: 350
- Fat: 18
- Carbohydrates: 45
- Protein: 4
Keywords: Halloween cake, black velvet cake, cream cheese frosting, spider web frosting, chocolate cake, festive dessert, easy Halloween dessert