For a while, I just accepted that Halloween cookies weren’t going to taste like something special—just the usual sugary, overly sweet treats that vanish too quickly without much memory left behind. I’d see all the spooky shapes and bright orange frosting, but honestly, the flavor was often an afterthought. One afternoon, while sifting through my baking stash and craving something with a bit more depth and surprise, I realized there was a missing piece: a cookie that looked as dark and mysterious as a moonless night, yet hid a creamy, bright burst of flavor inside. Not just any filling, but something that captured that crisp fall feeling without being cliché or cloying.
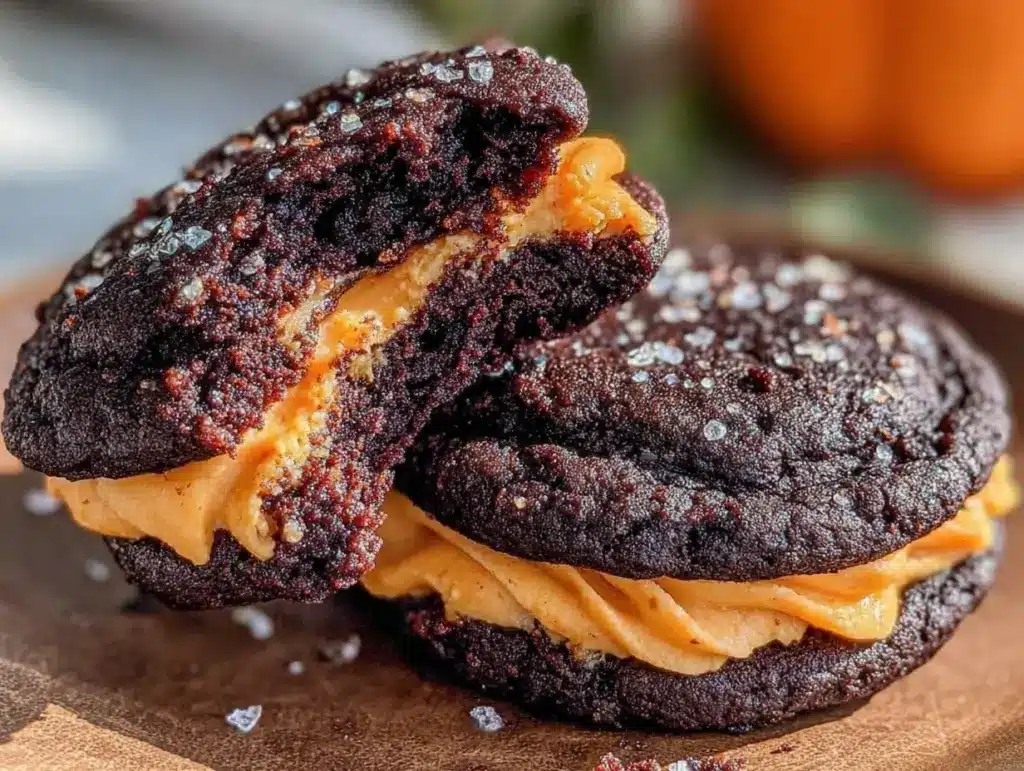
That’s when the idea for these Black Velvet Halloween Sandwich Cookies with Orange Cream Filling began to take shape. It wasn’t a flash of inspiration but more like a quiet simmer of wanting something different—something that felt festive but also felt like a grown-up treat you could enjoy without feeling like you’d eaten a handful of candy corn. The cookies themselves are rich, almost silky, with that deep black color that somehow feels both eerie and elegant. And the filling? Oh, it’s a smooth, tangy orange cream that cuts through the richness and adds just the right zing.
I remember pulling the first batch out of the oven, the smell of cocoa and vanilla mingling in the air, and thinking maybe this was the Halloween cookie I’d been waiting for all along. It’s not flashy, no wild decorations, just a little nostalgia wrapped in a simple sandwich cookie with a twist. I guess that’s why I keep coming back to this recipe year after year—it’s reliable, comforting, but still a bit unexpected, like a quiet secret waiting to be shared.
Why You’ll Love This Recipe
Honestly, this recipe has become a quiet favorite in my Halloween baking lineup, and here’s why you might find yourself reaching for it again and again:
- Quick & Easy: You can have these cookies ready in about 45 minutes, perfect when you’re juggling Halloween plans and still want something homemade.
- Simple Ingredients: No weird, hard-to-find stuff here. Everything is pantry-friendly — cocoa powder, butter, sugar — things you probably have already.
- Perfect for Halloween Parties: The jet-black cookies with bright orange filling fit the mood perfectly without overdoing it on decorations.
- Crowd-Pleaser: Kids and adults alike seem to appreciate the balance of rich chocolate and citrus cream, which isn’t something you find every day.
- Unbelievably Delicious: The texture is just right — tender and moist cookies with a creamy, tangy center that pulls you back for another bite.
This isn’t just another chocolate sandwich cookie with generic frosting. The trick is in the “black velvet” dough, which uses a touch of espresso powder to deepen the cocoa flavor without making it taste like coffee. Plus, the orange cream filling isn’t just a sweet smear; it’s whipped to a silky smoothness with real orange zest and a splash of fresh juice, giving it that fresh, vibrant pop.
Honestly, after trying a ton of Halloween treats over the years, this recipe stuck around because it feels like a grown-up nod to festive fun — a cookie that’s cozy, a little playful, but also something I trust to impress without a fuss. If you’re tired of the usual sugar bomb Halloween sweets, these cookies might just be your new go-to, quietly standing out on the dessert table.
What Ingredients You Will Need
This recipe uses simple, wholesome ingredients to deliver bold flavor and satisfying texture without the fuss. Most are pantry staples, and the orange cream filling brings a seasonal brightness that’s easy to swap out if you want to experiment.
- For the Black Velvet Cookies:
- All-purpose flour – 2 ¼ cups (280g), sifted
- Unsweetened cocoa powder – ¾ cup (75g), preferably Dutch-processed for richness
- Baking powder – 1 tsp
- Baking soda – ½ tsp
- Salt – ½ tsp
- Unsalted butter – 1 cup (227g), softened (I like using Land O’Lakes for consistency)
- Granulated sugar – 1 ¼ cups (250g)
- Egg – 1 large, room temperature
- Vanilla extract – 2 tsp
- Espresso powder – 1 tsp (optional but recommended to deepen cocoa flavor)
- Black food coloring gel – enough to achieve a deep, rich black (usually ½ tsp)
- For the Orange Cream Filling:
- Unsalted butter – ½ cup (113g), softened
- Powdered sugar – 2 cups (240g), sifted
- Heavy cream – 2 tbsp (30ml), or more as needed for smoothness
- Fresh orange zest – 1 tbsp (from about 1 medium orange)
- Fresh orange juice – 1 tbsp (adds brightness, use fresh for best flavor)
- Vanilla extract – 1 tsp
If you need substitutions, almond flour can swap for all-purpose if you want a gluten-free version (expect a slightly different texture). For a dairy-free option, use coconut oil in place of butter and a plant-based cream for the filling. The espresso powder might feel odd, but trust me, it makes the chocolate pop without tasting like coffee.
Equipment Needed
- Stand mixer or hand mixer – to cream butter and sugar smoothly and whip the filling
- Mixing bowls – for combining dry and wet ingredients separately
- Sifter or fine mesh sieve – to sift cocoa powder and flour, avoiding lumps
- Measuring cups and spoons – precise measurement is key for baking success
- Rolling pin – for rolling out cookie dough evenly (a silicone one works well)
- Cookie cutters – round shape preferred, about 2 inches diameter (you can improvise with a glass)
- Baking sheets lined with parchment paper or silicone mats – prevents sticking and promotes even baking
- Cooling racks – to cool cookies completely before sandwiching
If you don’t have a stand mixer, a sturdy hand mixer does the job just fine — I’ve used both over time. For rolling, if you’re short on space, chilling the dough and flattening with your hands works in a pinch. Parchment paper is a must-have for easy cleanup and consistent results, and silicone mats are a great investment if you bake often.
Preparation Method

- Prep the dry ingredients: In a medium bowl, sift together the all-purpose flour, cocoa powder, baking powder, baking soda, and salt. Set aside. This ensures a smooth dough without clumps of cocoa or leavening agents. (About 5 minutes)
- Cream the butter and sugar: In your stand mixer bowl, beat the softened unsalted butter and granulated sugar on medium speed until light and fluffy — usually 3 to 5 minutes. You’ll notice it turning pale and airy, which is crucial for tender cookies.
- Add egg, vanilla, espresso powder, and food coloring: Beat in the large egg until fully combined. Then mix in the vanilla extract and espresso powder. Add black food coloring gel gradually until the dough reaches a deep black tone. This stage is where the dough really starts to feel like something special.
- Combine wet and dry ingredients: Slowly add the flour mixture in two batches, mixing on low speed just until combined after each addition. Overmixing can toughen the cookies, so stop as soon as you see no flour streaks. The dough should be smooth but slightly soft and pliable.
- Chill the dough: Wrap the dough in plastic wrap and chill in the fridge for at least 1 hour. This step helps the dough firm up, making it easier to roll and cut, and prevents spreading during baking.
- Roll and cut cookies: Preheat your oven to 350°F (175°C). On a lightly floured surface, roll out the dough to about ¼ inch (6 mm) thickness. Use your 2-inch round cutter to shape cookies and place them about 1 inch (2.5 cm) apart on parchment-lined baking sheets.
- Bake: Bake cookies for 8 to 10 minutes. They’ll look set but still soft in the center. Don’t overbake — you want them tender, not crisp. Remove and let cool completely on a wire rack before filling. (Cooling can take 20-30 minutes)
- Make the orange cream filling: While cookies cool, beat softened butter in a bowl until smooth. Gradually add powdered sugar, beating on low until combined. Add fresh orange zest, juice, heavy cream, and vanilla extract. Increase speed to medium and whip until light and fluffy, about 3 minutes. Add more cream if needed for spreadable consistency.
- Assemble the sandwich cookies: Pair cookies of similar size. Spread about 1 tablespoon (15g) of orange cream filling on the flat side of one cookie and gently press the matching cookie on top. Repeat with remaining cookies.
- Chill before serving: Let assembled cookies chill in the fridge for 30 minutes to set the filling and make handling easier. Store leftovers in an airtight container in the fridge.
Pro tip: If your dough feels sticky after chilling, lightly flour your rolling surface and rolling pin to prevent sticking. Also, don’t rush the cooling — assembling warm cookies will melt the filling and create a mess.
Cooking Tips & Techniques
When it comes to these Black Velvet Halloween Sandwich Cookies, a few tricks help make sure your batch turns out just right:
- Don’t skip chilling the dough: This is non-negotiable. It firms up the dough, controls spreading, and makes cutting cleaner.
- Use gel food coloring: Liquid color can thin the dough, making it harder to work with. Gel is concentrated and won’t affect consistency.
- Espresso powder is your secret weapon: Even if you’re not into coffee, a teaspoon adds a rich depth to the cocoa that’s subtle but noticeable.
- Roll dough evenly: Uneven thickness leads to uneven baking. Use rolling pin rings or guides if you have them, or measure thickness with a ruler.
- Watch the baking time closely: Cookies continue to set as they cool, so take them out when edges are firm but centers still look soft.
- Whip the filling well: The orange cream filling should be fluffy, not dense—if it feels heavy, add a touch more cream and whip again.
One time, I forgot to chill the dough and ended up with cookies that spread into sad little puddles — lesson learned! Also, I’ve found pairing these with a warm cup of chai or pumpkin spice latte (hello, fall vibes) makes the experience even more comforting.
Variations & Adaptations
Feel like switching things up? These sandwich cookies are surprisingly adaptable.
- Spiced Orange Filling: Add a pinch of cinnamon or ground cloves to the orange cream for a cozy fall twist.
- Vegan Version: Use vegan butter and coconut cream in the filling. Replace the egg with flaxseed egg (1 tbsp flaxseed + 3 tbsp water, chilled).
- Pumpkin Cream Filling: Swap the orange zest and juice for pumpkin puree and a dash of pumpkin pie spice for a seasonal change.
- Chocolate Mint: Keep the black velvet cookies but switch the filling to a peppermint buttercream for a spooky minty bite.
- Gluten-Free: Use a gluten-free baking blend in place of all-purpose flour. I recommend brands like King Arthur GF Flour for best texture.
One variation I love is adding finely chopped candied orange peel into the cream filling — it gives a chewy surprise that feels unexpectedly festive. And if you want to try a different shape, bats or pumpkins cut from the dough work just as well for Halloween fun.
Serving & Storage Suggestions
These sandwich cookies are best served slightly chilled or at room temperature. The filling firms up nicely in the fridge but softens a bit once out, making them perfect for nibbling.
Present them on a dark or orange platter for a festive touch, maybe alongside a batch of classic banana bread with chocolate chips to balance out the flavors during a cozy fall gathering.
Store leftovers in an airtight container in the refrigerator for up to 5 days. For longer storage, freeze assembled cookies in a single layer on a baking sheet, then transfer to a freezer-safe container for up to 2 months. Thaw in the fridge overnight before serving.
Reheating isn’t necessary, but if you prefer a softer filling, leave them on the counter for 10-15 minutes before serving. The flavors actually mellow and meld beautifully after a day or two, so if you’re planning ahead for a party, bake a day early and enjoy the difference.
Nutritional Information & Benefits
Each sandwich cookie (one cookie plus filling) has approximately:
| Calories | 220 |
|---|---|
| Fat | 12g |
| Carbohydrates | 28g |
| Protein | 2g |
| Sugar | 18g |
The recipe includes real orange zest and juice, providing a small boost of vitamin C and antioxidants. Cocoa powder is rich in flavonoids, which can be heart-healthy in moderation. Using unsalted butter and controlling sugar levels helps keep it balanced.
Note: This recipe contains gluten, dairy, and eggs — if you have allergies, try the suggested vegan or gluten-free adaptations. I find these cookies hit that sweet spot where indulgence feels balanced with a little nutritional goodness, making them a treat that’s both satisfying and comforting.
Conclusion
These Black Velvet Halloween Sandwich Cookies with Orange Cream Filling quietly changed the way I think about festive baking. They aren’t flashy, but they pack a flavor punch and a textural contrast that feels just right for fall. Whether you want a simple homemade treat for a Halloween party or a cozy bite to share with family, this recipe is straightforward and dependable.
Feel free to customize the filling or shape to fit your own style — that’s part of the fun. I love how these cookies bring a little unexpected sophistication to my seasonal baking, and I hope they find a spot in your kitchen, too. If you try them, I’d love to hear how you tweaked the recipe or what you paired them with. Happy baking, and may your Halloween be deliciously memorable!
Frequently Asked Questions
Can I make the cookie dough ahead of time?
Yes! The dough can be wrapped tightly and refrigerated for up to 3 days before rolling and baking. You can also freeze it for up to 1 month, thawing overnight in the fridge before use.
What if I don’t have black food coloring?
You can mix blue, red, and green gel colors to approximate black, but the easiest way is to use black gel coloring for the richest color without thinning the dough.
How do I store these cookies to keep them fresh?
Store in an airtight container in the refrigerator for up to 5 days. For longer storage, freeze assembled cookies in a single layer and thaw before serving.
Can I use powdered sugar substitutes in the filling?
It’s best to use powdered sugar for the smooth texture, but you can experiment with coconut sugar or other fine sugars; just expect a slightly different texture and taste.
Are there any tips for making the orange cream filling extra smooth?
Make sure the butter is softened but not melted, and sift the powdered sugar before adding. Whip at medium-high speed for a few minutes to incorporate air and get that fluffy texture.
Pin This Recipe!

Black Velvet Halloween Sandwich Cookies with Orange Cream Filling

Rich, silky black velvet cookies with a smooth, tangy orange cream filling, perfect for a festive yet sophisticated Halloween treat.
- Prep Time: 15 minutes
- Cook Time: 10 minutes
- Total Time: 1 hour 55 minutes
- Yield: 24 cookies (12 sandwiches) 1x
- Category: Dessert
- Cuisine: American
Ingredients
- 2 ¼ cups (280g) all-purpose flour, sifted
- ¾ cup (75g) unsweetened cocoa powder, preferably Dutch-processed
- 1 tsp baking powder
- ½ tsp baking soda
- ½ tsp salt
- 1 cup (227g) unsalted butter, softened
- 1 ¼ cups (250g) granulated sugar
- 1 large egg, room temperature
- 2 tsp vanilla extract
- 1 tsp espresso powder (optional)
- ½ tsp black food coloring gel
- ½ cup (113g) unsalted butter, softened (for filling)
- 2 cups (240g) powdered sugar, sifted
- 2 tbsp (30ml) heavy cream, or more as needed
- 1 tbsp fresh orange zest (from about 1 medium orange)
- 1 tbsp fresh orange juice
- 1 tsp vanilla extract (for filling)
Instructions
- Sift together the all-purpose flour, cocoa powder, baking powder, baking soda, and salt in a medium bowl. Set aside.
- In a stand mixer bowl, beat the softened unsalted butter and granulated sugar on medium speed until light and fluffy, about 3 to 5 minutes.
- Beat in the large egg until fully combined. Mix in vanilla extract and espresso powder.
- Add black food coloring gel gradually until the dough reaches a deep black tone.
- Slowly add the flour mixture in two batches, mixing on low speed just until combined after each addition. Do not overmix.
- Wrap the dough in plastic wrap and chill in the fridge for at least 1 hour.
- Preheat oven to 350°F (175°C). Roll out dough on a lightly floured surface to about ¼ inch (6 mm) thickness.
- Use a 2-inch round cookie cutter to cut cookies and place them 1 inch apart on parchment-lined baking sheets.
- Bake for 8 to 10 minutes until edges are firm but centers are still soft. Remove and cool completely on a wire rack.
- To make the filling, beat softened butter until smooth. Gradually add powdered sugar, beating on low until combined.
- Add fresh orange zest, orange juice, heavy cream, and vanilla extract. Whip on medium speed until light and fluffy, about 3 minutes. Add more cream if needed.
- Pair cookies of similar size. Spread about 1 tablespoon (15g) of orange cream filling on one cookie and sandwich with another.
- Chill assembled cookies in the fridge for 30 minutes before serving. Store leftovers in an airtight container in the fridge.
Notes
Chilling the dough is essential to prevent spreading and ensure clean cuts. Use gel food coloring to avoid thinning the dough. Espresso powder deepens cocoa flavor without tasting like coffee. Whip the filling well for a fluffy texture. Dough can be refrigerated up to 3 days or frozen for 1 month before baking. Store assembled cookies in an airtight container in the fridge for up to 5 days or freeze for up to 2 months.
Nutrition
- Serving Size: 1 sandwich cookie
- Calories: 220
- Sugar: 18
- Fat: 12
- Carbohydrates: 28
- Protein: 2
Keywords: Halloween cookies, black velvet cookies, orange cream filling, sandwich cookies, chocolate cookies, festive treats, homemade Halloween dessert