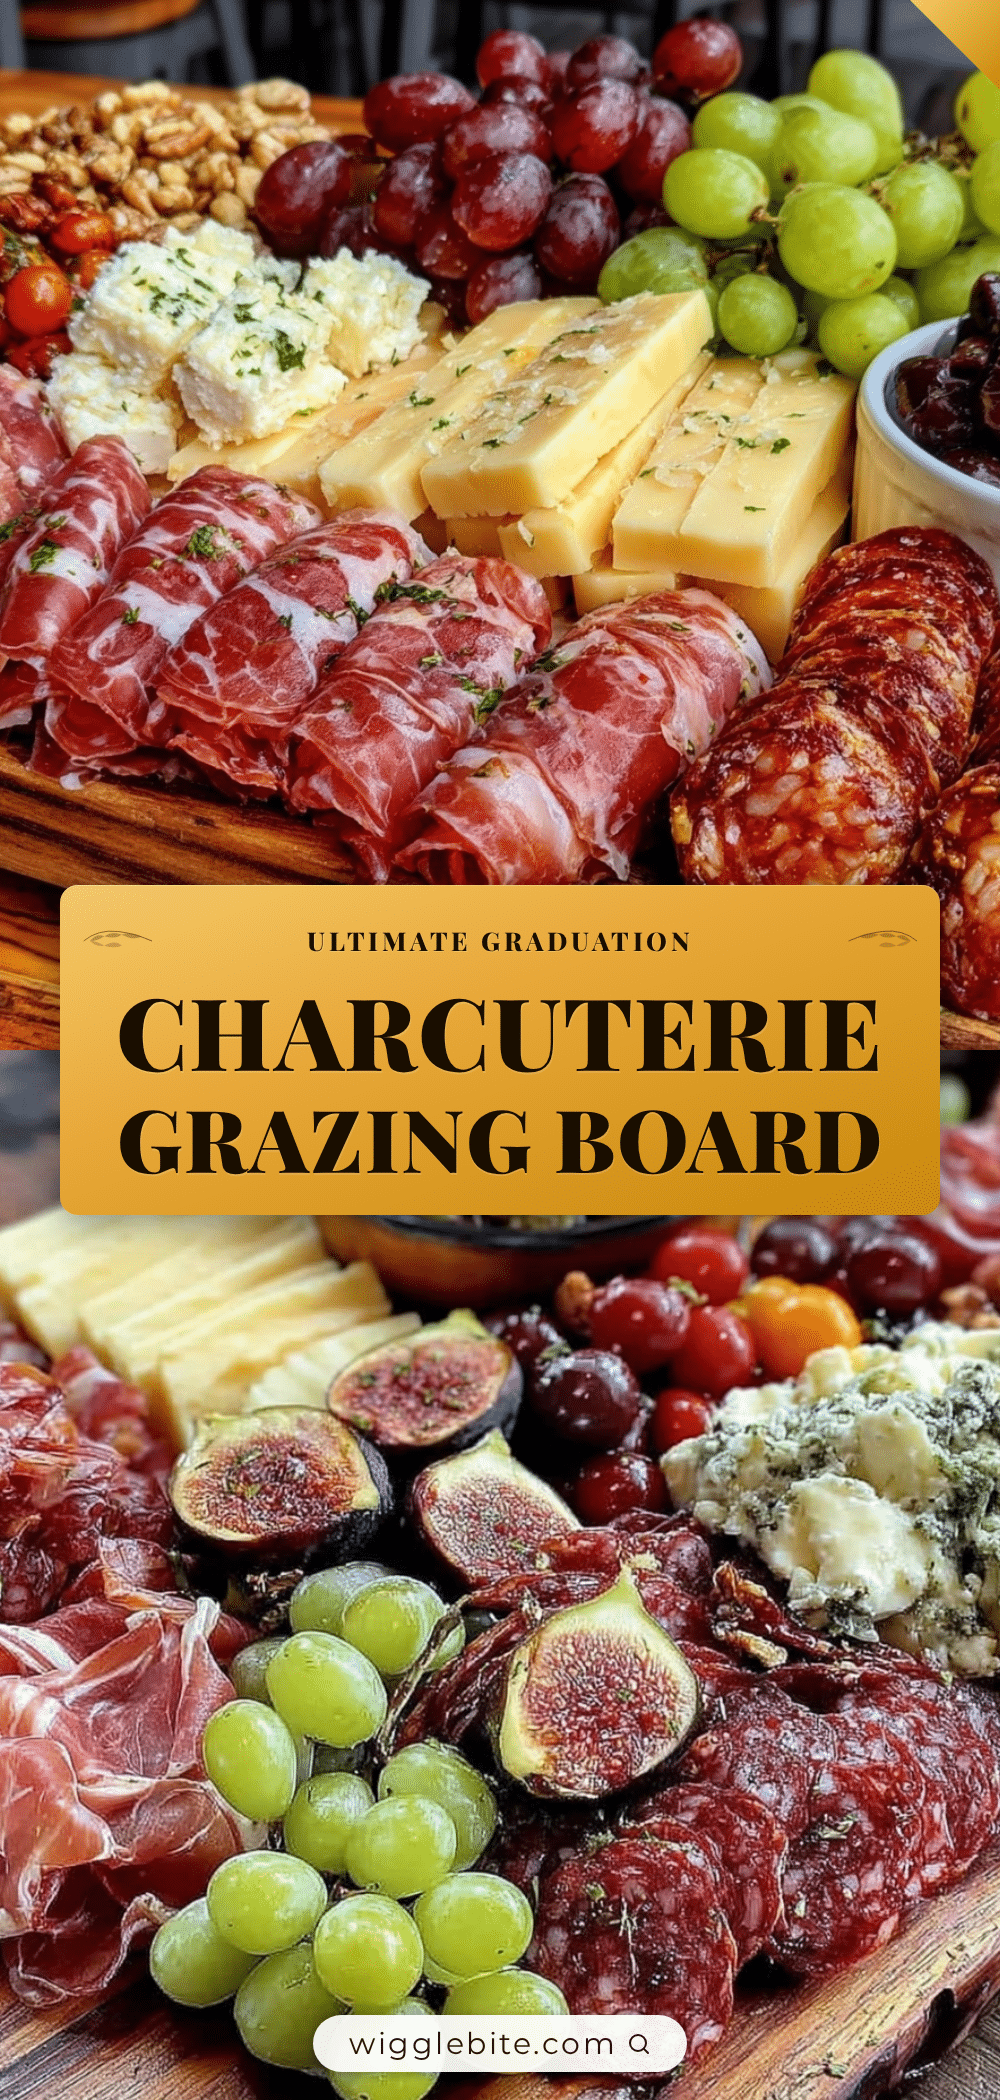
Introduction
“You seriously have to bring that board again next time,” my cousin texted me right after the graduation party. Honestly, I didn’t expect much when I threw together this charcuterie grazing board last minute. It started as a rescue plan—the original caterer bailed a day before my sister’s graduation celebration, and I was staring down a mountain of hungry relatives and friends. I had some deli meats, cheeses, and random crackers lying around, so I just started layering and arranging without much thought. To my surprise, it turned into the centerpiece of the whole event.
The colors, the mix of flavors, the way everyone gathered around it — it felt like more than just food. The sweet grapes and spicy mustard, the creamy cheeses paired with crunchy nuts, they all somehow made the day feel festive and easygoing. That night, as the party hummed around me, I realized this wasn’t just a last-minute fix; it was a simple way to bring everyone together. I’ve since made tweaks and perfected my approach, and now it’s my go-to for any celebration, especially graduations when you want to impress without the stress.
There’s something quietly satisfying about a well-built charcuterie board that just feels right for marking milestones. It’s not about fancy plating but about thoughtful combinations that invite everyone to nibble, chat, and celebrate. So here I am, sharing what I’ve learned from those frantic hours and happy moments. This Perfect Ultimate Graduation Charcuterie Grazing Board is more than finger food; it’s a way to make party planning feel effortless and fun.
Why You’ll Love This Recipe
Having put together countless grazing boards for everything from casual get-togethers to big family milestones, I can say this recipe really delivers on all fronts. It’s not just about piling things on a platter — it’s a tested way to keep guests happy and fed without slaving away in the kitchen. Here’s why this charcuterie grazing board is a winner:
- Quick & Easy: You can assemble it in under 30 minutes, freeing you up for last-minute party prep or just to relax before guests arrive.
- Simple Ingredients: No need to hunt for obscure items; everything is easy to find in your local grocery or specialty store.
- Perfect for Graduation Parties: This board balances elegance and casual vibes, making it ideal for celebrations where everyone wants to mingle and snack.
- Crowd-Pleaser: From kids to grandparents, this board gets compliments every time — no picky eaters left out.
- Unbelievably Delicious: The combination of creamy cheeses, savory meats, fresh fruits, and crunchy nuts creates a flavor and texture symphony that’s seriously addictive.
What makes this board stand apart is the thoughtful layering of flavors and textures, plus a few insider tricks I’ve learned, like pairing tangy honey mustard with smoked meats or adding unexpected pops of color with edible flowers or seasonal berries. It’s not just another charcuterie board—it’s my personal favorite recipe that still surprises me and delights guests.
Honestly, the best part is watching people close their eyes after that first bite, savoring the perfect balance of salty, sweet, creamy, and crunchy. That’s the kind of food memory I want for any party, and especially for such a meaningful occasion as graduation.
What Ingredients You Will Need
This recipe uses simple, wholesome ingredients to deliver bold flavor and satisfying texture without the fuss. Most are pantry staples or easy to pick up from your local market. Feel free to swap based on what you find or prefer!
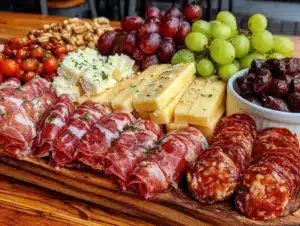
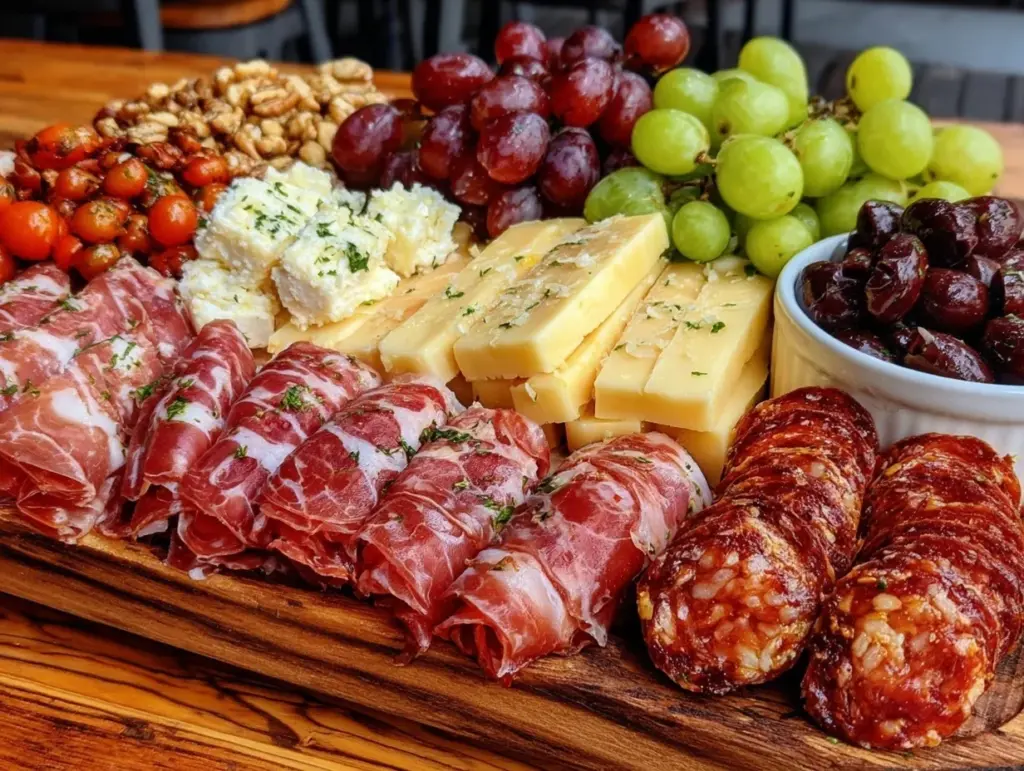
- For the Meats:
- Prosciutto, thinly sliced (adds a delicate saltiness)
- Salami, sliced (I like Genoa or soppressata for bold flavor)
- Smoked turkey or chicken breast, sliced (for a lighter option)
- For the Cheeses:
- Brie or Camembert, whole or in wedges (soft and creamy texture)
- Sharp cheddar, cubed or sliced (for that classic tang)
- Manchego or aged gouda, sliced (adds nutty notes)
- Small bowls of goat cheese or herbed cream cheese (for spreadable options)
- Fresh Fruits & Veggies:
- Seedless red and green grapes (great for snacking and color)
- Fresh figs or berries (seasonal—swap in peaches or plums in summer)
- Sliced cucumbers or cherry tomatoes (adds crunch and freshness)
- Crunchy Elements:
- Assorted crackers and breadsticks (I recommend simple water crackers and multigrain crisps)
- Toasted nuts – almonds, pecans, or walnuts (for texture variety)
- Extras & Condiments:
- Honey or fig jam (for drizzling or dipping—balances saltiness)
- Dijon or honey mustard (pairs amazingly with meats)
- Pitted olives (green or kalamata for briny contrast)
- Pickled vegetables or cornichons (optional, for tangy bites)
I usually recommend brands like Cabot for cheddar or Président for brie because they melt beautifully and taste creamy without overpowering. When it comes to fresh produce, pick firm, ripe fruits—nothing mushy. For a gluten-free option, swap crackers with rice crackers or crisp veggie slices. My personal favorite touch? A handful of edible flowers scattered on top—it just brings that wow factor without any extra effort.
Equipment Needed

Gathering the right tools makes assembling a charcuterie grazing board so much smoother. Here’s what I use and recommend:
- Large wooden or slate serving board: The base for your display. I prefer wood for warmth, but slate gives a sleek modern vibe. If you don’t have either, a large baking sheet lined with parchment works fine.
- Small bowls or ramekins: For dips, jams, olives, and nuts. Using separate dishes keeps wet and dry items from mixing.
- Cheese knives and spreaders: Different knives for soft and hard cheeses make life easier and keep flavors pure.
- Tongs or small spoons: Helpful for serving olives or pickles without mess.
- Sharp knife: For slicing meats and cheeses. A serrated one can help with crusty bread.
If you’re on a budget, thrift stores often have charming boards and utensils at great prices. I’ve found that keeping your equipment simple allows the food to shine. Plus, cleaning is a breeze when you stick to basics!
Preparation Method
- Prep your ingredients (10-15 minutes): Slice all cheeses and meats into bite-sized pieces or thin strips. Wash and dry fruits and veggies thoroughly. If using fresh figs or berries, slice or hull as needed. Toast nuts lightly in a dry skillet over medium heat until fragrant (about 3-4 minutes), then let cool.
- Arrange bowls on the board (5 minutes): Place small bowls for olives, jams, and mustard spaced evenly on your board. This anchors the layout and helps balance the flow.
- Place cheeses first (10 minutes): Position your cheeses with some space between each type. Leave wedges slightly separated so guests can easily grab pieces. Use cheese knives or spreaders nearby.
- Add meats around cheeses (10 minutes): Fold or roll slices of prosciutto and salami to create height and texture. Arrange smoked turkey or chicken slices in neat piles. Think about grouping meats near complementary cheeses for flavor pairing.
- Fill in with fruits and veggies (10 minutes): Scatter grapes in small clusters and tuck fresh berries or sliced figs around the edges. Slice cucumbers or tomatoes and fan them out for visual interest. This adds freshness and color contrast.
- Insert crunchy elements (5 minutes): Fill gaps with crackers, breadsticks, and toasted nuts. Place some crackers upright or leaning to add dimension. Nuts can be poured directly onto the board or in small piles.
- Add condiments and final touches (5 minutes): Spoon honey, fig jam, and mustard into bowls. Garnish with fresh herbs like rosemary or thyme sprigs if you have them handy. Optional: sprinkle edible flowers for a festive look.
Pro tip: Keep the board refrigerated until about 20 minutes before serving to maintain freshness but let cheeses soften slightly for best flavor. Don’t overcrowd the board; leaving some negative space makes the spread more inviting and easier to access.
Cooking Tips & Techniques
While this recipe doesn’t involve cooking per se, there are some culinary tricks I’ve picked up that make the board shine:
- Balance flavors and textures: Include at least one item from each category: salty (cured meats), creamy (soft cheeses), sweet (fruits and honey), crunchy (nuts and crackers), and tangy (mustards or pickles). This keeps every bite interesting.
- Use height and layers: Folding meats or stacking cheese slices adds depth and makes the board look more inviting. Play with shapes and sizes.
- Room temperature cheeses: Take your cheeses out of the fridge 30 minutes before serving. Cold cheese dulls flavor and can be harder to slice.
- Don’t forget the palate cleansers: Fresh cucumber slices or mild crackers help reset the palate between bold flavors.
- Avoid soggy crackers: Keep crackers separate from juicy fruits or wet ingredients until serving to maintain crispness.
One thing I learned the hard way was layering wet fruits too close to crackers — it turned my favorite multigrain crackers into a sad mush. Now I always tuck in fruits with a little barrier, like a cheese wedge or small bowl, to keep textures perfect.
Variations & Adaptations
This grazing board is super flexible depending on your crowd and occasion. Here are a few ideas I’ve tried and loved:
- Vegetarian Version: Swap out meats for marinated artichokes, grilled veggies, and a variety of cheeses. Add hummus and roasted chickpeas for protein.
- Seasonal Twists: For fall graduations, add roasted pumpkin seeds, sliced apples, and cranberry chutney. Summer boards shine with fresh peaches, cherries, and basil.
- International Flair: Incorporate Spanish chorizo, manchego, and quince paste for a tapas-inspired board. Or go French with brie, cornichons, and baguette slices.
- Allergen-Friendly: Use gluten-free crackers or crisp veggie sticks instead of bread. Swap nuts for seeds if allergies are an issue.
Once, I made a version inspired by my favorite cozy stuffed pork chops flavors—adding apple slices and sage-infused honey. It was an unexpected hit with the family!
Serving & Storage Suggestions
Serve this charcuterie grazing board at room temperature for maximum flavor and texture impact. If you’re hosting outdoors in warm weather, keep it shaded or chilled until guests arrive.
Pair it with crisp white wine or sparkling water with fresh lemon for a refreshing balance. For heartier appetites, complement the board with simple sides like a fresh cucumber tomato salad or warm dishes like crispy bang bang shrimp tacos to round out the meal.
Leftovers can be stored in airtight containers in the fridge for up to 2 days. To keep crackers crisp, remove them and store separately. When reheating cheeses like brie, a gentle 10-second zap in the microwave softens them nicely without melting completely.
Over time, flavors meld and deepen, especially in the condiments and meats, so leftovers sometimes taste even better the next day. Just bring everything back to room temp before serving again.
Nutritional Information & Benefits
This board offers a balanced mix of protein, healthy fats, and fiber, making it a satisfying choice for party guests without weighing them down. Cheeses provide calcium and vitamin D, while nuts contribute heart-healthy fats and a crunchy texture that helps slow down eating.
Fresh fruits add natural sweetness and important antioxidants, and lean meats like turkey offer a lighter protein option. If you’re watching carbs, focus on the meats, cheeses, and veggies, and keep crackers to a minimum.
It’s naturally gluten-free if you skip the bread and crackers, and you can easily accommodate dairy-free diets by swapping in vegan cheese alternatives and plant-based spreads.
For me, this board strikes the perfect balance between indulgence and nutrition—ideal for celebrating milestones without guilt.
Conclusion
The Perfect Ultimate Graduation Charcuterie Grazing Board is a celebration staple that feels both special and effortless. It’s the kind of recipe that’s easy to customize, quick to assemble, and genuinely loved by everyone at the party. I keep coming back to it because it turns any gathering into something memorable with minimal stress.
Feel free to make this board your own—swap in your favorite cheeses, play with seasonal fruits, or add a unique twist that reflects your style. Whether you’re planning a graduation bash or just a casual get-together, this board is a sure crowd-pleaser.
And hey, if you ever want to add a warm, hearty bite alongside it, check out my cozy stuffed pork chops recipe or the flavorful crispy bang bang shrimp tacos. They pair wonderfully for a full spread that satisfies every craving.
I’d love to hear how your board turns out—drop a comment or share your own favorite combinations. Here’s to easy, delicious celebrations that bring everyone together!
FAQs
What type of cheese works best on a graduation charcuterie board?
Soft cheeses like brie or goat cheese, alongside firmer options like cheddar or manchego, work beautifully. They offer a range of textures and flavors that appeal to most palates.
How far in advance can I prepare the charcuterie board?
You can prep most items a day ahead—slice cheeses and meats, wash fruits, and toast nuts. Assemble the board a few hours before serving, then cover and refrigerate.
Can I make this board vegan or dairy-free?
Absolutely! Use plant-based cheeses, swap meats for marinated veggies or smoked tofu, and include plenty of fruits, nuts, and dips like hummus.
What’s the best way to keep crackers from getting soggy?
Keep crackers separate from juicy fruits or moist condiments until serving. You can place them on a different plate or tuck them into dry areas of the board.
How do I store leftovers from the grazing board?
Store cheeses and meats in airtight containers in the fridge for up to 2 days. Keep crackers in a separate container at room temp to maintain crunch.
Pin This Recipe!
Perfect Ultimate Graduation Charcuterie Grazing Board

A quick and easy charcuterie grazing board perfect for graduation parties, featuring a balanced mix of meats, cheeses, fruits, nuts, and condiments that impress guests without stress.
- Prep Time: 15 minutes
- Cook Time: 5 minutes (toasting nuts)
- Total Time: 20 minutes
- Yield: 8-12 servings
- Category: Appetizer
- Cuisine: American
Ingredients
- Prosciutto, thinly sliced
- Salami, sliced (Genoa or soppressata preferred)
- Smoked turkey or chicken breast, sliced
- Brie or Camembert, whole or in wedges
- Sharp cheddar, cubed or sliced
- Manchego or aged gouda, sliced
- Goat cheese or herbed cream cheese (in small bowls)
- Seedless red and green grapes
- Fresh figs or berries (seasonal, can swap peaches or plums in summer)
- Sliced cucumbers or cherry tomatoes
- Assorted crackers and breadsticks (water crackers and multigrain crisps recommended)
- Toasted nuts – almonds, pecans, or walnuts
- Honey or fig jam
- Dijon or honey mustard
- Pitted olives (green or kalamata)
- Pickled vegetables or cornichons (optional)
- Fresh herbs like rosemary or thyme (optional)
- Edible flowers (optional)
Instructions
- Prep your ingredients (10-15 minutes): Slice all cheeses and meats into bite-sized pieces or thin strips. Wash and dry fruits and veggies thoroughly. Slice or hull fresh figs or berries as needed. Toast nuts lightly in a dry skillet over medium heat until fragrant (about 3-4 minutes), then let cool.
- Arrange small bowls on the board (5 minutes): Place bowls for olives, jams, and mustard spaced evenly on your board to anchor the layout.
- Place cheeses first (10 minutes): Position cheeses with space between each type. Leave wedges slightly separated for easy grabbing. Place cheese knives or spreaders nearby.
- Add meats around cheeses (10 minutes): Fold or roll slices of prosciutto and salami to create height and texture. Arrange smoked turkey or chicken slices in neat piles, grouping meats near complementary cheeses.
- Fill in with fruits and veggies (10 minutes): Scatter grapes in small clusters and tuck fresh berries or sliced figs around edges. Fan out sliced cucumbers or cherry tomatoes for color and freshness.
- Insert crunchy elements (5 minutes): Fill gaps with crackers, breadsticks, and toasted nuts. Place some crackers upright or leaning to add dimension.
- Add condiments and final touches (5 minutes): Spoon honey, fig jam, and mustard into bowls. Garnish with fresh herbs and optionally sprinkle edible flowers for a festive look.
- Keep the board refrigerated until about 20 minutes before serving to maintain freshness but allow cheeses to soften slightly.
- Avoid overcrowding the board; leave some negative space to make the spread inviting and easy to access.
Notes
Keep cheeses at room temperature 30 minutes before serving for best flavor. Keep crackers separate from juicy fruits until serving to avoid sogginess. Leftovers store well in airtight containers for up to 2 days; store crackers separately to maintain crispness. Edible flowers add a festive touch without extra effort.
Nutrition
- Serving Size: Approximately 1/8 to
- Calories: 30035
- Sugar: 8
- Sodium: 550
- Fat: 22
- Saturated Fat: 8
- Carbohydrates: 15
- Fiber: 3
- Protein: 12
Keywords: charcuterie board, grazing board, graduation party, easy party food, appetizer, meats, cheeses, fruits, nuts, quick assembly