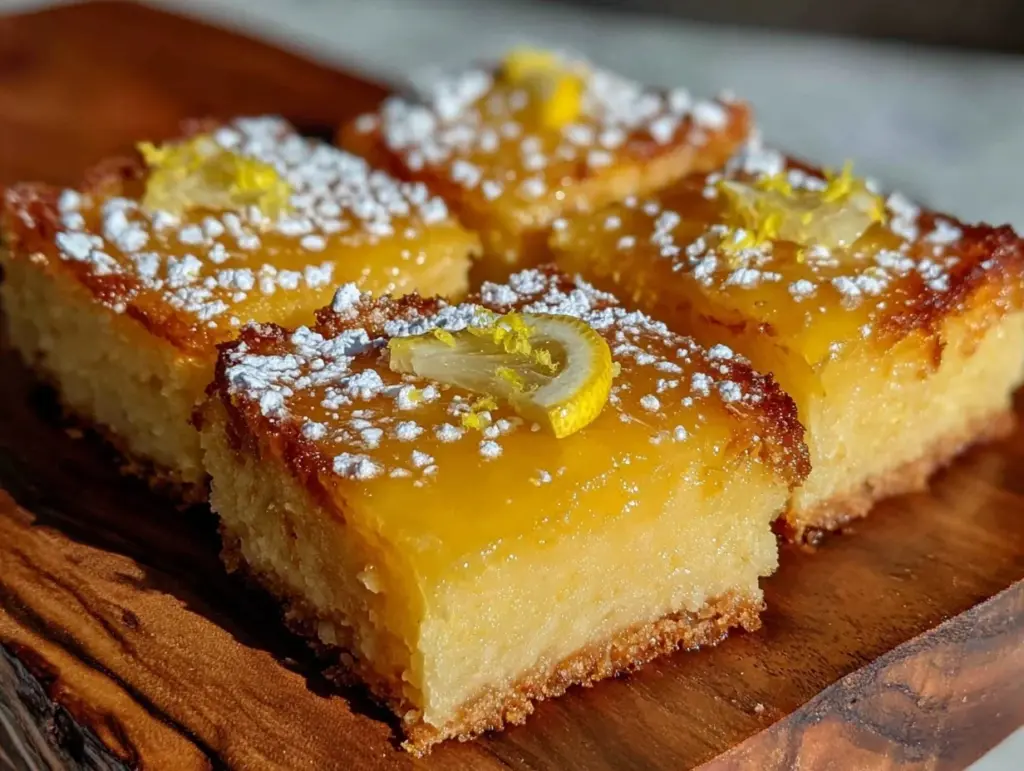
Let me tell you, the scent of fresh lemons mingling with warm, buttery shortbread baking in the oven is enough to make anyone’s mouth water. The first time I baked these perfect tangy sweet lemon bars, I was instantly hooked—the kind of moment where you pause, take a deep breath, and just smile because you know you’re onto something truly special. Years ago, when I was knee-high to a grasshopper, my grandma used to make lemon bars that felt like sunshine on a plate, and I’ve been chasing that nostalgic comfort ever since. Honestly, these bars bring back that exact warm feeling, with a zingy brightness that wakes up your taste buds.
You know what’s dangerous? My family couldn’t stop sneaking them off the cooling rack (and I can’t really blame them). Whether it was a weekend treat or a last-minute dessert for potlucks, these lemon bars quickly became a staple for family gatherings and gifting. Let’s face it, there’s something about that perfect balance of tangy and sweet nestled on a crumbly, buttery crust that feels like a warm hug after a long day. If you’re looking to brighten up your Pinterest cookie board or just want a sweet treat for your kids, this recipe is dangerously easy and packed with pure, nostalgic comfort. After testing it multiple times (in the name of research, of course), it’s become my go-to whenever I want a dessert that’s both impressive and simple.
Why You’ll Love This Recipe
Honestly, these lemon bars are more than just a dessert; they’re a little slice of happiness that’s quick and fuss-free. Having tried countless lemon bar recipes, this one stands out because it’s been thoroughly tested in my kitchen and loved by my family and friends alike. Plus, it’s perfect for those moments when you want something sweet but not overwhelming.
- Quick & Easy: Comes together in under 45 minutes, perfect for busy weeknights or last-minute dessert cravings.
- Simple Ingredients: No fancy grocery trips needed; you likely already have everything in your pantry.
- Perfect for Any Occasion: Whether it’s brunch, potlucks, or cozy dinners, these lemon bars fit right in.
- Crowd-Pleaser: Kids and adults both rave about the zingy lemon flavor paired with that buttery crust.
- Unbelievably Delicious: The texture combo of tangy, sweet filling and crumbly shortbread is pure comfort food.
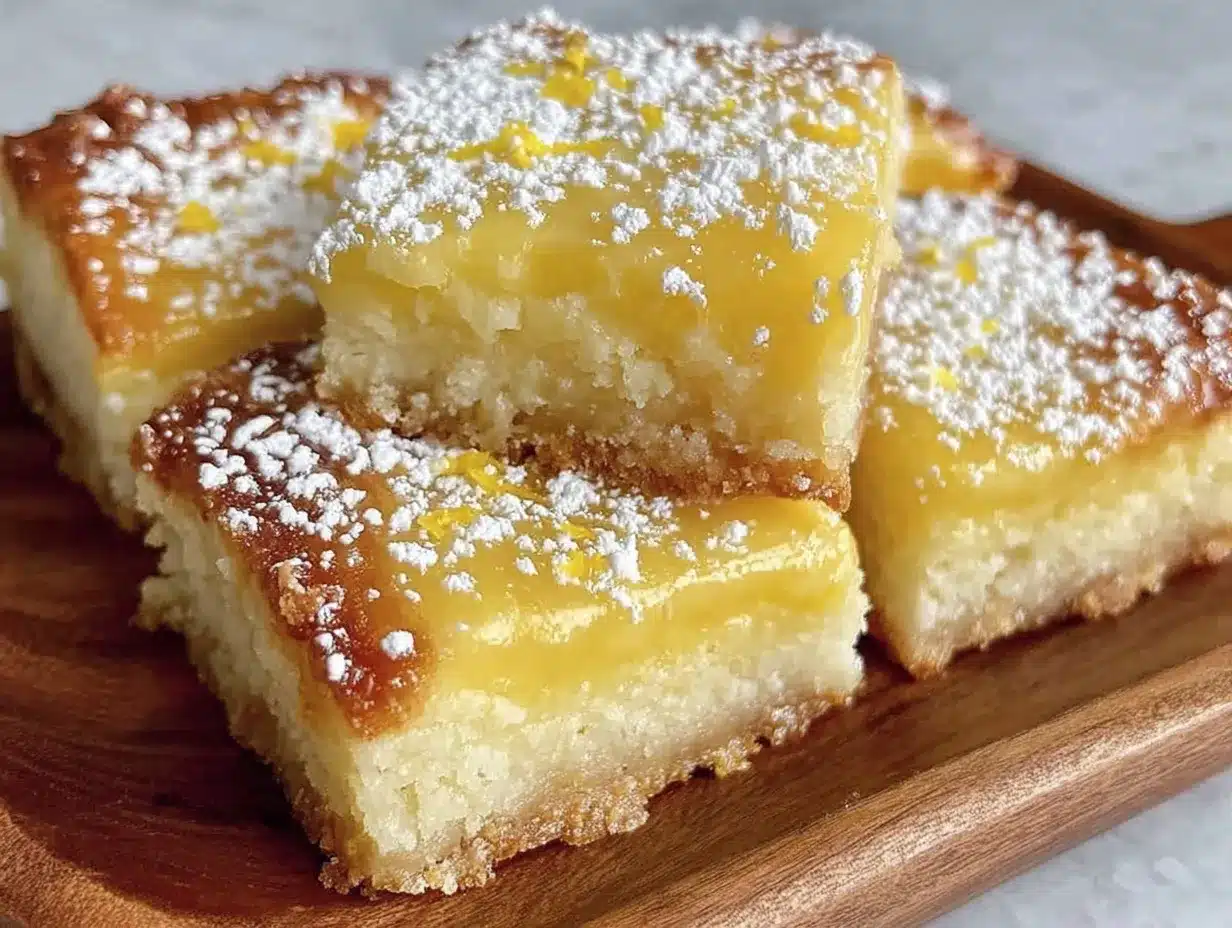
What sets this recipe apart? Well, it’s the buttery shortbread crust that holds everything together without getting soggy, and the perfectly balanced lemon filling that’s tangy without being too tart. I love blending fresh lemon juice and zest for that authentic citrus punch, and the slight dusting of powdered sugar on top just adds that finishing touch of sweetness. It’s the kind of dessert that makes you close your eyes after the first bite and smile. Whether you’re impressing guests without breaking a sweat or simply treating yourself, this recipe nails that classic lemon bar magic every single time.
What Ingredients You Will Need
This recipe uses simple, wholesome ingredients to deliver bold flavor and satisfying texture without the fuss. Most of these are pantry staples, so you probably have them on hand already!
- For the Shortbread Crust:
- 1 cup (226g) unsalted butter, softened (I recommend using a good-quality European-style butter for richness)
- 1/2 cup (100g) granulated sugar
- 2 cups (250g) all-purpose flour
- 1/4 teaspoon salt
- For the Lemon Filling:
- 4 large eggs, room temperature (adds richness and structure)
- 1 1/2 cups (300g) granulated sugar
- 1/4 cup (30g) all-purpose flour (helps thicken the filling)
- 1/2 cup (120ml) fresh lemon juice (about 3-4 lemons; fresh juice is key for tanginess)
- Zest of 2 lemons (for that bright citrus aroma)
- For Garnish:
- Powdered sugar, for dusting (optional but highly recommended for that classic look)
If you want a gluten-free version, you can swap the all-purpose flour with a 1:1 gluten-free baking flour blend. For a dairy-free option, try using vegan butter sticks—they work surprisingly well here. I always suggest using fresh lemons over bottled juice because it makes a world of difference in flavor. If fresh lemons are out of season, Meyer lemons are a nice alternative for a sweeter twist.
Equipment Needed
- 9×13 inch (23×33 cm) baking pan – metal pans work best for even heat distribution, but glass is fine if that’s what you have.
- Mixing bowls – one large for crust, another for filling.
- Electric mixer or stand mixer – makes creaming the butter and sugar a breeze.
- Whisk – for beating eggs and mixing the filling smoothly.
- Zester or microplane – fresh lemon zest really changes the game.
- Measuring cups and spoons – accuracy matters here for the perfect balance.
- Spatula – for scraping down the sides and spreading the filling.
- Parchment paper (optional but recommended) – helps with easy removal and cleanup.
If you don’t have a stand mixer, a hand mixer works just fine, and you can even cream butter and sugar by hand with a sturdy wooden spoon if you’re feeling old-school. For zesting, a microplane is my favorite tool because it gets the zest fine without the bitter pith. Parchment paper makes it so much easier to lift the bars out of the pan, especially if you want clean edges for serving.
Preparation Method
- Preheat your oven to 350°F (175°C). Line your 9×13 inch pan with parchment paper, leaving some overhang for easy removal later.
- Make the shortbread crust: In a large bowl, cream together 1 cup softened unsalted butter and 1/2 cup granulated sugar until light and fluffy—about 3-4 minutes using an electric mixer on medium speed. This step is crucial; don’t rush it or your crust won’t be as tender.
- Add the dry ingredients: Gradually mix in 2 cups all-purpose flour and 1/4 teaspoon salt until the dough just comes together. It’ll look crumbly but should hold when pressed.
- Press the dough evenly into the prepared pan, making sure to pack it firmly into the corners. I usually press it with the back of a measuring cup for even thickness.
- Bake the crust for 18-20 minutes or until it’s lightly golden around the edges. You want it firm but not browned too dark—this helps prevent sogginess when the filling goes on.
- Prepare the lemon filling: While the crust bakes, whisk together 4 large eggs and 1 1/2 cups granulated sugar until smooth and slightly thickened, about 2 minutes. Add 1/4 cup flour, 1/2 cup fresh lemon juice, and zest of 2 lemons. Mix until fully combined and no lumps remain.
- Pour the lemon mixture over the warm crust as soon as it comes out of the oven. This warmth helps the filling set evenly.
- Bake for another 20-25 minutes until the filling has set but still has a slight jiggle in the center. A toothpick inserted should come out mostly clean with a few moist crumbs.
- Cool completely in the pan on a wire rack for at least 1 hour. Then refrigerate for an additional 1-2 hours to help the bars firm up for clean slicing.
- Dust with powdered sugar just before serving for that classic finishing touch. Use the parchment overhang to lift out the whole slab and cut into squares or rectangles with a sharp knife.
Pro tip: If your crust edges start browning too fast, tent the pan loosely with foil halfway through baking. Also, don’t skip chilling the bars after baking—it really helps with cleaner cuts and better texture.
Cooking Tips & Techniques
One thing I learned early on is that creaming the butter and sugar well is key to a tender shortbread crust. If you rush this step, your crust can turn out dense or crumbly. Also, using room temperature eggs for the filling ensures it blends smoothly without curdling.
Watch your oven temperature carefully! Too hot and the crust browns too fast while the filling stays runny. Too low and you’ll end up with a pale crust and underbaked filling. I suggest an oven thermometer if yours tends to run hot or cold.
When mixing the lemon filling, whisk just until combined. Overbeating can incorporate too much air and cause cracks in the filling as it bakes. And trust me, those cracks are tricky to fix.
Multi-task by prepping your lemon zest and juice while the crust bakes, so you’re ready to go as soon as it comes out. Efficiency is king in baking!
Lastly, slicing lemon bars is easier if your knife is warm and wiped clean between cuts. It keeps the edges from crumbling and gives you those nice, neat squares for sharing or gifting.
Variations & Adaptations
If you want to switch things up or cater to different tastes, here are some variations I’ve tried and loved:
- Gluten-Free: Use a 1:1 gluten-free baking flour blend for both crust and filling flour. The texture is slightly different but just as delicious.
- Seasonal Berry Twist: Add a handful of fresh raspberries or blueberries on top of the lemon filling before baking. It adds a fresh, fruity pop and a pretty presentation.
- Low-Sugar Option: Reduce sugar by about 1/4 cup and substitute with a natural sweetener like honey or maple syrup (adjust liquids slightly). The bars are less sweet but still tangy and satisfying.
- Dairy-Free: Swap butter for vegan butter or coconut oil. The crust is a bit different in texture but still buttery and tasty.
- Herb-Infused: Add a teaspoon of finely chopped fresh thyme or basil to the crust for a subtle twist that pairs beautifully with lemon.
My personal favorite variation is the seasonal berry twist—those juicy bursts of fruit contrast nicely with the tart lemon. It’s perfect for summer gatherings when berries are at their peak.
Serving & Storage Suggestions
These lemon bars are best served chilled or at room temperature. I like to dust them with powdered sugar just before serving for that pretty, classic look. They pair beautifully with a cup of tea or iced coffee, and honestly, they’re a crowd-pleaser at brunch or potlucks.
To store, keep the bars in an airtight container in the refrigerator for up to 4 days. You can also freeze cut bars wrapped tightly in plastic wrap and foil for up to 2 months. When ready to enjoy, thaw in the fridge overnight and bring to room temperature before serving.
Reheating isn’t really necessary, but if you want a warm treat, pop them in a 300°F (150°C) oven for 5-7 minutes. Just be careful not to melt the powdered sugar topping.
Fun fact: the flavors deepen and mellow slightly after a day or two in the fridge, so if you can wait, they actually taste even better after resting.
Nutritional Information & Benefits
Each serving of these lemon bars (assuming 12 bars per pan) contains approximately:
| Calories | 280 |
|---|---|
| Fat | 15g |
| Carbohydrates | 35g |
| Sugar | 22g |
| Protein | 3g |
Lemons are a great source of vitamin C and antioxidants, which support immune health and skin vitality. Using fresh lemon juice and zest means you get all those natural nutrients and a bright, clean flavor. The recipe is gluten-friendly with a simple substitution and can be made dairy-free with ease.
From a wellness perspective, enjoying a treat like this in moderation is part of a balanced lifestyle. The lemon bars offer a satisfying sweet fix without artificial ingredients or preservatives, making them a wholesome homemade dessert choice.
Conclusion
All in all, this perfect tangy sweet lemon bars recipe with buttery shortbread crust is a keeper. It’s simple enough for a beginner but impressive enough to bring to any gathering. The combination of that crumbly, rich crust with the bright, luscious lemon filling is just irresistible.
Feel free to customize with your favorite variations or keep it classic—either way, you’re in for a treat. Personally, I love how these bars bring a little sunshine to any day and always get an enthusiastic thumbs-up from my crew.
Give it a try, and don’t forget to leave a comment or share your own twists! I’d love to hear how your lemon bars turn out. Happy baking and enjoy every tangy, sweet bite!
FAQs
Can I use bottled lemon juice instead of fresh?
Fresh lemon juice is best for flavor and brightness, but bottled lemon juice can work in a pinch. Just expect a slightly less vibrant taste.
How do I get clean cuts when slicing lemon bars?
Use a sharp knife warmed under hot water and wiped dry between cuts. Chilling the bars well before slicing also helps.
Can I make these lemon bars ahead of time?
Yes! They keep well in the fridge for up to 4 days and even taste better after resting overnight.
What’s the best way to store leftover lemon bars?
Store in an airtight container in the refrigerator. For longer storage, freeze wrapped tightly and thaw before serving.
Can I make these bars vegan?
Yes, by substituting butter with vegan butter and using a flax egg (1 tbsp ground flaxseed + 3 tbsp water) instead of eggs, though texture will be slightly different.
Pin This Recipe!

Perfect Tangy Sweet Lemon Bars Recipe with Buttery Shortbread Crust

These lemon bars feature a tangy sweet lemon filling atop a buttery shortbread crust, delivering a nostalgic and comforting homemade dessert that’s quick and easy to make.
- Prep Time: 15 minutes
- Cook Time: 40-45 minutes
- Total Time: 1 hour 55 minutes
- Yield: 12 servings 1x
- Category: Dessert
- Cuisine: American
Ingredients
- 1 cup (226g) unsalted butter, softened
- 1/2 cup (100g) granulated sugar
- 2 cups (250g) all-purpose flour
- 1/4 teaspoon salt
- 4 large eggs, room temperature
- 1 1/2 cups (300g) granulated sugar
- 1/4 cup (30g) all-purpose flour
- 1/2 cup (120ml) fresh lemon juice (about 3–4 lemons)
- Zest of 2 lemons
- Powdered sugar, for dusting (optional)
Instructions
- Preheat your oven to 350°F (175°C). Line a 9×13 inch baking pan with parchment paper, leaving some overhang for easy removal.
- Make the shortbread crust: In a large bowl, cream together 1 cup softened unsalted butter and 1/2 cup granulated sugar until light and fluffy, about 3-4 minutes using an electric mixer on medium speed.
- Gradually mix in 2 cups all-purpose flour and 1/4 teaspoon salt until the dough just comes together. It will look crumbly but should hold when pressed.
- Press the dough evenly into the prepared pan, packing it firmly into the corners.
- Bake the crust for 18-20 minutes or until lightly golden around the edges.
- Prepare the lemon filling: While the crust bakes, whisk together 4 large eggs and 1 1/2 cups granulated sugar until smooth and slightly thickened, about 2 minutes.
- Add 1/4 cup flour, 1/2 cup fresh lemon juice, and zest of 2 lemons. Mix until fully combined and no lumps remain.
- Pour the lemon mixture over the warm crust as soon as it comes out of the oven.
- Bake for another 20-25 minutes until the filling has set but still has a slight jiggle in the center.
- Cool completely in the pan on a wire rack for at least 1 hour, then refrigerate for an additional 1-2 hours to firm up.
- Dust with powdered sugar just before serving. Use the parchment overhang to lift out the slab and cut into squares or rectangles.
Notes
Use fresh lemon juice and zest for best flavor. If crust edges brown too fast, tent with foil halfway through baking. Chill bars after baking for cleaner cuts and better texture. Warm knife before slicing to prevent crumbling. Gluten-free and dairy-free substitutions are possible.
Nutrition
- Serving Size: 1 bar (assuming 12 b
- Calories: 280
- Sugar: 22
- Fat: 15
- Carbohydrates: 35
- Protein: 3
Keywords: lemon bars, lemon dessert, shortbread crust, tangy lemon bars, easy lemon bars, homemade dessert, sweet lemon bars