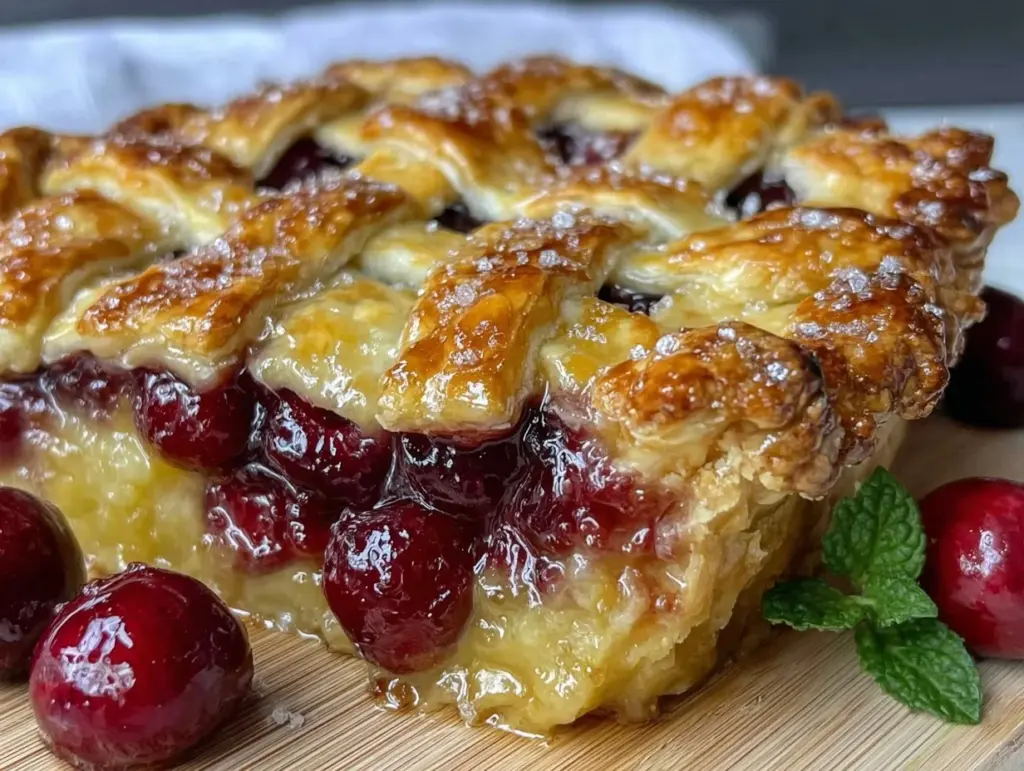
Let me tell you, the smell of fresh cherries mingling with buttery, flaky crust baking in the oven is enough to make anyone’s mouth water. The first time I baked this perfect homemade cherry pie with flaky lattice crust, I was instantly hooked—the kind of moment where you pause, take a deep breath, and just smile because you know you’re onto something truly special. Years ago, when I was knee-high to a grasshopper, my grandma used to pull pies like this out of her oven on rainy weekends, filling the house with pure, nostalgic comfort.
I stumbled upon this recipe while trying to recreate that very same magic for a family gathering. Honestly, my family couldn’t stop sneaking slices off the cooling rack (and I can’t really blame them). This cherry pie is dangerously easy to make and turns out beautifully every single time. You know what? It’s perfect for potlucks, a sweet treat for your kids after school, or to brighten up your Pinterest cookie board with something a little different.
After testing this recipe multiple times—in the name of research, of course—it has become a staple for family gatherings, gifting, and just those cozy nights when you want a slice of pure joy. Trust me, this perfect homemade cherry pie with flaky lattice crust feels like a warm hug and you’re going to want to bookmark this one forever.
Why You’ll Love This Recipe
Having perfected this cherry pie recipe over countless bakes, I can confidently say it’s a winner for so many reasons:
- Quick & Easy: Comes together in under 90 minutes, perfect for busy weeknights or last-minute cravings.
- Simple Ingredients: No fancy grocery trips needed; you likely already have everything in your kitchen pantry.
- Perfect for Any Occasion: Great for holiday dinners, summer picnics, or just a cozy dessert night.
- Crowd-Pleaser: Always gets rave reviews from kids and adults alike, a true classic everyone loves.
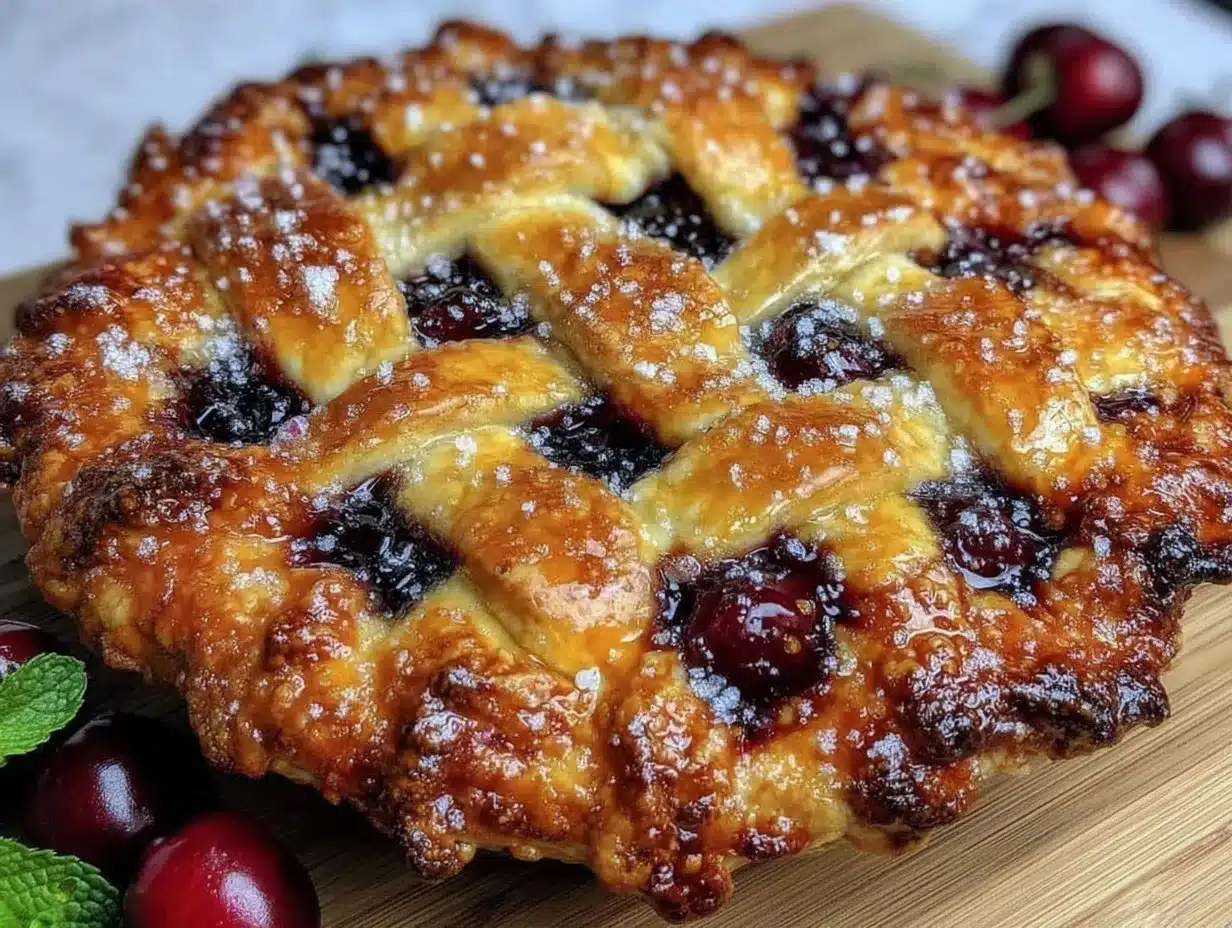
- Unbelievably Delicious: The balance of tart cherries with a sweet glaze and the perfect flaky lattice crust is next-level comfort food.
What really sets this pie apart isn’t just the fresh cherries or the homemade crust—it’s the technique I use for that flaky lattice top. It’s all about chilling the dough just right and weaving the strips with a light hand, so they bake up crisp and golden without a hint of sogginess. This recipe isn’t just good; it’s the kind that makes you close your eyes after the first bite, savoring that perfect mix of textures and flavors. It’s comfort food reimagined—simple, approachable, but with that soul-soothing satisfaction that feels like home.
Whether you want to impress guests without stressing in the kitchen or turn a simple dessert into something memorable, this cherry pie is your go-to.
What Ingredients You Will Need
This recipe uses simple, wholesome ingredients to deliver bold flavor and satisfying texture without the fuss. Most are pantry staples, and the fresh cherries really make the difference here. Feel free to swap or adjust depending on what you have on hand.
- For the Pie Crust:
- 2 1/2 cups (315g) all-purpose flour (I prefer Bob’s Red Mill for consistent results)
- 1 cup (226g) unsalted butter, cold and cubed (adds richness and flakiness)
- 1 teaspoon salt
- 1 tablespoon granulated sugar
- 6-8 tablespoons ice water (keep it very cold to prevent melting the butter)
- For the Cherry Filling:
- 5 cups (about 700g) fresh or frozen tart cherries, pitted (fresh cherries are best in season; frozen works well too)
- 1 cup (200g) granulated sugar
- 1/4 cup (32g) cornstarch (for thickening)
- 1 tablespoon lemon juice (brightens the flavor)
- 1 teaspoon vanilla extract
- 1/4 teaspoon almond extract (optional, but highly recommended for that classic cherry note)
- Pinch of salt
- For the Lattice Top & Finishing Touches:
- 1 large egg, beaten (for egg wash to get that golden color)
- 1 tablespoon coarse sugar (sprinkled on top for crunch and sparkle)
Substitutions & Tips: Use almond flour for a gluten-free crust adaptation, or swap cornstarch with tapioca starch for a clearer filling. You can replace the butter with a vegan alternative if needed, but expect a slightly different texture. If fresh cherries aren’t available, thaw frozen cherries and drain excess juice before using.
Equipment Needed
- 9-inch (23cm) pie dish – glass or ceramic works best for even baking
- Mixing bowls – one large for dough and one medium for filling
- Rolling pin – a wooden or silicone one, depending on your preference
- Pastry cutter or food processor – to cut cold butter into flour quickly
- Bench scraper or knife – handy for dividing dough and cutting lattice strips
- Measuring cups and spoons
- Wire rack – to cool the pie properly
- Pastry brush – for applying the egg wash
If you don’t have a pastry cutter, you can use two knives or your fingers, but be careful not to warm the butter too much. A food processor speeds things up, but I’ve made this pie many times by hand, and it turns out just as flaky. For budget-friendly options, a silicone rolling mat can help prevent sticking and make cleanup easier.
Preparation Method
- Make the Pie Dough: In a large bowl, whisk together 2 1/2 cups (315g) flour, 1 teaspoon salt, and 1 tablespoon sugar. Add the cold, cubed butter. Using a pastry cutter or your fingers, quickly cut the butter into the flour until the mixture resembles coarse crumbs with pea-sized pieces. Be careful not to overwork it.
- Add Ice Water: Drizzle in 6 tablespoons of ice water one tablespoon at a time, tossing gently with a fork after each addition just until the dough starts to come together. Add more water if it feels too dry, but don’t overhydrate. The dough should hold when pressed but not be sticky.
- Form and Chill Dough: Divide the dough into two equal discs, wrap each tightly in plastic wrap, and refrigerate for at least 1 hour (or up to 2 days). This step is key for flaky crust.
- Prepare Cherry Filling: In a medium bowl, combine 5 cups (700g) pitted cherries, 1 cup (200g) sugar, 1/4 cup (32g) cornstarch, 1 tablespoon lemon juice, 1 teaspoon vanilla extract, 1/4 teaspoon almond extract (if using), and a pinch of salt. Stir gently to coat. Let sit while you roll out the dough.
- Roll Out Bottom Crust: On a lightly floured surface, roll one dough disc into a 12-inch (30cm) circle. Carefully transfer to your 9-inch (23cm) pie dish, pressing gently into the bottom and sides. Trim edges to about 1/2-inch overhang.
- Fill the Pie: Pour the cherry filling evenly into the crust, spreading gently with a spoon to distribute.
- Create the Lattice Top: Roll out the second dough disc into another 12-inch (30cm) circle. Using a sharp knife or pizza cutter, cut into 1/2-inch (1.3cm) wide strips. Lay half the strips parallel across the pie. Fold back every other strip, place a strip perpendicular, then unfold strips over it. Repeat alternating until lattice is complete. Trim edges to match bottom crust.
- Seal and Crimp Edges: Fold the bottom crust edges over the lattice edges and pinch or crimp decoratively to seal.
- Apply Egg Wash: Brush the lattice and edges with beaten egg. Sprinkle coarse sugar on top for sparkle and crunch.
- Bake the Pie: Preheat oven to 400°F (204°C). Place pie on the middle rack and bake for 20 minutes. Then reduce heat to 350°F (177°C) and bake an additional 35-40 minutes until filling bubbles and crust is golden brown. If edges brown too fast, shield them with foil.
- Cool Completely: Let the pie cool on a wire rack for at least 3 hours to allow the filling to set. This step is crucial for slicing clean pieces.
Pro tip: If your dough feels too sticky while rolling, pop it back in the fridge for 10-15 minutes. And don’t skip chilling the dough—the difference in flakiness is worth the wait.
Cooking Tips & Techniques
Here are a few things I’ve learned after many cherry pies (and a few flops!):
- Keep everything cold: Cold butter and ice water are your best friends for that flaky crust. Warm dough loses its structure and becomes tough.
- Don’t overmix the dough: Overworking releases gluten, making crust chewy instead of tender.
- Use fresh or properly thawed cherries: If using frozen, drain well to avoid watery filling. You want that thick, jammy texture.
- Lattice weaving: Take your time with the strips. If the dough cracks, press gently to patch. It adds character!
- Shield edges if needed: Pie edges can brown quickly. Just cover with foil halfway through baking to prevent burning.
- Let it cool fully: It’s tempting to dig in, but that cooling time helps the filling thicken and slice neatly.
Honestly, these little steps make all the difference between a good pie and a memorable one. I’ve ruined more pies than I want to admit by rushing or skipping chilling, so trust me on this!
Variations & Adaptations
Want to switch things up? Here are some tasty variations you can try:
- Dietary: Use almond flour or gluten-free blend for the crust to make it gluten-free. Swap butter for coconut oil for a dairy-free version, though the texture changes slightly.
- Seasonal: In summer, try swapping cherries with fresh blueberries or mixed berries for a colorful twist.
- Flavor: Add 1/2 teaspoon cinnamon or ground ginger to the filling for warm spice notes. Or toss in a splash of Grand Marnier for a boozy cherry punch.
- Cooking method: You can bake mini pies or hand pies using the same filling and lattice technique for portable treats.
Personally, I once made a version with a streusel topping instead of lattice, and it was a hit for those who prefer crumbly over flaky. Feel free to experiment—it’s your pie after all!
Serving & Storage Suggestions
This cherry pie is best served at room temperature or slightly warm. A scoop of vanilla ice cream or a dollop of whipped cream pairs beautifully and adds a creamy contrast to the tart cherries.
For storage, cover the pie loosely with foil or plastic wrap and refrigerate. It keeps well for up to 4 days. If you want to freeze it, wrap tightly in plastic wrap and foil before freezing for up to 2 months. Thaw overnight in the fridge and warm slightly before serving to bring back that fresh-baked feel.
Reheating tips: Warm slices in a 350°F (177°C) oven for about 10 minutes to refresh the crust’s crispness. Microwave works in a pinch but can make the crust a bit soggy.
Fun fact: The flavors actually deepen and meld beautifully after a day or two, so if you can resist, it tastes even better the next day!
Nutritional Information & Benefits
Here’s an estimated nutrition snapshot per slice (1/8 of pie): approximately 320 calories, 15g fat, 45g carbohydrates, 3g protein, and 3g fiber.
Cherries are rich in antioxidants and vitamin C, which support your immune system and reduce inflammation. Using fresh ingredients and homemade crust means you avoid unnecessary preservatives and additives common in store-bought pies.
This recipe is naturally gluten-free adaptable and can be made dairy-free with simple swaps, making it a crowd-pleaser even for those with dietary restrictions. Always keep in mind potential allergens like nuts if you add any variations.
From my experience, this pie strikes a good balance between indulgence and wholesome ingredients, perfect for treating yourself without overdoing it.
Conclusion
So there you have it—the perfect homemade cherry pie with flaky lattice crust that’s as charming as it is delicious. Whether you’re a seasoned baker or a kitchen newbie, this recipe invites you to make it your own with simple steps and reliable results.
I love this pie because it brings back those cozy family memories while still feeling fresh and exciting every time I bake it. Plus, the flaky lattice top? Pure magic. You can’t go wrong!
Give it a try, tweak it to your taste, and don’t forget to share your variations or questions in the comments. I’m always excited to hear how you make this recipe your own. Happy baking—you’re going to love every bite!
FAQs
How do I prevent the pie crust from getting soggy?
Make sure to chill your dough well before baking and use cornstarch or tapioca starch in the filling to thicken juices. Also, baking at a higher temperature initially helps set the crust quickly.
Can I use frozen cherries instead of fresh?
Yes! Just thaw and drain excess liquid well to avoid a watery filling. Frozen cherries work great and are convenient year-round.
How long should I let the pie cool before slicing?
At least 3 hours at room temperature to let the filling set properly. This helps you get clean slices without runny filling.
What’s the best way to make a lattice crust?
Roll out your dough evenly, cut strips about 1/2 inch wide, and weave them carefully over and under each other. Chill the strips if they get too soft while working.
Can I make this pie ahead of time?
Absolutely! You can prepare the pie a day before baking and keep it refrigerated, then bake it fresh when you’re ready. Or bake completely and reheat gently before serving.
Pin This Recipe!

Perfect Homemade Cherry Pie Recipe Easy Flaky Lattice Crust Guide
A classic cherry pie with a flaky lattice crust that is quick and easy to make, perfect for family gatherings and special occasions. This recipe balances tart cherries with a sweet glaze and a golden, crisp crust.
- Prep Time: 20 minutes
- Cook Time: 55-60 minutes
- Total Time: 3 hours 20 minutes
- Yield: 8 servings 1x
- Category: Dessert
- Cuisine: American
Ingredients
- 2 1/2 cups (315g) all-purpose flour
- 1 cup (226g) unsalted butter, cold and cubed
- 1 teaspoon salt
- 1 tablespoon granulated sugar
- 6–8 tablespoons ice water
- 5 cups (about 700g) fresh or frozen tart cherries, pitted
- 1 cup (200g) granulated sugar
- 1/4 cup (32g) cornstarch
- 1 tablespoon lemon juice
- 1 teaspoon vanilla extract
- 1/4 teaspoon almond extract (optional)
- Pinch of salt
- 1 large egg, beaten
- 1 tablespoon coarse sugar
Instructions
- In a large bowl, whisk together flour, salt, and sugar. Add cold, cubed butter and cut into flour until mixture resembles coarse crumbs with pea-sized pieces.
- Drizzle in 6 tablespoons of ice water one tablespoon at a time, tossing gently until dough starts to come together. Add more water if needed but do not overhydrate.
- Divide dough into two discs, wrap in plastic wrap, and refrigerate for at least 1 hour.
- In a medium bowl, combine cherries, sugar, cornstarch, lemon juice, vanilla extract, almond extract (if using), and salt. Stir gently and let sit.
- Roll out one dough disc into a 12-inch circle and place in a 9-inch pie dish, trimming edges to 1/2-inch overhang.
- Pour cherry filling evenly into crust.
- Roll out second dough disc into 12-inch circle. Cut into 1/2-inch strips and weave lattice over filling. Trim edges to match bottom crust.
- Fold bottom crust edges over lattice and crimp to seal.
- Brush lattice and edges with beaten egg and sprinkle coarse sugar on top.
- Preheat oven to 400°F (204°C). Bake pie for 20 minutes, then reduce heat to 350°F (177°C) and bake for 35-40 minutes until filling bubbles and crust is golden. Shield edges with foil if browning too fast.
- Cool pie on wire rack for at least 3 hours before slicing.
Notes
Keep dough and butter cold for flaky crust. Chill dough for at least 1 hour before rolling. Use fresh or well-drained frozen cherries to avoid watery filling. Shield pie edges with foil if browning too quickly. Let pie cool completely before slicing for clean pieces.
Nutrition
- Serving Size: 1 slice (1/8 of pie)
- Calories: 320
- Fat: 15
- Carbohydrates: 45
- Fiber: 3
- Protein: 3
Keywords: cherry pie, homemade pie, lattice crust, flaky crust, dessert, easy cherry pie, classic pie, fruit pie