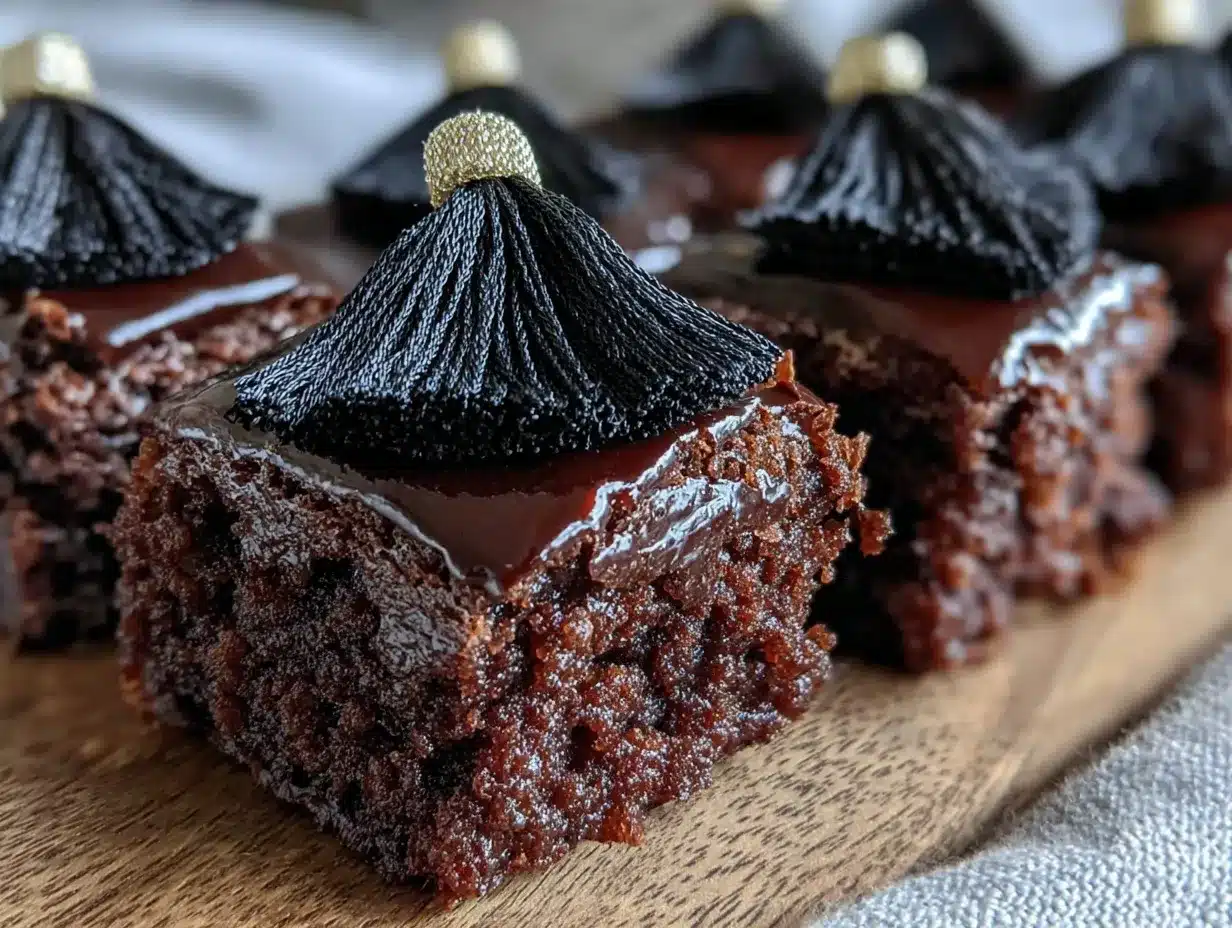
“Hand me that spatula,” my neighbor called out last Saturday afternoon as we prepped for our impromptu graduation party. Honestly, I wasn’t expecting to spend the weekend crafting tiny desserts, but those perfect brownie bites with graduation cap toppers stole the show. The idea came from watching my niece struggle with her cap-and-gown excitement and craving something sweet that matched the celebration’s spirit. I mean, you know that feeling when a simple dessert turns into a centerpiece? That was exactly it.
The kitchen was a mess—flour dusted on the counter, a cracked mixing bowl with a stubborn batter stuck to its sides, and me forgetting to preheat the oven on time. But in the chaos, those little brownie bites came together beautifully. The rich chocolate aroma filled the air, blending with laughter and the faint sound of a graduation speech echoing from the TV.
These treats aren’t just cute; they carry the warmth of accomplishment and the joy of sharing something homemade. Maybe you’ve been there—trying to make a celebration feel a little more personal, a little more “you.” That’s why this recipe stuck with me, and I keep making it whenever it’s time to celebrate milestones big or small.
Why You’ll Love This Recipe
Having tested this recipe through several parties and casual get-togethers, I can vouch for its crowd-pleasing charm and straightforward approach. Whether you’re a seasoned baker or a kitchen newbie, these brownie bites come together without fuss but with maximum impact. Here’s why this recipe stands out:
- Quick & Easy: Comes together in about 30 minutes, perfect for last-minute celebrations or spontaneous baking urges.
- Simple Ingredients: Uses pantry staples you probably already have—no fancy or hard-to-find items required.
- Perfect for Graduation Parties: The cap toppers add a festive touch that’s sure to impress guests and graduates alike.
- Crowd-Pleaser: Rich, fudgy texture with a slightly crackly top that both kids and adults rave about.
- Unbelievably Delicious: The combination of a moist interior and chocolatey flavor keeps everyone coming back for more.
What makes these brownie bites different? The secret is in the topping—using simple fondant or chocolate cutouts shaped like graduation caps brings that extra wow factor. Plus, the brownies themselves have the perfect balance of chewiness and melt-in-your-mouth softness thanks to the mix of melted butter and high-quality cocoa powder. Honestly, it’s the kind of recipe that makes you close your eyes after the first bite and smile.
What Ingredients You Will Need
This recipe relies on straightforward, wholesome ingredients to create a bold chocolate flavor and satisfying texture. Most are pantry staples, and the caps can be made from simple decorating supplies or homemade fondant.
- For the Brownie Batter:
- 1/2 cup (115g) unsalted butter, melted (I prefer Kerrygold for richness)
- 1 cup (200g) granulated sugar
- 2 large eggs, room temperature
- 1 teaspoon vanilla extract
- 1/3 cup (40g) unsweetened cocoa powder (use Dutch-processed for deep flavor)
- 1/2 cup (65g) all-purpose flour (can swap for gluten-free flour mix)
- 1/4 teaspoon salt
- 1/4 teaspoon baking powder
- For the Graduation Cap Toppers:
- Black fondant or black candy melts (Wilton brand works well)
- Small toothpicks or edible glue
- Optional: tiny yellow or gold icing for tassels
If you want to add a personal twist, consider swapping vanilla extract for almond or adding a pinch of espresso powder to deepen the chocolate notes. For those avoiding dairy, use a plant-based butter substitute and check your fondant ingredients carefully.
Equipment Needed
- 8×8 inch (20×20 cm) baking pan – if you don’t have this size, a 9×9 inch pan works but adjust baking time slightly
- Mixing bowls – one large for batter, one small for dry ingredients
- Whisk or electric mixer – I usually use a hand whisk, but a stand mixer speeds things up
- Spatula for folding and spreading batter
- Sharp knife or brownie cutter – for clean, uniform bites
- Rolling pin (if shaping fondant caps by hand)
- Small round and square cookie cutters or a craft knife – for cutting graduation caps
- Cooling rack – to cool brownies before decorating
For budget-friendly options, you can use a glass baking dish instead of non-stick pans, just grease it well. When working with fondant, a little cornstarch on your surface prevents sticking. I’ve learned the hard way that fondant can be tricky if your hands are too warm—so keep them cool and dry!
Preparation Method
- Preheat your oven to 350°F (175°C). Grease your 8×8 inch pan with butter or line it with parchment paper for easy removal. (About 10 minutes)
- Mix the wet ingredients: In a large bowl, whisk together the melted butter and sugar until smooth and glossy. Beat in the eggs one at a time, then stir in the vanilla extract. (3-5 minutes)
- Combine the dry ingredients: In a separate bowl, sift together the cocoa powder, flour, salt, and baking powder. This helps avoid lumps and ensures even mixing. (2 minutes)
- Fold the dry into the wet: Gradually add the dry ingredients to the wet, folding gently with a spatula until just combined. Don’t overmix—this keeps the brownies tender. The batter should be thick and glossy. (3 minutes)
- Pour and spread: Transfer the batter to your prepared pan, smoothing the top evenly. You can tap the pan lightly on the counter to settle the batter and release air bubbles. (2 minutes)
- Bake: Place in the oven and bake for 20-25 minutes. Start checking at 20 minutes by inserting a toothpick in the center—it should come out with a few moist crumbs but not wet batter. Overbaking dries out these brownie bites. (20-25 minutes)
- Cool completely: Let the brownies cool in the pan on a wire rack for at least 30 minutes. This step is crucial for clean cutting and easier decorating. (30 minutes)
- Cut into bite-sized squares: Use a sharp knife or a brownie cutter to create uniform pieces, about 1.5 inches (4 cm) square. Wipe your knife between cuts to keep edges neat.
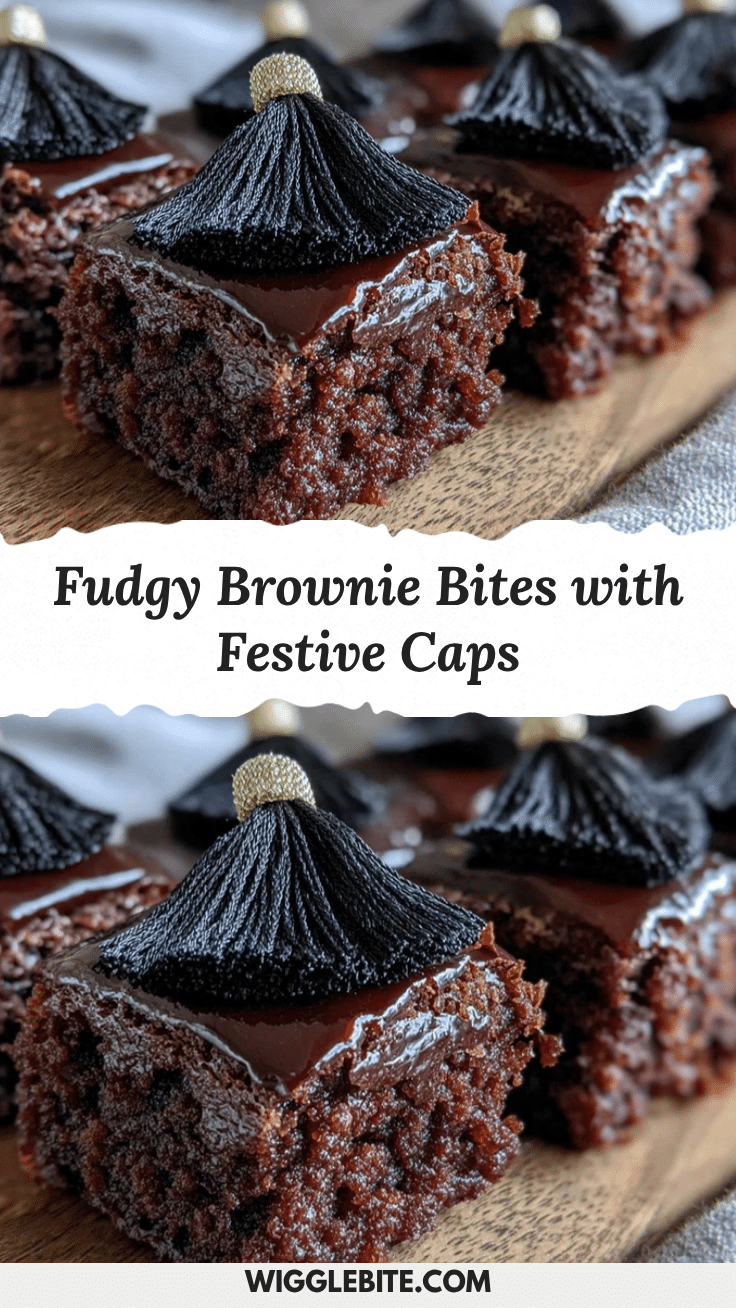
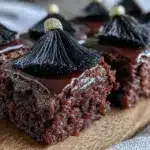
- Create the graduation caps: Roll out black fondant to about 1/8 inch (3 mm) thickness. Cut small squares matching your brownie size. For the mortarboard’s top, cut small diamond shapes if you prefer a tilted look. Use toothpicks or edible glue to attach the caps to each brownie bite gently. Add a tiny tassel with yellow icing or a thin fondant strip. (15-20 minutes)
- Serve and enjoy: Arrange these adorable brownie bites on a festive platter. Watch the smiles when guests notice the fun cap toppers!
Tip: If fondant feels intimidating, black candy melts can be poured into small square molds for a similar effect. Just allow them to fully harden before placing on brownies.
Cooking Tips & Techniques
Getting the perfect fudgy brownie bites takes a little attention, but you’ll find it’s worth the small effort. Here are some tips I’ve picked up:
- Don’t overmix the batter. Once the dry ingredients go in, fold gently to keep the texture tender and moist. Overmixing can make brownies cakey or tough.
- Use room temperature eggs. They incorporate better and help the batter bind smoothly.
- Check your oven temperature. Ovens vary, so use an oven thermometer if you can. Too hot, and brownies dry out; too low, and they stay gooey and underdone.
- Allow brownies to cool fully. Cutting warm brownies leads to crumbling and messy edges. Patience here pays off with neat squares perfect for decoration.
- For neat fondant caps, chill the fondant before cutting. This firms it up and prevents stretching or tearing.
- Practice makes perfect. My first batch of caps looked more like abstract art, but after a few tries, I nailed the shape and size.
- Multitask while brownies bake: Prepare your decorations or clean up to save time and keep the kitchen manageable.
Variations & Adaptations
Feel free to make these brownie bites your own! Here are a few ways I’ve played around with the recipe:
- Dietary swaps: Use gluten-free flour blends for gluten sensitivity, or swap butter for coconut oil for a dairy-free version. Just note texture may vary slightly.
- Flavor twists: Add a teaspoon of instant espresso powder to the batter for a mocha kick, or swirl in peanut butter before baking for a nutty surprise.
- Decoration ideas: Instead of fondant caps, try piping chocolate ganache hats or use mini chocolate squares with a candy tassel for a no-fondant route.
- Seasonal touches: Swap black fondant for school colors by using colored candy melts or edible glitter to match your graduate’s theme.
- Personal favorite: I once added a sprinkle of sea salt on top before baking—it brought out the chocolate flavor beautifully and added a subtle crunch.
Serving & Storage Suggestions
Serve these brownie bites at room temperature for the best texture and flavor. They look fantastic arranged on a decorated tray with a sprinkle of edible confetti or alongside fresh berries for a fresh contrast.
Leftovers keep well in an airtight container at room temperature for up to 3 days. If you want to store longer, refrigerate them for up to a week or freeze for up to 2 months. When freezing, separate layers with parchment paper to avoid sticking. Thaw overnight in the fridge before serving.
Reheat gently in the microwave for 10-15 seconds if you want them slightly warm—just be careful not to melt the fondant caps. Over time, the flavors deepen and the brownies become even more fudgy, so they’re great for making ahead.
Nutritional Information & Benefits
Each brownie bite contains approximately 120 calories, with 6 grams of fat, 15 grams of carbohydrates, and 1.5 grams of protein. The recipe uses real butter and cocoa powder, which provides antioxidants and a rich flavor without artificial additives.
Using high-quality cocoa powder means you get some health benefits from flavonoids, which can support heart health in moderation. Plus, these brownie bites avoid processed oils or fillers often found in store-bought treats.
The recipe can be adapted to gluten-free or dairy-free versions, accommodating common dietary needs. Just keep in mind that substitutions may slightly alter texture.
Conclusion
Perfect brownie bites with graduation cap toppers aren’t just a dessert—they’re a celebration in every bite. This recipe brings together simple ingredients and a touch of creativity to honor milestones with style and taste. Whether you’re hosting a party or just want a sweet reminder of an achievement, these treats hit the spot.
Feel free to customize the decoration or tweak the flavors to suit your taste. I love how these brownies bring smiles and spark conversations every time I make them. If you try them, drop a comment and share your version—I’d love to hear how you made them your own!
Here’s to sweet endings and new beginnings—happy baking!
FAQs
Can I make the brownie bites ahead of time?
Yes! You can bake the brownies a day ahead and store them in an airtight container. Add the graduation cap toppers just before serving for the freshest look.
What can I use if I don’t have fondant?
Black candy melts or small chocolate squares work well as an alternative. You can also pipe chocolate ganache hats using a piping bag for a homemade touch.
How do I prevent the brownies from drying out?
Keep an eye on baking time—start checking at 20 minutes. Also, avoid overmixing the batter and store leftovers properly in an airtight container.
Can I freeze these brownie bites?
Absolutely. Freeze them in a single layer separated by parchment paper for up to two months. Thaw overnight in the fridge before serving.
How do I make the tassels on the graduation caps?
Use a small amount of yellow or gold icing piped onto the fondant caps, or cut thin strips of fondant in a contrasting color. You can also use edible glitter for a festive sparkle.
Pin This Recipe!
Perfect Brownie Bites Recipe with Graduation Cap Toppers
These rich, fudgy brownie bites topped with festive graduation cap decorations are perfect for celebrating milestones with style and taste. Easy to make and crowd-pleasing, they combine a moist interior with a crackly top and fun personalized toppers.
- Prep Time: 15 minutes
- Cook Time: 25 minutes
- Total Time: 40 minutes
- Yield: 24 brownie bites 1x
- Category: Dessert
- Cuisine: American
Ingredients
- 1/2 cup (115g) unsalted butter, melted
- 1 cup (200g) granulated sugar
- 2 large eggs, room temperature
- 1 teaspoon vanilla extract
- 1/3 cup (40g) unsweetened cocoa powder (Dutch-processed preferred)
- 1/2 cup (65g) all-purpose flour (can substitute gluten-free flour mix)
- 1/4 teaspoon salt
- 1/4 teaspoon baking powder
- Black fondant or black candy melts (Wilton brand recommended) for toppers
- Small toothpicks or edible glue
- Optional: tiny yellow or gold icing for tassels
Instructions
- Preheat your oven to 350°F (175°C). Grease an 8×8 inch baking pan with butter or line it with parchment paper for easy removal.
- In a large bowl, whisk together the melted butter and sugar until smooth and glossy. Beat in the eggs one at a time, then stir in the vanilla extract.
- In a separate bowl, sift together the cocoa powder, flour, salt, and baking powder to avoid lumps.
- Gradually fold the dry ingredients into the wet ingredients gently with a spatula until just combined. Do not overmix; the batter should be thick and glossy.
- Pour the batter into the prepared pan and smooth the top evenly. Tap the pan lightly on the counter to release air bubbles.
- Bake for 20-25 minutes, starting to check at 20 minutes by inserting a toothpick in the center. It should come out with a few moist crumbs but no wet batter.
- Allow the brownies to cool completely in the pan on a wire rack for at least 30 minutes.
- Cut the brownies into 1.5 inch (4 cm) bite-sized squares using a sharp knife or brownie cutter, wiping the knife between cuts for clean edges.
- Roll out black fondant to about 1/8 inch (3 mm) thickness. Cut small squares or diamond shapes matching the brownie size. Attach the caps to each brownie bite using toothpicks or edible glue. Add tiny tassels with yellow icing or thin fondant strips.
- Arrange the decorated brownie bites on a festive platter and serve.
Notes
Do not overmix the batter to keep brownies tender and moist. Use room temperature eggs for better incorporation. Check oven temperature with a thermometer to avoid drying out brownies. Cool brownies completely before cutting for neat edges. Chill fondant before cutting to prevent stretching. Black candy melts can be used as an alternative to fondant for toppers. Store leftovers in an airtight container at room temperature for up to 3 days, refrigerate up to a week, or freeze up to 2 months with parchment paper between layers.
Nutrition
- Serving Size: 1 brownie bite (appr
- Calories: 120
- Fat: 6
- Carbohydrates: 15
- Protein: 1.5
Keywords: brownie bites, graduation party dessert, fudgy brownies, chocolate treats, easy brownies, homemade brownies, graduation cap toppers