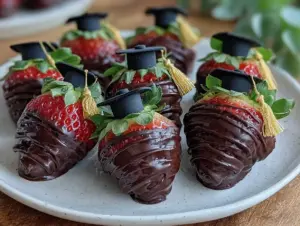
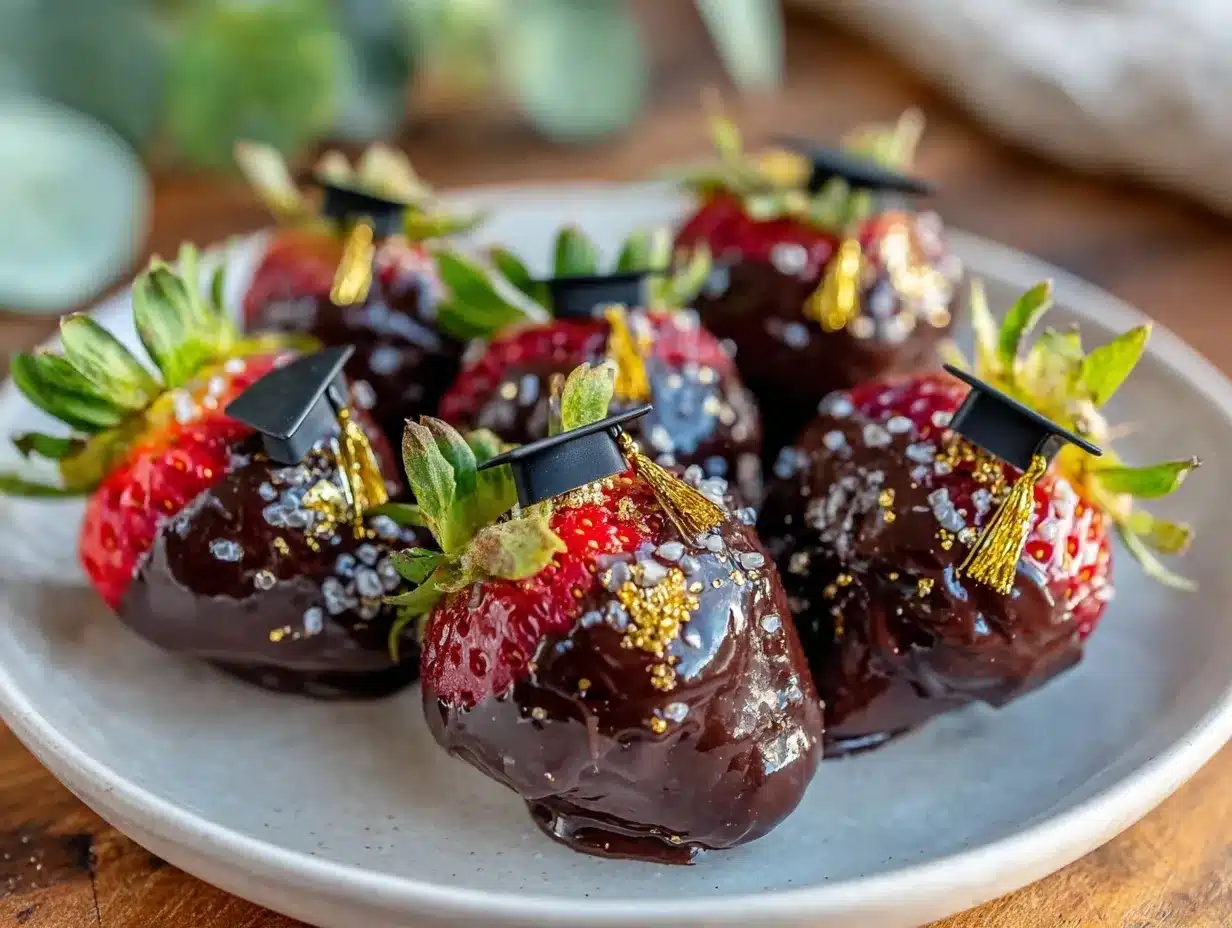
“Wait, you made these yourself? They look too perfect to eat!” That’s what my cousin blurted out last graduation party when she spotted my easy graduation cap chocolate covered strawberries. Honestly, I wasn’t aiming for perfection that day. I was juggling last-minute party prep, a mountain of dishes, and a very hungry toddler demanding snacks. I needed a quick, festive treat that didn’t scream “store-bought.” So, I grabbed some fresh strawberries, melted a few chocolates I had stashed in the pantry, and started winging it.
The first few attempts were a little messy—chocolate dribbled everywhere, the “tassels” looked like sad spaghetti strands, and the caps weren’t quite square. But after a couple tries (and a lot of chocolate tasting, of course), I landed on a simple method that anyone can follow, even if you’re not a dessert pro. That day, my accidental win became the highlight of the dessert table, with guests snapping photos and asking for the recipe. Now these chocolate covered strawberries with graduation caps are my go-to party treat for any celebration that needs a little extra flair.
What’s really stuck with me is how this recipe feels like a blend of creativity and ease — something that brings a little joy without adding stress. Plus, the way the bittersweet chocolate contrasts with the juicy strawberry always makes me pause and savor the moment, especially when I’m surrounded by folks celebrating a major milestone. It’s not just about the looks; it’s about the little happiness bites that make a party feel special. That’s why I keep coming back to this simple tutorial whenever there’s a graduation to cheer for.
Why You’ll Love This Recipe
This easy graduation cap chocolate covered strawberries recipe isn’t just a crowd-pleaser—it’s a stress-reliever disguised as a party treat. Here’s why it quickly became a staple in my celebration repertoire:
- Quick & Easy: You can whip up a batch in under 30 minutes, which is perfect when you’re balancing all the other party prep chaos.
- Simple Ingredients: No fancy baking skills or rare items needed. Fresh strawberries, chocolate, and a few pantry staples are all it takes.
- Perfect for Graduations & Parties: Whether it’s a backyard barbecue or a formal ceremony, these strawberries add a festive touch without fuss.
- Crowd-Pleaser: Kids and adults alike can’t get enough of these—especially when the chocolate hits just right with the juicy berries.
- Unbelievably Delicious: The bittersweet chocolate coating complements the natural sweetness of the strawberries, while the little graduation caps add that fun, celebratory vibe.
What sets this recipe apart? The little details, honestly. I’ve found that dipping the strawberries twice—once for a smooth base and again to carefully shape the cap—makes all the difference. Plus, using square-shaped chocolate pieces and a tiny piped tassel turns the strawberries into mini works of art without complicated steps or sculpting. It’s not just a treat; it’s a keepsake from the party that everyone remembers.
Plus, I like that these don’t require any baking, so they’re perfect for hot summer days when you don’t want to heat up the kitchen. No stress, just sweet, festive fun that you can feel good about sharing.
What Ingredients You Will Need
This recipe uses simple, wholesome ingredients to deliver bold flavor and a festive look without the fuss. Most of these are pantry staples or easy finds at your local grocery store.
- Fresh Strawberries: Choose firm, ripe strawberries with the green tops still attached. Medium to large size works best for decorating the caps.
- Dark or Semi-Sweet Chocolate Chips or Melting Wafers (about 8 oz / 225g): I prefer Ghirardelli or Guittard for smooth melting and rich flavor.
- White Chocolate Chips or Candy Melts (about 2 oz / 55g): Used for piping the tassel and fine details. You can swap with dairy-free melts if needed.
- Square-Shaped Chocolate Pieces or Almond Bark Squares (optional but recommended): These make creating the mortarboard cap shape easier—look for baking supply brands or specialty chocolates.
- Edible Gold or Yellow Sprinkles (optional): For a little tassel sparkle or cap decoration, especially fun for graduation themes.
- Wooden Skewers or Toothpicks: Handy for dipping and creating small details.
- Cooking Spray or Parchment Paper: For prepping your workspace and preventing sticking.
Seasonal tip: If strawberries aren’t at their peak, frozen and thawed berries can work in a pinch, but fresh firm ones hold up best. For a gluten-free twist, all these ingredients are naturally gluten-free, but double-check your chocolate brands if necessary. You can also experiment swapping white chocolate for colored candy melts to match school colors.
Equipment Needed
- Microwave-Safe Bowls: For melting chocolate quickly and evenly. Glass or ceramic works best.
- Baking Sheet or Tray: Lined with parchment paper to place dipped strawberries for setting.
- Piping Bag or Small Plastic Sandwich Bag: For piping the tassel and fine details. If you don’t have one, a small zip-top bag with a tiny corner snipped off works just fine.
- Spatula or Spoon: For stirring melted chocolate and coating strawberries smoothly.
- Cooling Rack (optional): Can help with setting the chocolate faster and evenly.
If you don’t have specialized square-shaped chocolate, no worries—just cut small squares from a chocolate bar or use almond bark sheets. I’ve found that using a simple microwave method for melting chocolate maintains a smooth texture, but a double boiler works great if you want to be extra cautious. For budget-friendly options, store-brand chocolate chips melt just as well, though the flavor might be a touch less rich. Just avoid pre-melted chocolate syrups—they don’t set the same way!
Preparation Method
- Wash and Dry Strawberries (10 minutes): Gently rinse your strawberries under cold water and pat dry completely with paper towels. The drier the berries, the better the chocolate will stick. Any moisture can cause the chocolate to seize or slide off.
- Melt the Dark or Semi-Sweet Chocolate (3-5 minutes): Place about 6 oz (170g) of chocolate chips or wafers in a microwave-safe bowl. Heat in 30-second intervals, stirring well between each, until smooth and glossy. Avoid overheating, or the chocolate will become grainy.
- Dip Strawberries for Base Coat (15 minutes): Holding the strawberry by the green top, dip it into the melted chocolate, swirling to cover about 2/3 of the berry. Let the excess drip off gently—too much chocolate can make the cap look bulky. Place each dipped strawberry on parchment-lined baking sheet. Chill in fridge for 10 minutes to set the base coat firmly.
- Prepare the Mortarboard Caps (10 minutes): While berries chill, melt the remaining 2 oz (55g) of dark chocolate or use almond bark squares. If using square chocolate pieces, gently melt just enough to soften them so you can stick them on top of dipped strawberries. Carefully press one square on each berry, slightly angled to mimic a graduation cap.
- Pipe the Tassels (10 minutes): Melt white chocolate chips or candy melts in a small bowl. Transfer to a piping bag or plastic sandwich bag with a tiny corner cut. Pipe a short line from the center of the square cap downwards, then add a little loop or squiggle at the end to resemble a tassel. If you want, sprinkle a few edible gold sprinkles on the tassel for a festive pop.
- Set and Serve (15 minutes): Return strawberries to the fridge for at least 15 minutes until the caps and tassels are fully set and firm. Serve chilled for the best texture and look. These are best enjoyed within 24 hours for freshness.
Quick tip: If the chocolate starts to harden while dipping, gently warm it again in short bursts. Also, don’t rush the drying process—letting the chocolate set properly keeps everything neat and prevents smudging. I like to line up the berries on a baking sheet so I can work systematically without feeling rushed.
Cooking Tips & Techniques
Chocolate covered strawberries might seem straightforward, but a few tricks make all the difference between a treat and a mess.
- Use Room Temperature Strawberries: Cold berries can cause condensation that messes with the chocolate’s texture. Let them sit out for 15 minutes before dipping.
- Dry Thoroughly: This can’t be stressed enough. Even a tiny bit of water ruins the chocolate coating.
- Double Dip for Richness: For a thicker chocolate shell, dip the strawberries twice. Let the first layer set before adding the second.
- Keep Chocolate Smooth: Stir frequently while melting. If chocolate gets grainy, a little vegetable oil can help smooth it—but don’t add too much or it won’t harden properly.
- Practice Piping on Parchment First: If you’re nervous about the tassels, try piping on parchment paper to get a feel before decorating the strawberries.
- Work Quickly: Chocolate hardens fast as it cools, so have your dipping and decorating station ready to go.
- Storage Matters: Chill strawberries in a single layer to avoid sticking, and bring to room temperature before serving for fullest flavor.
I once tried skipping the tassel detail because I was in a hurry, and the strawberries felt way less festive. Trust me, those little touches pay off. And if you want a quick win on presentation, pairing these with a simple fruit platter or alongside a batch of strawberry lemonade icebox cake makes a beautiful combo for any grad party.
Variations & Adaptations
One of the best things about this recipe is how easy it is to customize for different tastes and dietary needs.
- White Chocolate Caps: Swap dark chocolate for white chocolate caps and use colored candy melts to match your school colors. Piping the tassels in contrasting colors makes them pop.
- Nut-Free Version: Use allergy-friendly chocolate brands and skip any nut-based toppings if you’re serving to sensitive guests.
- Vegan or Dairy-Free: Substitute with vegan chocolate chips and dairy-free white melts. Make sure to check labels for gelatin or milk additives.
- Mini Strawberry Caps: For smaller bites, use mini strawberries and smaller chocolate squares or cut regular chocolate bars into tinier pieces.
- Fruit Mix Up: Add other fruits like blackberries or raspberries dipped in chocolate as complementary treats on your party table.
Personally, I tried adding a drizzle of salted caramel on some caps for a sweet-salty twist, and it was a hit. Also, for a fun twist, you can swap out the traditional tassel for a tiny edible flower or sprinkle cluster. If you want to serve something savory alongside, the cozy stuffed pork chops with easy cornbread sage dressing make a fantastic main dish to pair with these elegant treats.
Serving & Storage Suggestions
These easy graduation cap chocolate covered strawberries are best served chilled but not icy cold—about 10-15 minutes at room temperature brings out the strawberry’s juiciness and chocolate’s richness. Arrange them on a nice platter or tiered tray to showcase the caps and tassels. They’re perfect finger foods for mingling guests or an elegant dessert table addition.
Pair the strawberries with light, refreshing beverages like sparkling water with lemon or a fruity punch. If you’re hosting a full meal, these make a lovely sweet finish following dishes like the easy juicy turkey meatballs in marinara. The fresh fruit balances savory flavors beautifully.
For storage, keep them in a single layer in an airtight container in the refrigerator. Avoid stacking to prevent caps from cracking or melting. They’ll keep well for 24-48 hours, but strawberries tend to release moisture over time, so sooner is better. To reheat slightly, let them sit at room temperature for 10 minutes before serving to soften the chocolate without melting.
Flavors mellow and blend a bit after a few hours, making the chocolate and berry combo even more harmonious. Just don’t wait too long or the strawberries lose their firm texture.
Nutritional Information & Benefits
One of the joys of these chocolate covered strawberries is that they feel indulgent but are actually pretty light. A single serving (about 3 strawberries) typically contains roughly:
| Nutrient | Amount |
|---|---|
| Calories | 150-180 kcal |
| Fat | 9-12 g |
| Sugar | 15-20 g (mainly from fruit and chocolate) |
| Fiber | 2-3 g (from strawberries) |
Strawberries are rich in vitamin C and antioxidants, which support immune health, while dark chocolate contains flavonoids that may promote heart health when enjoyed in moderation. For those on gluten-free or low-carb diets, this recipe can be adapted easily by choosing appropriate chocolate brands and limiting added toppings. Just be mindful of potential nut allergens if using almond bark or sprinkles.
From a wellness perspective, these treats satisfy sweet cravings with real fruit and less processed sugar than typical desserts. They remind me that celebrations can be joyful and balanced, with homemade touches that nourish the soul as well as the palate.
Conclusion
This easy graduation cap chocolate covered strawberries tutorial proves that festive treats don’t have to be complicated or time-consuming. Whether you’re hosting a party, looking for a fun baking project with kids, or just wanting a sweet reminder to celebrate life’s milestones, these strawberries hit the spot.
I love this recipe because it feels personal, playful, and achievable—plus, it’s saved me more than once when I needed a last-minute dessert that looks like I spent way more time on it than I actually did. Feel free to tweak the colors, chocolate types, or even add your own decorations to make it uniquely yours.
Give these a try and let me know how your graduation party turns out! If you want more easy, crowd-pleasing ideas, you might enjoy my crispy air fryer bone-in pork chops for a quick main or the creamy spinach artichoke dip stuffed bread bowl for a cozy appetizer. Happy celebrating!
FAQs About Easy Graduation Cap Chocolate Covered Strawberries
How long can I store chocolate covered strawberries?
Store them in the fridge in a single layer for up to 48 hours. They’re best eaten within 1-2 days for freshness and texture.
Can I use other berries for this recipe?
Absolutely! Blackberries, raspberries, or even grapes can be dipped and decorated, though strawberries work best for the cap shape.
What’s the easiest way to melt chocolate without burning it?
Microwave in 30-second bursts, stirring well in between, or use a double boiler for gentle, even heating.
Can I make these ahead of time for a party?
You can prep them a day ahead and keep refrigerated. Avoid making more than 48 hours in advance to maintain berry freshness.
How do I pipe the tassels neatly if I’m new to decorating?
Practice on parchment paper first to get comfortable. Use a piping bag or a small plastic bag with a tiny corner cut, and don’t rush—steady pressure is key.
Pin This Recipe!
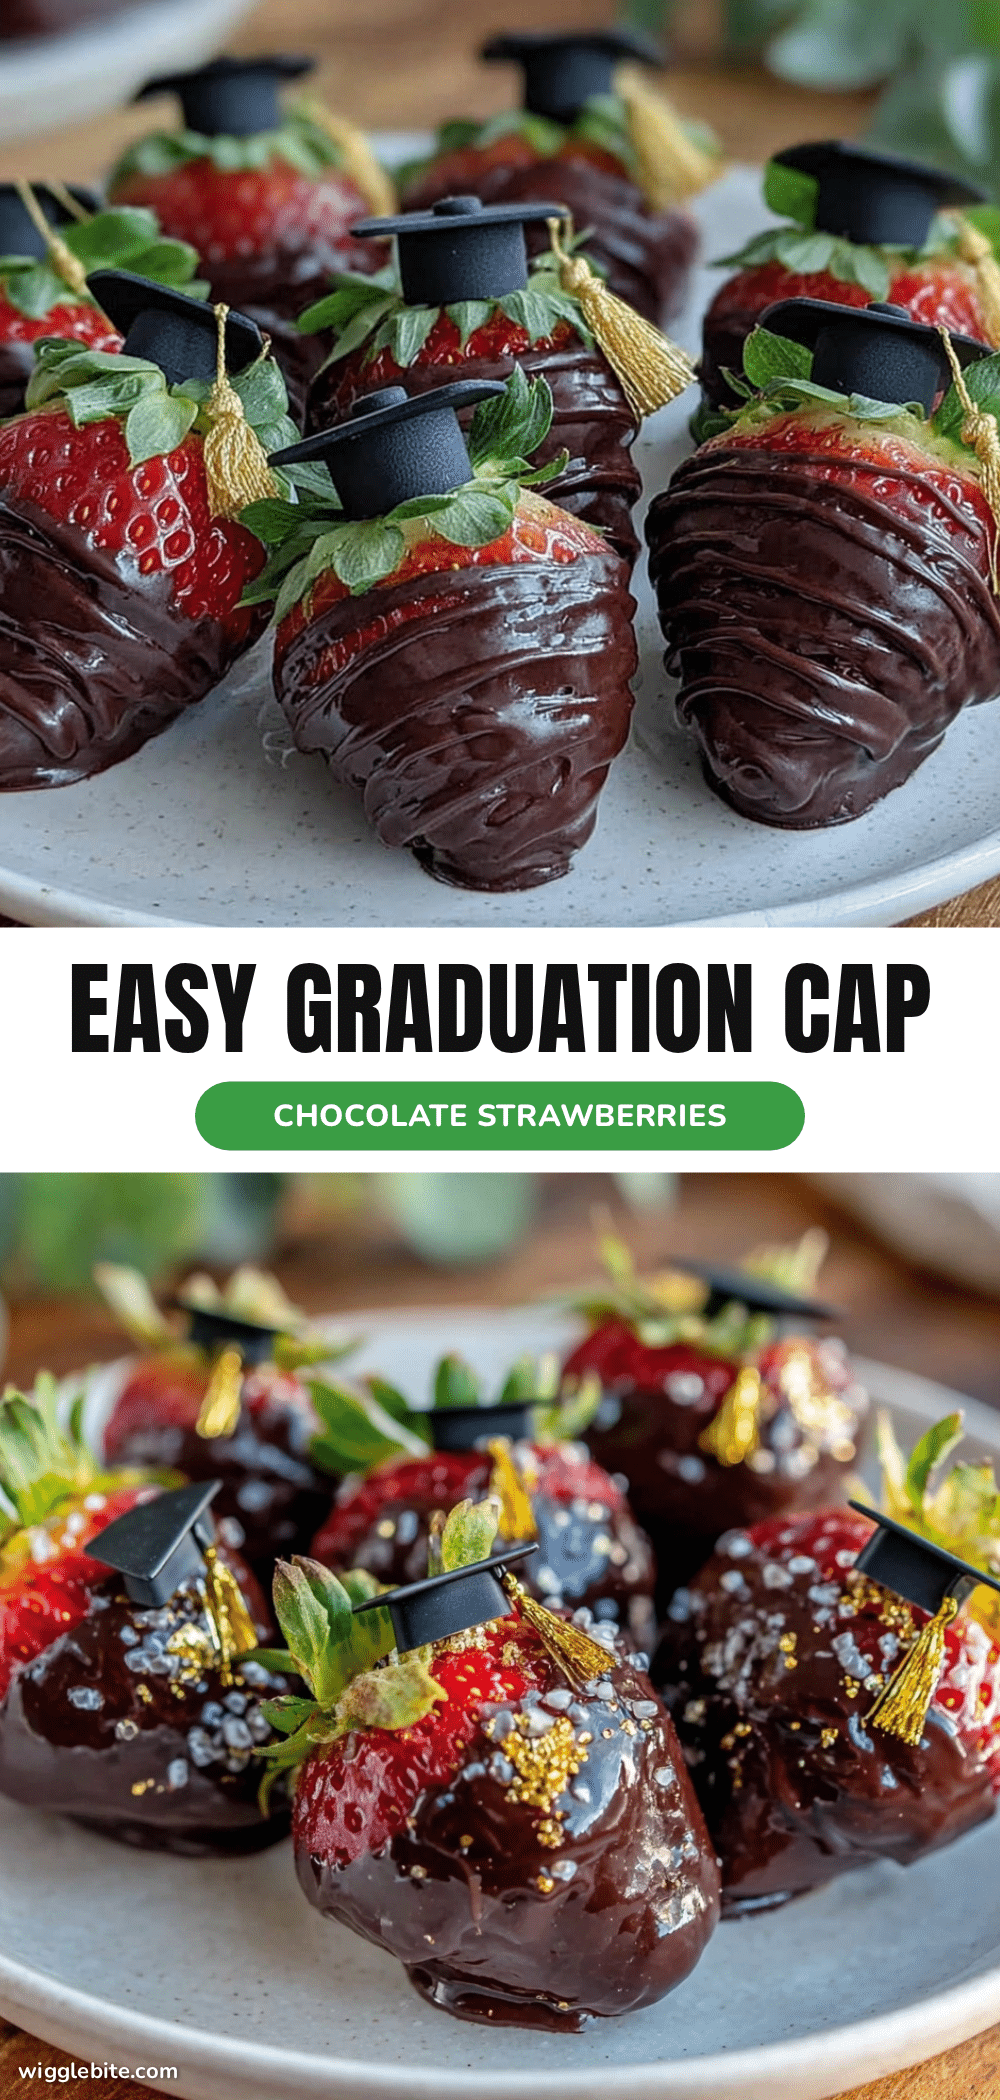
Easy Graduation Cap Chocolate Covered Strawberries

A quick and festive treat featuring fresh strawberries dipped in bittersweet chocolate, decorated with chocolate mortarboard caps and piped tassels, perfect for graduation parties and celebrations.
- Prep Time: 15 minutes
- Cook Time: 15 minutes
- Total Time: 30 minutes
- Yield: 12 servings (about 3 strawberries per serving) 1x
- Category: Dessert
- Cuisine: American
Ingredients
- Fresh strawberries with green tops attached (medium to large size)
- 8 oz (225g) dark or semi-sweet chocolate chips or melting wafers
- 2 oz (55g) white chocolate chips or candy melts
- Square-shaped chocolate pieces or almond bark squares (optional but recommended)
- Edible gold or yellow sprinkles (optional)
- Wooden skewers or toothpicks
- Cooking spray or parchment paper
Instructions
- Wash and dry strawberries thoroughly (about 10 minutes).
- Melt 6 oz (170g) of dark or semi-sweet chocolate chips in a microwave-safe bowl in 30-second intervals, stirring until smooth (3-5 minutes).
- Dip strawberries by holding the green top and swirling in melted chocolate to cover about 2/3 of the berry. Let excess drip off and place on parchment-lined baking sheet. Chill in fridge for 10 minutes to set.
- Melt remaining 2 oz (55g) of dark chocolate or soften almond bark squares. Press one square on top of each dipped strawberry at a slight angle to mimic a graduation cap (10 minutes).
- Melt white chocolate chips or candy melts and transfer to a piping bag or small plastic bag with a tiny corner cut. Pipe a short line from the center of the square cap downwards and add a loop or squiggle to resemble a tassel. Optionally, sprinkle edible gold sprinkles on tassels (10 minutes).
- Return strawberries to fridge for at least 15 minutes until caps and tassels are fully set and firm.
- Serve chilled within 24 hours for best freshness.
Notes
Use room temperature strawberries and dry thoroughly to prevent chocolate from seizing. Double dip for a thicker chocolate shell. Practice piping tassels on parchment paper before decorating. Store in a single layer in an airtight container in the fridge and serve within 1-2 days for best texture and freshness. Rewarm chocolate gently if it hardens during dipping.
Nutrition
- Serving Size: 3 strawberries
- Calories: 150180
- Sugar: 1520
- Fat: 912
- Fiber: 23
Keywords: chocolate covered strawberries, graduation party treats, easy dessert, festive treats, no bake dessert, party snacks