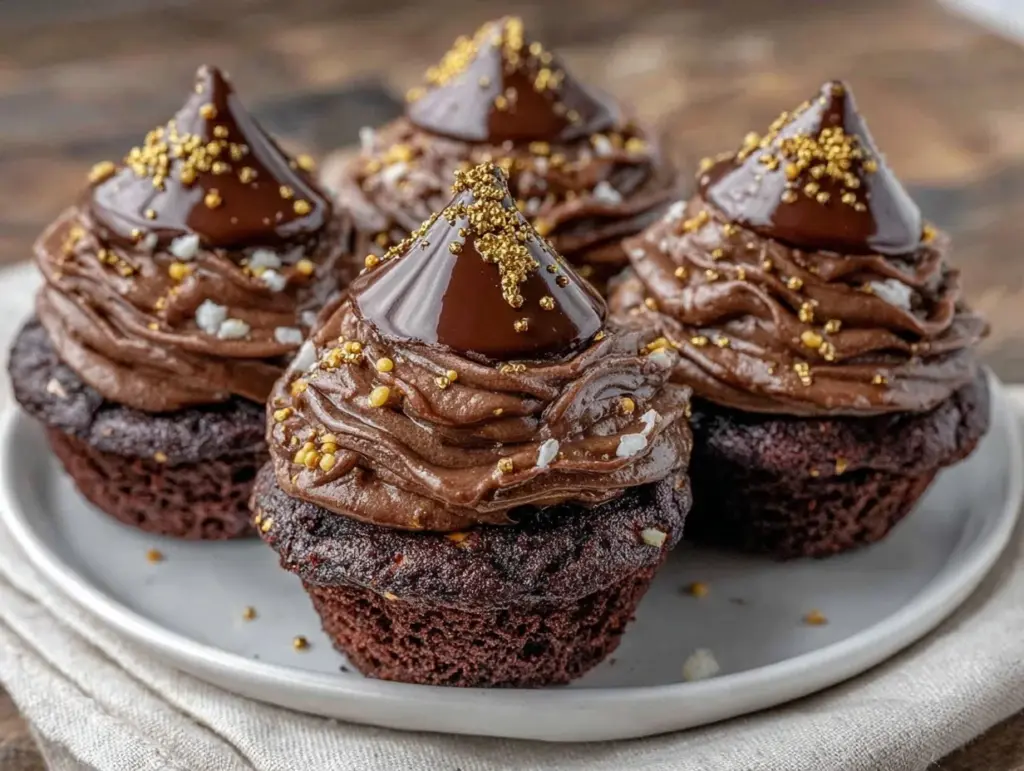
“I never expected baking cupcakes to turn into a mini art project,” my neighbor chuckled as she handed me a perfectly decorated chocolate cupcake shimmering with gold dust. It was the Saturday before my niece’s graduation party, and I was scrambling to find a dessert that felt special but not overly complicated. That’s when she shared her secret for these perfect gold-dusted chocolate graduation cap cupcakes.
Honestly, I was skeptical at first. Graduation caps? Edible gold dust? It all sounded a bit extra for a backyard celebration, but let me tell you—the magic was real. The moment I bit into one, the rich chocolate flavor paired with the subtle golden shimmer felt like a celebration on my tongue. You know that feeling when a recipe surprises you by being both elegant and easy? That’s exactly what happened here.
There was a tiny mishap when I forgot to set the timer and nearly overbaked the cupcakes, but hey, nobody’s perfect in the kitchen! Maybe you’ve been there—rushing, multitasking, and hoping for the best. Still, these cupcakes held up beautifully, and the gold dust made the whole batch look like they belonged in a fancy bakery window.
Since that day, these chocolate graduation cap cupcakes have become my go-to for any party that calls for a touch of class without the fuss. They bring that perfect balance of fun, flavor, and a little sparkle that makes any celebration feel extra special.
Why You’ll Love This Recipe
If you’re on the hunt for a crowd-pleaser that’s as visually stunning as it is delicious, this recipe nails it. I’ve tested these cupcakes multiple times—sometimes with a rushed schedule, other times with the luxury of calm prep—and they never fail to impress. Here’s why these gold-dusted chocolate graduation cap cupcakes should be your party staple:
- Quick & Easy: Ready in under an hour, including decorating time. Perfect when you’re juggling last-minute party plans.
- Simple Ingredients: No exotic pantry hunts here. Basic baking staples create a rich chocolate base with a touch of glam.
- Perfect for Graduation Parties: The cap design and gold dust scream celebration, making them ideal for marking milestone moments.
- Crowd-Pleaser: Adults and kids alike rave about the moist texture and balanced sweetness—no one can resist grabbing seconds.
- Unbelievably Delicious: The deep chocolate flavor paired with a subtle hint of vanilla and the shimmer of gold dust creates a memorable bite.
What sets this recipe apart is the fuss-free way it achieves that “wow” factor. The gold dust isn’t just for looks—it adds a delicate, edible sparkle that turns ordinary cupcakes into party showstoppers. Plus, the handmade graduation caps are surprisingly simple to craft once you get the hang of it.
This isn’t just dessert; it’s a celebration in every bite. Whether you’re a seasoned baker or a kitchen novice, these cupcakes will make you feel like a pro at your next graduation bash.
What Ingredients You Will Need
This recipe uses straightforward, wholesome ingredients to deliver that rich chocolate flavor with a hint of vanilla and a festive touch. Most are pantry staples, and you can find them easily at any grocery store. Here’s what you’ll need:
- For the Cupcakes:
- All-purpose flour – 1 ½ cups (180g)
- Granulated sugar – 1 cup (200g)
- Unsweetened cocoa powder – ⅓ cup (35g), sifted (I trust Hershey’s for consistent flavor)
- Baking powder – 1 teaspoon
- Baking soda – ½ teaspoon
- Salt – ¼ teaspoon
- Large eggs – 2, room temperature
- Whole milk – ½ cup (120ml), room temperature (use any milk you prefer)
- Vegetable oil – ⅓ cup (80ml)
- Vanilla extract – 1 teaspoon
- Boiling water – ½ cup (120ml)
- For the Frosting:
- Unsalted butter – ½ cup (115g), softened
- Powdered sugar – 2 cups (240g), sifted
- Unsweetened cocoa powder – ¼ cup (25g)
- Heavy cream – 2 tablespoons (30ml), plus more if needed
- Vanilla extract – 1 teaspoon
- Pinch of salt
- For Decoration:
- Black fondant – about 8 ounces (225g) (Wilton brand works well for beginners)
- Edible gold dust – 1 teaspoon (available at specialty baking stores or online)
- Toothpicks or thin skewers – for the tassel
If you want to keep things gluten-free, swapping the all-purpose flour for a gluten-free blend works fine. For dairy-free options, coconut or almond milk can replace whole milk, and vegan butter substitutes happily take the place of unsalted butter.
Equipment Needed
- Standard 12-cup muffin tin (non-stick preferred but lined with paper cups works too)
- Mixing bowls (medium and large sizes)
- Electric mixer or hand whisk (an electric mixer speeds up frosting prep but whisking by hand is doable)
- Sifter or fine mesh sieve (for cocoa and powdered sugar)
- Spatula for folding ingredients
- Rolling pin (for shaping the fondant caps)
- Sharp knife or pizza cutter (to cut fondant squares)
- Pastry brush (for applying edible gold dust)
If you don’t have a pastry brush, a clean, soft paintbrush works in a pinch—just keep it food-safe! When it comes to fondant, I recommend storing it tightly wrapped when not in use to keep it from drying out. For a budget-friendly option, you can skip the fondant and use black chocolate discs or large candy wafers, though shaping the caps will be less precise.
Preparation Method
- Preheat your oven to 350°F (175°C). Line your muffin tin with cupcake liners to prevent sticking. This usually takes about 5 minutes.
- Mix the dry ingredients: In a large bowl, sift together 1 ½ cups flour, ⅓ cup cocoa powder, 1 teaspoon baking powder, ½ teaspoon baking soda, and ¼ teaspoon salt. Give it a quick whisk to combine evenly. This step ensures a smooth batter without lumps.
- Combine wet ingredients: In another bowl, beat 2 eggs with 1 cup granulated sugar until pale and fluffy, about 2-3 minutes. Then add ½ cup whole milk, ⅓ cup vegetable oil, and 1 teaspoon vanilla extract. Mix gently until smooth.
- Incorporate dry into wet: Slowly add the dry ingredients to the wet mixture while stirring with a spatula. Don’t overmix—stir just until combined. The batter will be thick but smooth.
- Add hot water: Carefully pour in ½ cup boiling water and stir gently. The batter will thin out; this step makes the cupcakes beautifully moist. Be cautious not to splash—the hot water can surprise you!
- Fill the cupcake liners: Using a spoon or scoop, fill each liner about two-thirds full. This gives the cupcakes room to rise without overflowing. I usually get exactly 12 cupcakes from this batter.
- Bake: Place the tray in the oven and bake for 18-22 minutes. Check at 18 minutes by inserting a toothpick—it should come out clean or with a few moist crumbs. Overbaking will dry them out, so keep an eye!
- Cool completely: Let the cupcakes rest in the pan for 5 minutes, then transfer to a wire rack to cool fully. Patience here is key; frosting melts if the cupcakes are warm.
- Prepare the frosting: Beat ½ cup softened butter until creamy. Sift in 2 cups powdered sugar and ¼ cup cocoa powder gradually, mixing on low speed. Add 2 tablespoons heavy cream, 1 teaspoon vanilla, and a pinch of salt. Beat on high until fluffy, about 3 minutes. If frosting is too thick, add a splash more cream.
- Frost the cupcakes: Use a piping bag or spatula to apply a generous swirl of chocolate frosting on each cupcake. The smooth, rich frosting pairs perfectly with the moist cake.
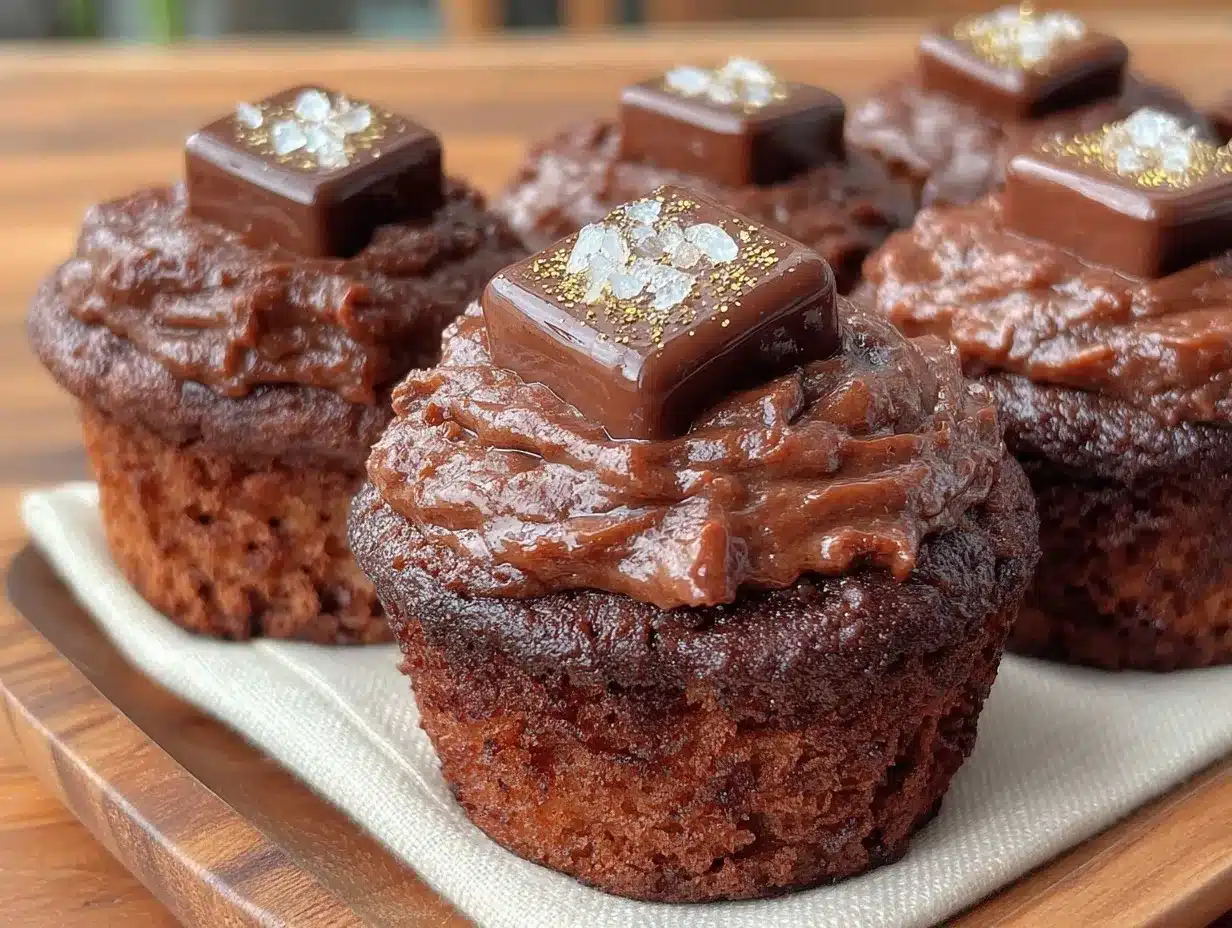
- Make the graduation caps: Roll out the black fondant to about ⅛ inch (3mm) thick. Cut into 2-inch (5cm) squares for the cap tops. For the cap base, roll small balls of fondant and flatten slightly to sit atop the frosting.
- Assemble the caps: Place the fondant square atop the flattened ball, gently pressing so they stick together. Insert a toothpick through the center to hold the pieces in place. Create a tassel by twisting a thin strip of fondant or thread a small piece of edible gold string around the toothpick.
- Dust with gold: Using a soft pastry brush, lightly apply edible gold dust over the fondant caps. This step adds that signature sparkle and elegance. Be gentle—you want a subtle shimmer, not a heavy coating.
- Final touches: Carefully position each graduation cap on top of the frosted cupcakes. Refrigerate for 10 minutes to set the fondant before serving.
Pro tip: If you’ve never worked with fondant, practice rolling and cutting a few test squares. It’s forgiving once you get the hang of the thickness and handling. Also, don’t rush the gold dusting—it looks best with a light, even layer.
Cooking Tips & Techniques
Working with chocolate cupcakes and fondant can be tricky, but a few tricks make all the difference. First off, always sift your cocoa powder and powdered sugar—no one wants gritty frosting or lumpy batter. I learned this the hard way the first time I rushed!
When mixing the batter, be gentle. Overmixing develops gluten, which can make cupcakes tough instead of tender. You want a light, airy crumb that melts in your mouth.
Timing is crucial in baking chocolate cupcakes. I recommend setting a timer and checking early. Ovens vary, so don’t wait for the full 22 minutes if they’re already done at 18. A toothpick test is your best friend here.
For the frosting, temperature matters. Use room temperature butter so it creams easily without lumps. If your frosting feels runny, chill it briefly—too soft and the caps won’t sit steady.
Dealing with fondant? Keep your hands dry and dust your surface lightly with powdered sugar or cornstarch to prevent sticking. Roll the fondant evenly, and don’t hesitate to trim edges if they’re uneven.
Applying edible gold dust requires a light touch—too much and it looks cakey rather than elegant. Use a small, soft brush and build up layers gradually.
Finally, multitasking tip: While cupcakes bake and cool, prepare the frosting and fondant caps. This saves time and keeps everything fresh when it’s assembly time.
Variations & Adaptations
This recipe can bend to your needs with a few simple tweaks. Here are some ideas to make it your own:
- Flavor Swap: Try swapping cocoa powder for espresso powder for a mocha twist that pairs beautifully with the gold dust.
- Diet-Friendly: Use almond flour and dairy-free milk plus vegan butter for gluten-free and vegan cupcakes that still taste indulgent.
- Decoration Alternatives: Instead of fondant, pipe black buttercream caps and sprinkle gold sugar crystals. It’s a bit messier but no less festive.
- Seasonal Twist: Add a teaspoon of cinnamon or pumpkin spice to the batter for a warm, cozy flavor perfect for fall graduations.
- Personalized Caps: Write graduate’s initials on the fondant squares with edible gold pens for a custom touch.
One time, I swapped the black fondant for deep navy blue to match a school’s colors, dusted with silver instead of gold—still got rave reviews! Don’t be afraid to experiment; the base recipe is forgiving and versatile.
Serving & Storage Suggestions
Serve these cupcakes at room temperature to enjoy the full chocolate flavor and creamy frosting texture. They look stunning on a tiered dessert stand or arranged with fresh flowers for a graduation party centerpiece.
Pair them with sparkling lemonade, rich coffee, or even a light red wine for adult guests. The gold shimmer plays nicely with drinks that have a touch of sparkle themselves.
Store leftovers in an airtight container at room temperature for up to 2 days. If your kitchen is warm, refrigerate but bring to room temperature before serving to soften the frosting.
For longer storage, freeze unfrosted cupcakes in a zip-top bag for up to 3 months. Thaw overnight in the fridge and frost just before serving. As for decorated cupcakes, freezing can dull the gold dust and affect fondant texture, so it’s best to enjoy fresh.
Flavors tend to deepen after a day, so if you can wait, they taste even better the next day. Just keep them covered to prevent drying out.
Nutritional Information & Benefits
Each chocolate graduation cap cupcake contains approximately 280 calories, 14g fat, 35g carbohydrates, and 3g protein. While they’re a treat, the cocoa powder adds antioxidants, and the dark chocolate flavor can satisfy sweet cravings with less sugar than some other desserts.
Using real butter and whole milk contributes to a richer flavor and texture, but you can swap for lighter alternatives if you want to reduce fat content.
Gluten-free and vegan adaptations make this recipe accessible to many dietary needs without sacrificing taste. Just watch out for the edible gold dust ingredients if allergies are a concern, as some may contain trace metals or additives.
From my wellness perspective, treats like these are about joy and celebration—enjoy in moderation and savor the moments they mark.
Conclusion
There’s something truly special about these perfect gold-dusted chocolate graduation cap cupcakes. They combine rich, moist chocolate cake with creamy frosting and a touch of edible sparkle that turns simple cupcakes into a celebration centerpiece. The best part? They’re surprisingly easy to make, even if you’re juggling a busy schedule or last-minute party prep.
Feel free to customize the colors, flavors, or decorations to make them your own. I love how these cupcakes bring a little extra joy and elegance to graduation day, creating memories that taste as good as they look.
Why not give them a try for your next celebration? Drop a comment below if you have any questions, share your own decorating tips, or let me know how your cupcakes turned out—I’d love to hear your stories!
Happy baking and congratulations to all the graduates out there!
FAQs
Can I make these cupcakes ahead of time?
Yes! Bake the cupcakes a day or two ahead, store them in an airtight container, and frost just before serving for the freshest taste.
What if I don’t have edible gold dust?
You can skip the gold dust or substitute with gold-colored sprinkles or edible glitter for a similar festive look.
Is it okay to use store-bought frosting?
Absolutely! While homemade frosting tastes best, store-bought chocolate frosting can save time and still taste great.
How do I keep the fondant caps from drying out?
Keep fondant wrapped tightly in plastic wrap when not in use and assemble the caps shortly before serving to maintain softness.
Can I use this recipe for other occasions?
Definitely! Swap the decoration for different themes—birthday hats, holiday motifs—and you have a versatile chocolate cupcake base.
Pin This Recipe!
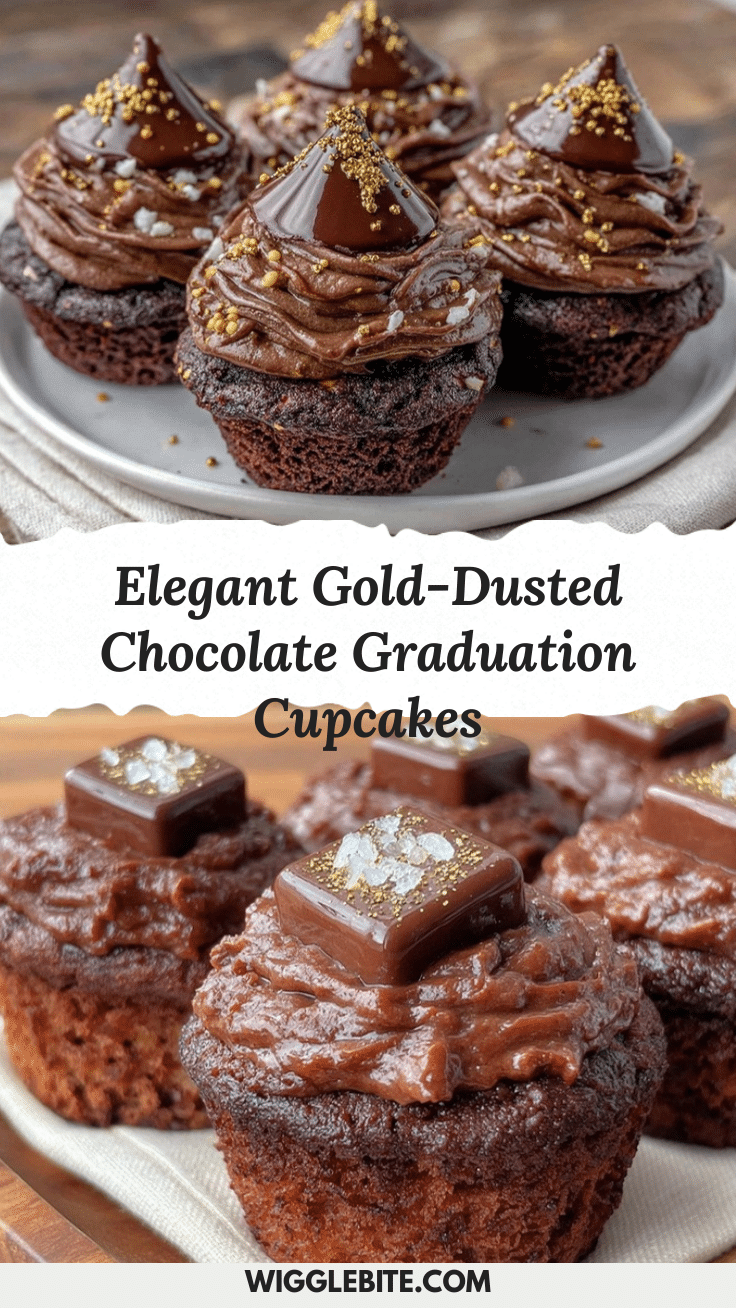
Perfect Gold-Dusted Chocolate Graduation Cap Cupcakes
Rich, moist chocolate cupcakes topped with creamy chocolate frosting and edible gold-dusted fondant graduation caps, perfect for graduation parties and celebrations.
- Prep Time: 20 minutes
- Cook Time: 22 minutes
- Total Time: 42 minutes
- Yield: 12 cupcakes
- Category: Dessert
- Cuisine: American
Ingredients
- All-purpose flour – 1 ½ cups (180g)
- Granulated sugar – 1 cup (200g)
- Unsweetened cocoa powder – ⅓ cup (35g), sifted
- Baking powder – 1 teaspoon
- Baking soda – ½ teaspoon
- Salt – ¼ teaspoon
- Large eggs – 2, room temperature
- Whole milk – ½ cup (120ml), room temperature
- Vegetable oil – ⅓ cup (80ml)
- Vanilla extract – 1 teaspoon
- Boiling water – ½ cup (120ml)
- Unsalted butter – ½ cup (115g), softened
- Powdered sugar – 2 cups (240g), sifted
- Unsweetened cocoa powder – ¼ cup (25g)
- Heavy cream – 2 tablespoons (30ml), plus more if needed
- Vanilla extract – 1 teaspoon
- Pinch of salt
- Black fondant – about 8 ounces (225g)
- Edible gold dust – 1 teaspoon
- Toothpicks or thin skewers – for the tassel
Instructions
- Preheat your oven to 350°F (175°C). Line your muffin tin with cupcake liners.
- In a large bowl, sift together 1 ½ cups flour, ⅓ cup cocoa powder, 1 teaspoon baking powder, ½ teaspoon baking soda, and ¼ teaspoon salt. Whisk to combine.
- In another bowl, beat 2 eggs with 1 cup granulated sugar until pale and fluffy, about 2-3 minutes. Add ½ cup whole milk, ⅓ cup vegetable oil, and 1 teaspoon vanilla extract. Mix gently until smooth.
- Slowly add the dry ingredients to the wet mixture while stirring with a spatula. Stir just until combined.
- Carefully pour in ½ cup boiling water and stir gently to thin the batter.
- Fill each cupcake liner about two-thirds full with batter (makes 12 cupcakes).
- Bake for 18-22 minutes. Check at 18 minutes with a toothpick; it should come out clean or with a few moist crumbs.
- Let cupcakes rest in the pan for 5 minutes, then transfer to a wire rack to cool completely.
- Beat ½ cup softened butter until creamy. Gradually sift in 2 cups powdered sugar and ¼ cup cocoa powder, mixing on low speed.
- Add 2 tablespoons heavy cream, 1 teaspoon vanilla, and a pinch of salt. Beat on high until fluffy, about 3 minutes. Add more cream if frosting is too thick.
- Frost the cooled cupcakes with a piping bag or spatula.
- Roll out black fondant to about ⅛ inch (3mm) thick. Cut into 2-inch (5cm) squares for the cap tops.
- Roll small balls of fondant and flatten slightly for the cap bases.
- Place the fondant square atop the flattened ball and gently press to stick. Insert a toothpick through the center to hold pieces together.
- Create a tassel by twisting a thin strip of fondant or threading a small piece of edible gold string around the toothpick.
- Using a soft pastry brush, lightly dust the fondant caps with edible gold dust.
- Position each graduation cap on top of the frosted cupcakes. Refrigerate for 10 minutes to set the fondant before serving.
Notes
Sift cocoa powder and powdered sugar to avoid lumps. Do not overmix batter to keep cupcakes tender. Use room temperature butter for frosting. Keep fondant wrapped tightly when not in use. Apply gold dust lightly with a soft brush for best effect. Refrigerate cupcakes after decorating to set fondant.
Nutrition
- Serving Size: 1 cupcake
- Calories: 280
- Sugar: 24
- Sodium: 150
- Fat: 14
- Saturated Fat: 7
- Carbohydrates: 35
- Fiber: 3
- Protein: 3
Keywords: chocolate cupcakes, graduation cupcakes, gold dust cupcakes, party dessert, homemade frosting, celebration cupcakes