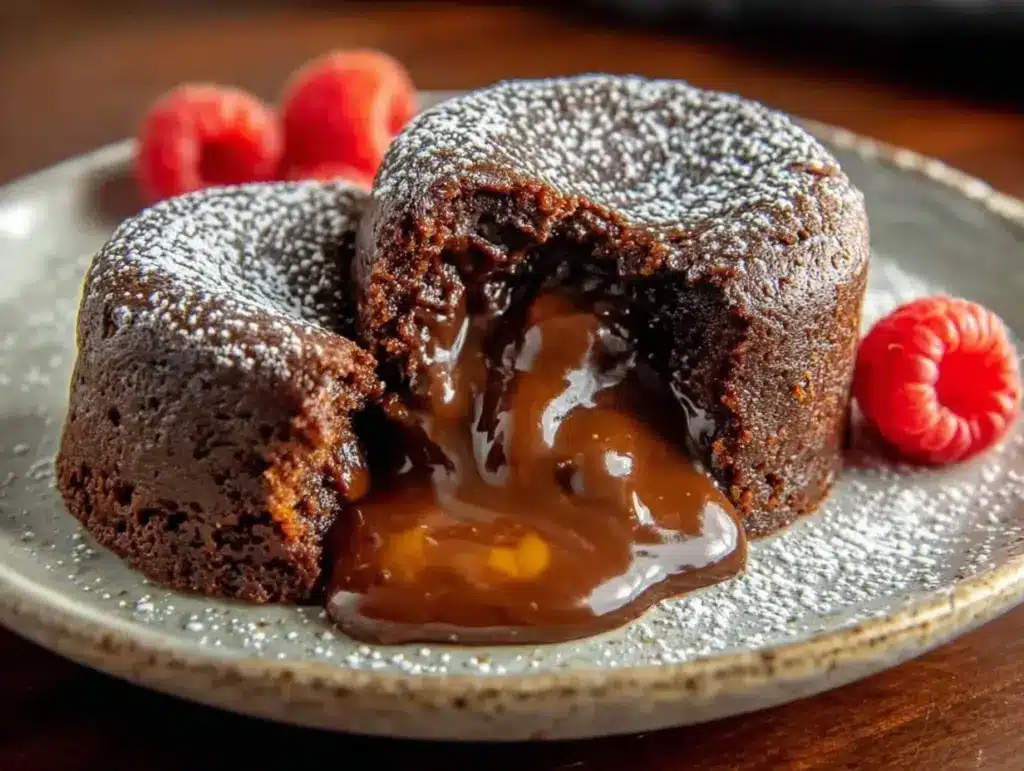
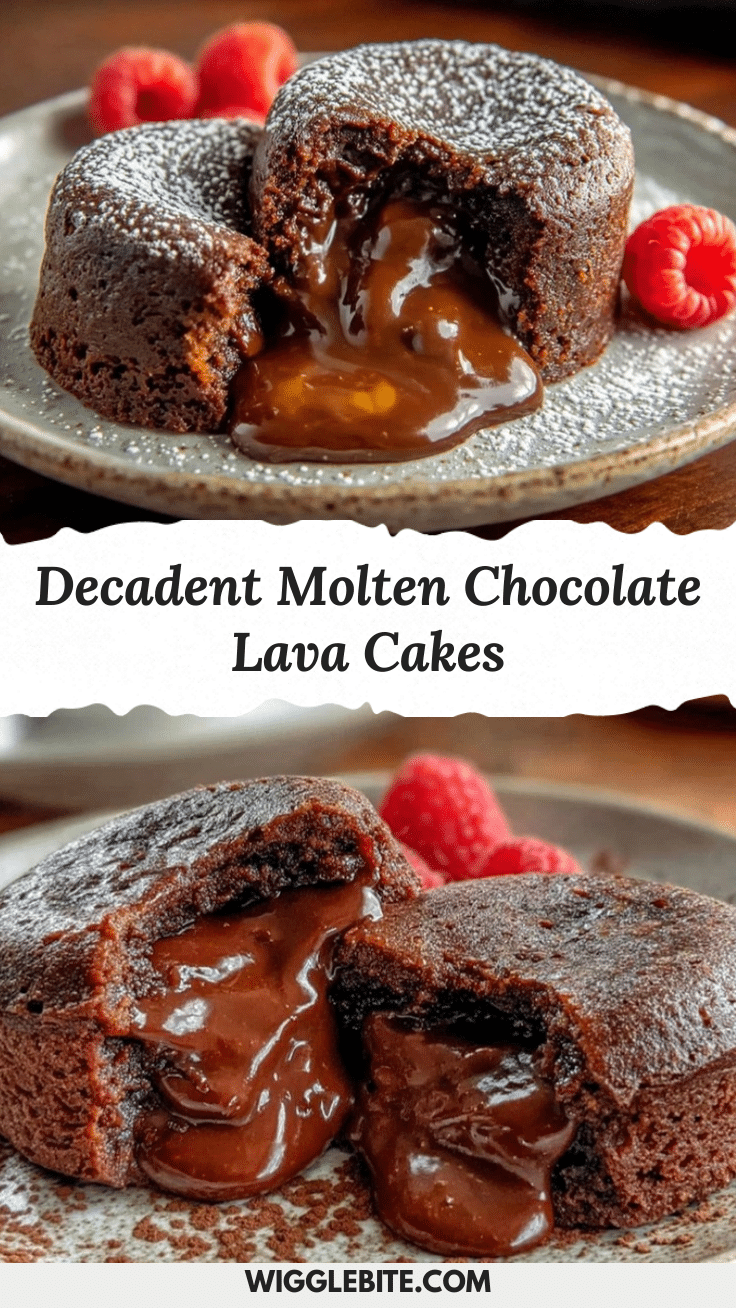
“I wasn’t expecting to learn a thing or two about chocolate lava cakes from my upstairs neighbor, Mrs. Kline—who’s more of a crossword puzzle champion than a baker. But there I was, standing in her cozy kitchen last Friday evening, the clock humming softly, as she whipped up these decadent chocolate lava cakes with molten center magic. Honestly, the moment she slid those little cakes out of the oven and the rich, gooey center oozed out with the first spoonful, I knew this recipe was something special.”
Maybe you’ve been there too—the craving for something sweet but fancy without hours spent in the kitchen. This recipe came to me on a whim, between a cracked mixing bowl and a distracted phone call, yet the results were anything but accidental. The contrast of the slightly crisp cake shell and the molten chocolate heart is just the kind of treat that makes you pause and smile, even on a hectic Tuesday night.
Let me tell you, the texture and warmth of these decadent chocolate lava cakes with molten center have kept me coming back. The best part? It’s not just a dessert; it’s a little moment of indulgence, the kind that feels like a hug in a ramekin. Whether it’s a date night, a last-minute guest surprise, or just because the week needs a pick-me-up, this recipe fits the bill without fuss or fancy ingredients.
Why You’ll Love This Recipe
After testing this decadent chocolate lava cakes recipe countless times (some more successful than others, trust me!), I can say it’s a definite keeper. Here’s why it’s been a favorite in my kitchen:
- Quick & Easy: Ready in under 30 minutes—perfect for when you want a fancy dessert fast.
- Simple Ingredients: No hunting for exotic items; just pantry staples and quality chocolate.
- Perfect for Special Occasions: Great for impressing guests or turning an ordinary night into something memorable.
- Crowd-Pleaser: Kids, adults, chocolate lovers—everyone asks for seconds.
- Unbelievably Delicious: The silky molten center contrasts beautifully with the tender cake exterior.
This recipe isn’t just another chocolate cake; it’s crafted with a secret technique—folding melted chocolate into the batter just right to keep the center irresistibly molten. Plus, the balance of sweetness and deep cocoa flavor means you won’t feel overwhelmed but totally satisfied. Honestly, it’s the kind of dessert you close your eyes for, savoring every bite.
So if you’re after a show-stopping dessert without the stress, this decadent chocolate lava cakes recipe with molten center is your new best friend.
What Ingredients You Will Need
This recipe uses straightforward, wholesome ingredients to create a rich, velvety chocolate lava cake without fuss. Most are pantry staples or easy to find at any grocery store.
- Bittersweet or Semi-sweet Chocolate (6 oz / 170 g): I recommend Ghirardelli or Valrhona for their smooth melt and deep flavor.
- Unsalted Butter (1/2 cup / 115 g): Softened, adds richness and helps create that tender crumb.
- Granulated Sugar (2/3 cup / 135 g): Balances the chocolate bitterness without overpowering.
- Large Eggs (3): Room temperature, for structure and silkiness.
- All-Purpose Flour (1/3 cup / 45 g): Just enough to hold the cake together while keeping it light.
- Vanilla Extract (1 tsp): Adds a subtle warmth to the chocolate profile.
- Salt (a pinch): Enhances all the flavors beautifully.
- Powdered Sugar (optional, for dusting): Because a little snow of sweetness on top never hurts.
If you’re feeling adventurous, you can swap the all-purpose flour for almond flour for a gluten-free twist. For dairy-free, try coconut oil instead of butter, but be ready for a slight flavor shift.
Equipment Needed
- Ramekins or Muffin Tins: Four 6-ounce ramekins work best; nonstick or lightly buttered.
- Mixing Bowls: One medium-sized for batter prep.
- Whisk or Electric Mixer: To blend ingredients smoothly.
- Double Boiler or Microwave-safe Bowl: For melting chocolate and butter gently.
- Spatula: For folding ingredients without overmixing.
- Baking Sheet: To place ramekins on for easy handling in and out of the oven.
If you don’t have ramekins, muffin tins lined with foil cups can be a good alternative. Just keep an eye on baking times since they might vary slightly. I’ve tried silicone molds too, but the cake release isn’t always as clean, so I stick with classic ceramic ramekins.
Preparation Method

- Preheat your oven to 425°F (220°C) and prepare the ramekins. Lightly butter each ramekin and dust with cocoa powder to prevent sticking. This small step saves a lot of frustration when unmolding later. (5 minutes)
- Melt the chocolate and butter. Using a double boiler or microwave, melt the 6 oz (170 g) of chopped bittersweet chocolate with 1/2 cup (115 g) butter. Heat gently in 20-second bursts if microwaving, stirring in between to avoid burning. Once smooth, set aside to cool slightly. (5 minutes)
- Whisk eggs and sugar. In a medium bowl, vigorously whisk together 3 large eggs and 2/3 cup (135 g) granulated sugar until the mixture is pale and thickened—this aerates the batter for a tender texture. (3 minutes)
- Combine chocolate mixture with eggs. Slowly pour the chocolate-butter mixture into the eggs while whisking continuously. This tempers the eggs and prevents scrambling. Add 1 tsp vanilla extract and a pinch of salt here as well. (2 minutes)
- Fold in flour. Sift 1/3 cup (45 g) all-purpose flour over the mixture and gently fold with a spatula until just combined. Don’t overmix—some lumps are okay. The batter should be thick but pourable. (2 minutes)
- Divide batter among ramekins. Pour the batter evenly into the prepared ramekins—about 3/4 full. Place ramekins on a baking sheet for easy transfer. (3 minutes)
- Bake. Place the baking sheet in the preheated oven. Bake for 12-14 minutes. The edges should be set and firm, while the center remains soft and slightly jiggly. Keep a close eye after 12 minutes to avoid overbaking. (12-14 minutes)
- Rest and unmold. Let the cakes cool for 1 minute; then carefully run a knife around the edges and invert onto dessert plates. If they resist, a gentle tap or warm knife helps loosen them. (2 minutes)
- Serve immediately. Dust with powdered sugar or garnish with fresh berries or a scoop of vanilla ice cream for that ultimate indulgence. (Optional)
Pro tip: If your cakes bake unevenly, rotate the baking sheet halfway through. Also, don’t skip the cocoa dusting—it boosts both release and flavor. I once forgot it and spent a good five minutes wrestling a cake free—lesson learned!
Cooking Tips & Techniques
Chocolate lava cakes can be finicky, but a few tricks go a long way:
- Temperature control is key. Make sure chocolate and butter aren’t too hot when mixed with eggs, or you risk scrambling.
- Use room temperature eggs. They whisk up better and create a smoother batter.
- Don’t overbake. The molten center depends on slightly underbaking the cake. When the edges look set but the center jiggles, it’s time to pull them.
- Prep ramekins well. Butter and cocoa powder prevent sticking and add a nice flavor touch.
- Be gentle folding in flour. Overmixing can toughen the cake, ruining that tender crumb.
- Multitasking tip: While the cakes bake, clean your prep area or prepare toppings to make the most of your time.
Honestly, I learned these tips after a few burned edges and too-firm centers. Now, I time everything carefully, and it’s become my go-to quick dessert whenever I want to impress without stress.
Variations & Adaptations
Playing around with this decadent chocolate lava cakes recipe can be fun! Here are a few ideas I’ve tried or thought up:
- Salted Caramel Center: Drop a teaspoon of caramel sauce into the center of the batter before baking for a gooey surprise.
- Raspberry Twist: Add fresh or frozen raspberries on top of batter for a tart contrast to the richness.
- Espresso Infusion: Stir in a teaspoon of instant espresso powder into the batter to deepen chocolate flavor.
- Gluten-Free Version: Swap all-purpose flour with almond flour or a gluten-free blend; baking times may be slightly shorter.
- Dairy-Free Option: Use coconut oil instead of butter and a dairy-free chocolate bar. Texture shifts slightly but still delicious.
One time, I even tried adding a pinch of cayenne pepper for a subtle heat that surprised and delighted my guests. It’s amazing how small tweaks can personalize this dessert.
Serving & Storage Suggestions
Serve these decadent chocolate lava cakes warm—straight from the oven or gently reheated. That molten center is the star, so don’t let them cool completely before serving.
- Presentation: Dust with powdered sugar, add a scoop of vanilla ice cream, or fresh berries for color and freshness.
- Pairings: A cup of strong coffee or a glass of red wine complements the rich chocolate beautifully.
- Storage: These cakes are best eaten immediately but can be stored covered in the refrigerator for up to 2 days.
- Reheating: Warm gently in the microwave for 20-30 seconds to revive the molten center.
- Flavor Development: While the molten center softens with chilling, the cake texture can become denser, so warming is key.
Nutritional Information & Benefits
Each decadent chocolate lava cake contains approximately:
| Calories | 370 kcal |
|---|---|
| Fat | 25 g |
| Saturated Fat | 15 g |
| Carbohydrates | 35 g |
| Sugars | 25 g |
| Protein | 5 g |
Chocolate provides antioxidants, and the eggs contribute protein and essential nutrients. While indulgent, this dessert fits well into a balanced diet when enjoyed in moderation. For those watching gluten, almond flour swaps keep it friendly, and dairy-free options accommodate lactose intolerance.
Personally, I appreciate that this recipe focuses on quality ingredients and straightforward preparation, making it a treat that feels both satisfying and a little special.
Conclusion
These decadent chocolate lava cakes with molten center have earned a permanent spot in my recipe rotation. They manage to be fancy yet accessible, indulgent yet surprisingly quick to throw together. I love how they bring a sense of occasion to any evening, no matter how ordinary the day has been.
Feel free to make this recipe your own—tweak the flavors, try different chocolates, or add your favorite fillings. I’d love to hear how you personalize these little cakes!
So go ahead, treat yourself or your loved ones to this rich, warm delight, and don’t forget to share your experiences and any fun twists you’ve tried. Happy baking and indulgent tasting!
FAQs
Can I prepare these chocolate lava cakes ahead of time?
Yes, you can prepare the batter and fill the ramekins, then refrigerate for up to 24 hours before baking. Just add an extra minute or two to the baking time if baking from cold.
Why did my lava cake not have a molten center?
Most likely, it was overbaked. The key is to remove the cakes when the edges are set but the center still jiggles slightly.
Can I use milk chocolate instead of bittersweet chocolate?
You can, but the cake will be sweeter and less intense in chocolate flavor. Adjust sugar accordingly if you prefer a less sweet dessert.
What if I don’t have ramekins?
Muffin tins lined with foil cups can work, but watch the baking time closely as it may vary. Ramekins provide the best shape and heat distribution.
How do I clean the ramekins after baking?
Soak them in warm water immediately after use to loosen any stuck chocolate. A gentle scrub with a sponge usually does the trick.
Pin This Recipe!
Decadent Chocolate Lava Cakes
Rich and indulgent chocolate lava cakes with a molten center, perfect for a quick and impressive dessert.
- Prep Time: 15 minutes
- Cook Time: 14 minutes
- Total Time: 29 minutes
- Yield: 4 servings 1x
- Category: Dessert
- Cuisine: American
Ingredients
- 6 oz (170 g) bittersweet or semi-sweet chocolate (recommend Ghirardelli or Valrhona)
- 1/2 cup (115 g) unsalted butter, softened
- 2/3 cup (135 g) granulated sugar
- 3 large eggs, room temperature
- 1/3 cup (45 g) all-purpose flour
- 1 tsp vanilla extract
- Pinch of salt
- Powdered sugar (optional, for dusting)
Instructions
- Preheat your oven to 425°F (220°C) and prepare the ramekins by lightly buttering each and dusting with cocoa powder to prevent sticking.
- Melt the chocolate and butter using a double boiler or microwave in 20-second bursts, stirring in between until smooth. Set aside to cool slightly.
- Vigorously whisk together the eggs and granulated sugar in a medium bowl until pale and thickened.
- Slowly pour the chocolate-butter mixture into the eggs while whisking continuously. Add vanilla extract and a pinch of salt.
- Sift the flour over the mixture and gently fold with a spatula until just combined; do not overmix.
- Divide the batter evenly among the prepared ramekins, filling about 3/4 full. Place ramekins on a baking sheet.
- Bake for 12-14 minutes until edges are set and firm but the center is soft and slightly jiggly. Watch closely after 12 minutes to avoid overbaking.
- Let the cakes cool for 1 minute, then run a knife around the edges and invert onto dessert plates.
- Serve immediately, optionally dusted with powdered sugar or garnished with fresh berries or vanilla ice cream.
Notes
Use room temperature eggs for better batter texture. Do not overbake to maintain the molten center. Butter and cocoa powder the ramekins to prevent sticking. Rotate baking sheet halfway if cakes bake unevenly. For gluten-free, substitute almond flour; for dairy-free, use coconut oil instead of butter.
Nutrition
- Serving Size: 1 lava cake (6 oz ra
- Calories: 370
- Sugar: 25
- Fat: 25
- Saturated Fat: 15
- Carbohydrates: 35
- Protein: 5
Keywords: chocolate lava cake, molten chocolate cake, easy dessert, quick chocolate cake, homemade lava cake, decadent dessert