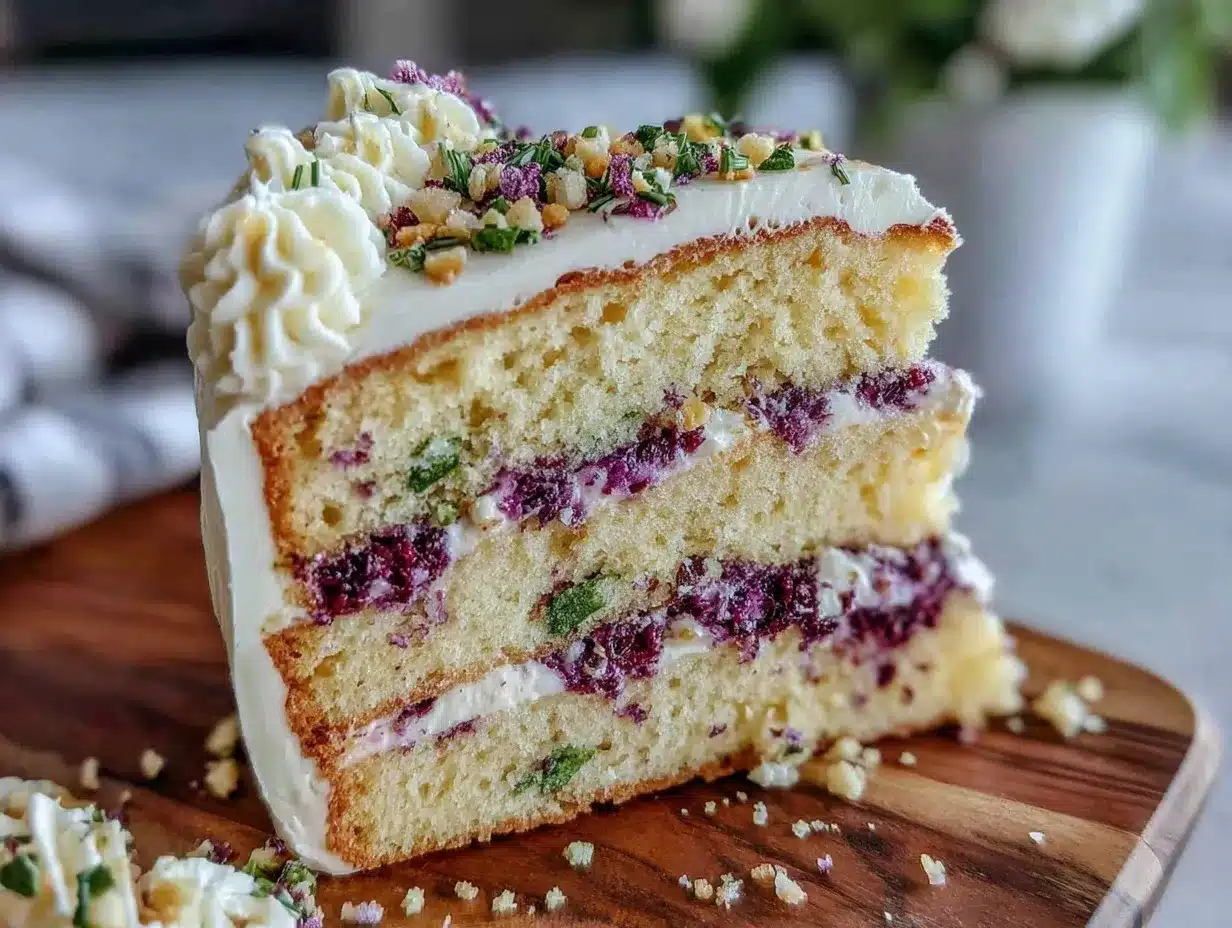
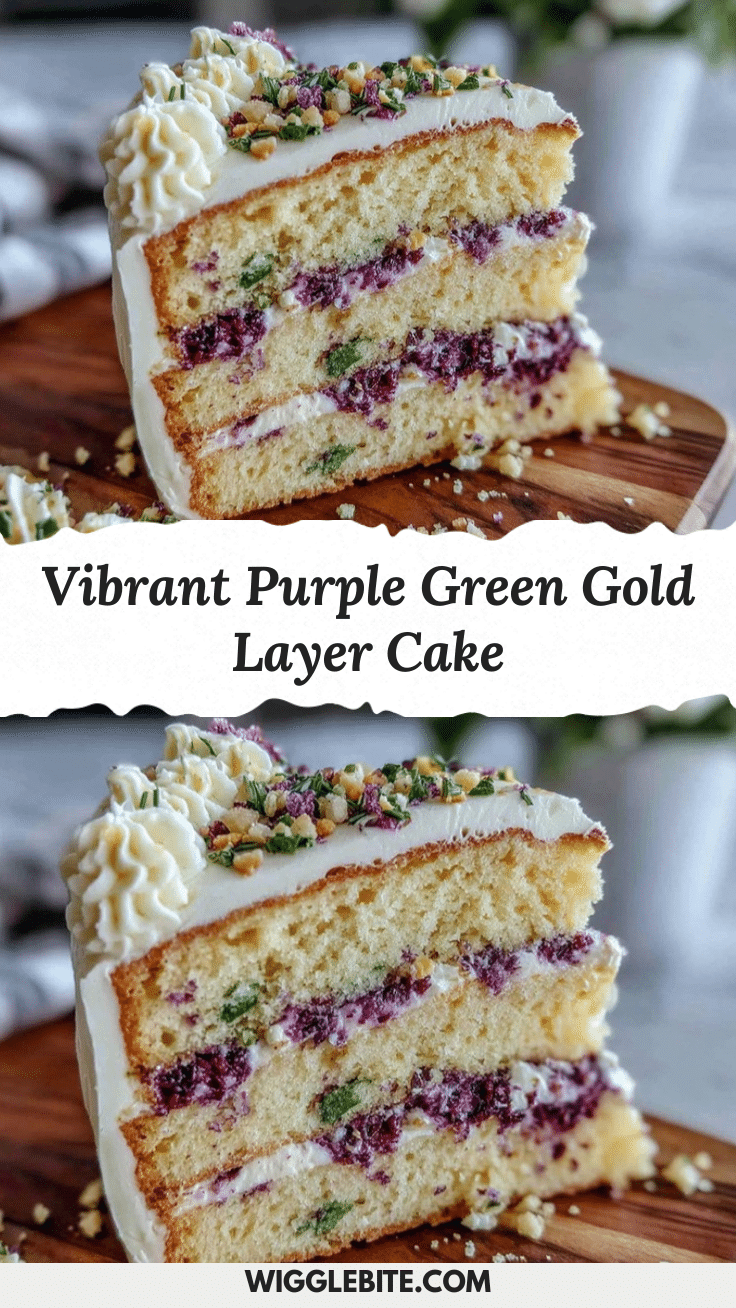
“You know that moment when you walk into a party and a cake just stops you dead in your tracks? That happened to me last summer on a random Saturday afternoon. I was at my friend Lena’s house, and the aroma of vanilla and sugar was wafting through the air like a gentle hug. What caught my eye was this stunning purple, green, and gold layer cake sitting on the counter — honestly, it looked like it belonged in a museum, not a casual backyard get-together. Lena wasn’t even trying to impress anyone; she was just messing around in the kitchen with some food coloring and her favorite vanilla buttercream recipe.”
Now, I’m not usually the type to get starstruck by a cake, but this one? It was different. The colors were vibrant but soft, and when I finally took a bite, the layers were moist and tender with the kind of buttery sweetness that makes you close your eyes and smile. Honestly, I forgot I had promised to help set the table because I was so caught up in savoring each mouthful. That cracked mixing bowl on the counter and the little splash of batter on the floor told me this wasn’t a perfect bake, but something real and joyful — kind of like the best home-cooked meal you didn’t know you needed.
Maybe you’ve been there, staring at a cake that looks too pretty to eat, or wanting to create something that feels both special and approachable. The Perfect Purple Green Gold Layer Cake with Vanilla Buttercream is exactly that kind of recipe — a sweet, colorful celebration that’s surprisingly simple to pull off. And trust me, once you try it, you’ll find yourself making it again and again for birthdays, potlucks, or just because you deserve a little slice of happiness.
Why You’ll Love This Recipe
After testing this recipe multiple times (and yes, I might have eaten more frosting than the cake during the trials), I can say this is one cake that checks all the boxes. Here’s why it stands out:
- Quick & Easy: You can have this beauty baked and frosted in just under two hours — perfect for when you want something impressive but don’t have all day.
- Simple Ingredients: No fancy or hard-to-find items here; most are pantry staples, with just a few food coloring drops for that magical purple, green, and gold effect.
- Perfect for Celebrations: Whether it’s a birthday, brunch, or an unexpected get-together, this cake’s colors and flavor profile make it a showstopper.
- Crowd-Pleaser: I’ve brought this to family dinners and potlucks, and it always disappears fast — kids and adults alike can’t get enough.
- Unbelievably Delicious: The vanilla buttercream frosting is smooth, creamy, and just sweet enough to complement the tender layers without overwhelming them.
What makes this cake different? It’s the way the colors come together without the usual artificial feel — the purple is soft but vibrant, the green feels fresh, and the golden layer adds warmth and depth. Plus, the vanilla buttercream isn’t just frosting; it’s a creamy cloud that ties everything together with a subtle vanilla aroma. It’s the kind of cake that makes you pause and appreciate the little joys in baking and sharing food.
What Ingredients You Will Need
This recipe uses simple, wholesome ingredients to deliver bold flavor and satisfying texture without the fuss. Most are kitchen staples, and the food coloring is optional if you want to keep it classic or use natural alternatives.
- For the Cake Layers:
- All-purpose flour, 2 ½ cups (320 g) – I prefer King Arthur for consistent results
- Baking powder, 2 ½ tsp – to get that perfect rise
- Baking soda, ½ tsp – balances the acidity
- Salt, ½ tsp – enhances flavor
- Unsalted butter, 1 cup (225 g), softened – makes the cake tender
- Granulated sugar, 1 ¾ cups (350 g) – for sweetness without grit
- Large eggs, 4, room temperature – helps with structure and richness
- Whole milk, 1 cup (240 ml), room temperature – keeps layers moist
- Vanilla extract, 2 tsp – the soul of vanilla flavor
- Food coloring gel or paste:
- Purple (e.g., AmeriColor Violet)
- Green (e.g., Wilton Leaf Green)
- Gold/yellow (e.g., Chefmaster Gold)
- For the Vanilla Buttercream Frosting:
- Unsalted butter, 1 cup (225 g), softened – for that creamy base
- Powdered sugar, 4 cups (480 g), sifted – to avoid lumps
- Vanilla extract, 2 tsp – adds that perfect vanilla punch
- Milk or heavy cream, 2-4 tbsp (30-60 ml) – adjust for desired consistency
- Pinch of salt – balances the sweetness
If you want to swap dairy for plant-based options, try using vegan butter and almond milk — the texture shifts a bit, but it still tastes great. And if you can’t find gel food coloring, natural alternatives like beet juice for purple or spinach powder for green can work, but the colors might be softer.
Equipment Needed
- Three 8-inch (20 cm) round cake pans – I’ve tried different brands, but non-stick pans like Wilton make release easier.
- Mixing bowls – at least two, medium and large.
- Electric mixer or stand mixer – hand mixers work, but a stand mixer saves your arms.
- Measuring cups and spoons – accuracy matters here for consistent results.
- Rubber spatula – for scraping down the bowl and folding batter gently.
- Cooling racks – helps layers cool evenly and avoid sogginess.
- Offset spatula and bench scraper – perfect for smooth frosting application.
- Cake turntable (optional) – makes frosting easier, but you can manage without by rotating the cake manually.
If you don’t have three cake pans, bake the layers in batches or use 9-inch pans for a shorter cake. Just keep an eye on baking times. For maintenance, wash your mixer beaters promptly to avoid hardened buttercream sticking, and invest in a good-quality spatula – trust me, it makes a difference!
Preparation Method
- Preheat and Prep: Set your oven to 350°F (175°C). Grease and flour three 8-inch cake pans, or line them with parchment paper. This step keeps your layers from sticking and ensures a clean release.
- Mix Dry Ingredients: In a medium bowl, whisk together 2 ½ cups (320 g) all-purpose flour, 2 ½ tsp baking powder, ½ tsp baking soda, and ½ tsp salt. This ensures even distribution and prevents clumps.
- Cream Butter and Sugar: Using your mixer, beat 1 cup (225 g) softened unsalted butter and 1 ¾ cups (350 g) granulated sugar on medium speed for about 4-5 minutes until light and fluffy. The texture should be pale and airy — this is key for a tender crumb.
- Add Eggs: Crack in 4 large eggs, one at a time, beating well after each addition. This helps emulsify the batter and build structure.
- Incorporate Vanilla: Stir in 2 tsp vanilla extract for that classic flavor boost.
- Alternate Dry and Wet: Gradually add the dry ingredients in three parts, alternating with 1 cup (240 ml) whole milk, beginning and ending with flour. Mix on low speed just until combined each time to avoid overmixing — overworked batter leads to dense cake.
- Divide and Color Batter: Evenly divide the batter into three bowls. Add purple gel coloring to the first, green to the second, and gold to the third. Start with a few drops and add more until you reach the desired shade. Stir gently to combine.
- Pour and Smooth: Pour each colored batter into its own prepared pan. Use a spatula to smooth the tops evenly. Don’t overfill; they should be about 2/3 full to prevent overflow.
- Bake: Place pans in the oven and bake for 25-30 minutes. Test doneness by inserting a toothpick in the center — it should come out clean or with a few moist crumbs. Rotate pans halfway through baking if your oven runs hot.
- Cool: Allow cakes to cool in pans for 10 minutes, then invert onto wire racks to cool completely. Patience is key here; frosting warm cake will melt the buttercream.
- Make Vanilla Buttercream: Beat 1 cup (225 g) softened unsalted butter on medium speed until creamy (about 2 minutes). Gradually add 4 cups (480 g) sifted powdered sugar, alternating with 2-4 tbsp (30-60 ml) milk or heavy cream, beating well after each addition. Add 2 tsp vanilla extract and a pinch of salt. Beat on high for 3-4 minutes until light and fluffy. Adjust consistency by adding more milk if too stiff or powdered sugar if too thin.
- Assemble: Place the gold layer on your cake board or plate. Spread a generous layer of buttercream on top. Repeat with green and purple layers, stacking carefully. Use the remaining buttercream to frost the sides and top, smoothing with an offset spatula or bench scraper.
- Decorate: Add any final touches like sprinkles, edible glitter, or fresh flowers if you like. Chill the cake for 30 minutes before slicing to set the frosting.
Pro tip: If your buttercream feels too soft, pop it in the fridge for 15 minutes and then give it a quick whip before frosting.
Cooking Tips & Techniques
One thing I learned the hard way: don’t rush the creaming step. It’s tempting to just mix until combined, but beating the butter and sugar until fluffy traps air, giving your cake that light texture everyone loves. Also, be gentle when folding in dry ingredients — overmixing tightens gluten and makes the cake tough.
Coloring batter can be tricky. Gel food coloring is best because it doesn’t thin the batter, but start with small amounts. You can always add more for intensity. And remember, the batter’s color will deepen slightly during baking.
When frosting, chill your layers if they feel crumbly; it makes them easier to handle and reduces crumbs in your frosting. Using an offset spatula and a bench scraper helps you get those smooth, professional-looking sides. If you don’t have a scraper, a flat knife works in a pinch.
Finally, timing matters. It’s best to make the buttercream fresh, but if you need to prepare it ahead, keep it covered in the fridge and re-whip before use. And always trust your senses — if something smells off or looks weird, it’s better to pause and check than to push through.
Variations & Adaptations
- Flavor Variations: Swap the vanilla extract in the cake or frosting for almond or lemon extract for a fresh twist.
- Dietary Adaptations: For gluten-free, replace all-purpose flour with a 1:1 gluten-free baking blend. The texture might be a bit different but still delicious. For dairy-free, use plant-based butter and milk substitutes.
- Seasonal Color Swaps: In fall, try warm orange, deep red, and brown layers using natural colorings like pumpkin puree, beet juice, and cocoa powder.
- Texture Tweaks: Add a tablespoon of sour cream or Greek yogurt to the batter for extra moisture and tang.
- Personal Favorite: Once, I added a thin layer of raspberry jam between each cake layer before frosting, which gave a subtle fruity zing that balanced the sweetness perfectly.
Serving & Storage Suggestions
Serve this cake at room temperature to enjoy the soft crumb and creamy frosting at their best. It pairs wonderfully with a cup of black coffee or a light herbal tea — the bitterness cuts through the richness perfectly.
To store, cover loosely with a cake dome or plastic wrap and keep it in the refrigerator. It will stay fresh for up to 4 days. For longer storage, slice and freeze individual pieces in airtight containers for up to 3 months. Thaw overnight in the fridge and bring to room temperature before serving.
Reheating? Just let slices sit out for 30 minutes; if you want a warm bite, microwave for 10-15 seconds, but don’t overdo it or the frosting might melt.
Interestingly, the flavors in this cake mellow and deepen a bit after a day, so sometimes waiting before indulging gives you an even tastier experience.
Nutritional Information & Benefits
Each slice (assuming 12 slices) contains approximately:
| Calories | 350-400 kcal |
|---|---|
| Fat | 18 g |
| Carbohydrates | 50 g |
| Protein | 4 g |
| Sugar | 35 g |
While it’s definitely a treat, this cake uses real butter and whole milk, providing some calcium and vitamin A. The vanilla extract adds antioxidants, and using quality ingredients makes a difference in overall flavor and satisfaction. For those mindful of allergens, this recipe contains gluten, dairy, and eggs.
From a wellness perspective, I like that this cake uses familiar, minimally processed ingredients. Baking at home means you control what goes in, avoiding preservatives and artificial additives common in store-bought cakes.
Conclusion
So, there you have it — the Perfect Purple Green Gold Layer Cake with Vanilla Buttercream that’s as fun to make as it is to eat. It’s colorful but approachable, delicious but not fussy, and guaranteed to turn heads wherever you bring it. Feel free to tweak the colors, flavors, or frosting to make it your own. Honestly, that’s part of the joy of baking — making something that fits your style and tastes.
I keep coming back to this recipe because it reminds me of that afternoon at Lena’s, where a simple, joyful cake brought everyone a little closer. I’d love to hear how your version turns out — leave a comment, share your tweaks, or tell me about your favorite layer cake memories. Happy baking, friends!
FAQs
Can I make this cake gluten-free?
Yes! Substitute the all-purpose flour with a 1:1 gluten-free baking blend, and be sure to check that your baking powder is gluten-free too.
How do I prevent the colors from bleeding into each other?
Make sure your cake layers are completely cool before assembling and frosting. Chilling layers briefly helps keep colors vibrant and crisp.
Can I prepare the cake layers ahead of time?
Absolutely. You can bake the layers up to two days in advance, wrap them tightly in plastic wrap, and store them in the fridge until ready to assemble.
What if I don’t have gel food coloring?
Liquid food coloring can work but may thin the batter slightly and produce less intense colors. Natural options like beet juice or spinach powder can be used but will give softer hues.
How long does the cake keep after frosting?
Store it covered in the fridge for up to 4 days. Let it come to room temperature before serving for the best texture and flavor.
Pin This Recipe!
Perfect Purple Green Gold Layer Cake Recipe with Easy Vanilla Buttercream Frosting
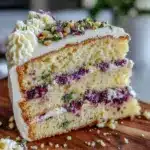
A vibrant and moist three-layer cake with purple, green, and gold colors, paired with a smooth and creamy vanilla buttercream frosting. Perfect for celebrations and easy to make with simple pantry ingredients.
- Prep Time: 20 minutes
- Cook Time: 30 minutes
- Total Time: 1 hour 20 minutes
- Yield: 12 servings 1x
- Category: Dessert
- Cuisine: American
Ingredients
- 2 ½ cups (320 g) all-purpose flour
- 2 ½ tsp baking powder
- ½ tsp baking soda
- ½ tsp salt
- 1 cup (225 g) unsalted butter, softened
- 1 ¾ cups (350 g) granulated sugar
- 4 large eggs, room temperature
- 1 cup (240 ml) whole milk, room temperature
- 2 tsp vanilla extract
- Purple gel food coloring (e.g., AmeriColor Violet)
- Green gel food coloring (e.g., Wilton Leaf Green)
- Gold/yellow gel food coloring (e.g., Chefmaster Gold)
- For the Vanilla Buttercream Frosting:
- 1 cup (225 g) unsalted butter, softened
- 4 cups (480 g) powdered sugar, sifted
- 2 tsp vanilla extract
- 2–4 tbsp (30–60 ml) milk or heavy cream
- Pinch of salt
Instructions
- Preheat oven to 350°F (175°C). Grease and flour three 8-inch cake pans or line with parchment paper.
- In a medium bowl, whisk together flour, baking powder, baking soda, and salt.
- Beat softened butter and granulated sugar on medium speed for 4-5 minutes until light and fluffy.
- Add eggs one at a time, beating well after each addition.
- Stir in vanilla extract.
- Add dry ingredients in three parts, alternating with milk, beginning and ending with flour. Mix on low speed just until combined each time.
- Divide batter evenly into three bowls. Add purple gel coloring to one, green to another, and gold to the last. Stir gently to combine.
- Pour each colored batter into prepared pans, filling about 2/3 full. Smooth tops.
- Bake for 25-30 minutes, testing doneness with a toothpick. Rotate pans halfway if needed.
- Cool cakes in pans for 10 minutes, then invert onto wire racks to cool completely.
- For the buttercream, beat softened butter on medium speed until creamy (about 2 minutes). Gradually add powdered sugar alternating with milk or cream, beating well after each addition.
- Add vanilla extract and salt. Beat on high for 3-4 minutes until light and fluffy. Adjust consistency as needed.
- Assemble cake by placing gold layer on cake board or plate. Spread buttercream on top. Repeat with green and purple layers.
- Frost sides and top with remaining buttercream, smoothing with offset spatula or bench scraper.
- Decorate as desired. Chill cake for 30 minutes before slicing to set frosting.
Notes
Do not rush the creaming step to trap air for a light texture. Use gel food coloring for best results and start with small amounts. Chill layers if crumbly before frosting. Buttercream can be refrigerated and re-whipped if too soft. For gluten-free, substitute flour with gluten-free blend and check baking powder. For dairy-free, use plant-based butter and milk substitutes.
Nutrition
- Serving Size: 1 slice (1/12 of cak
- Calories: 350400
- Sugar: 35
- Fat: 18
- Carbohydrates: 50
- Protein: 4
Keywords: layer cake, vanilla buttercream, colorful cake, celebration cake, easy cake recipe, party cake, homemade cake