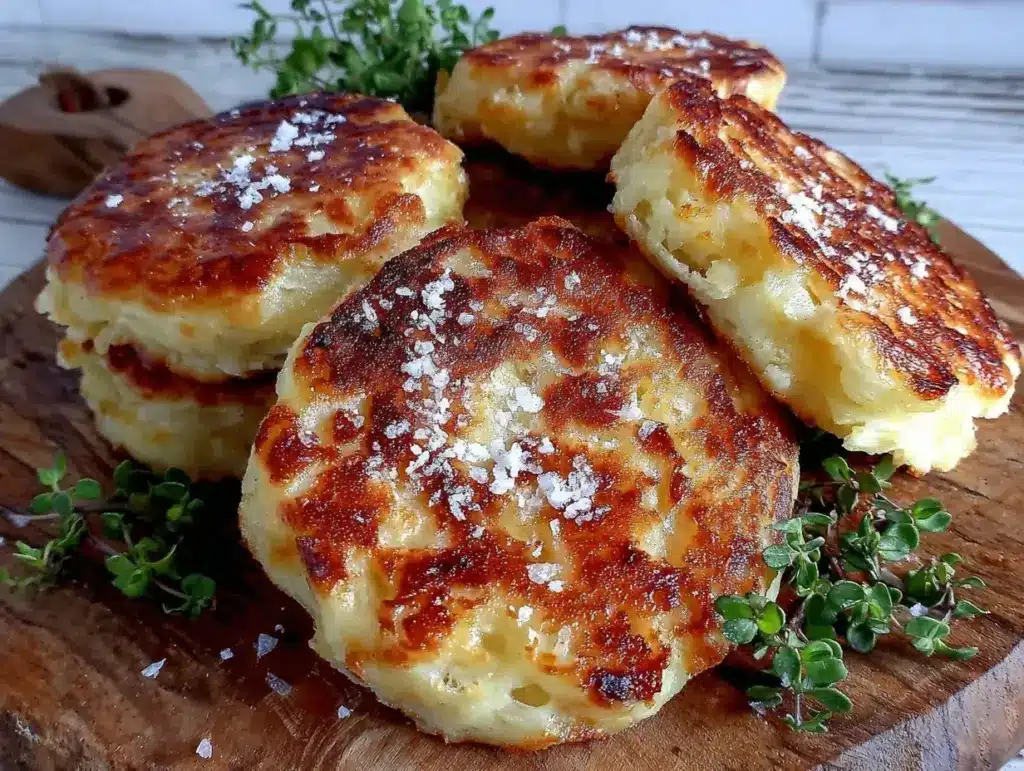
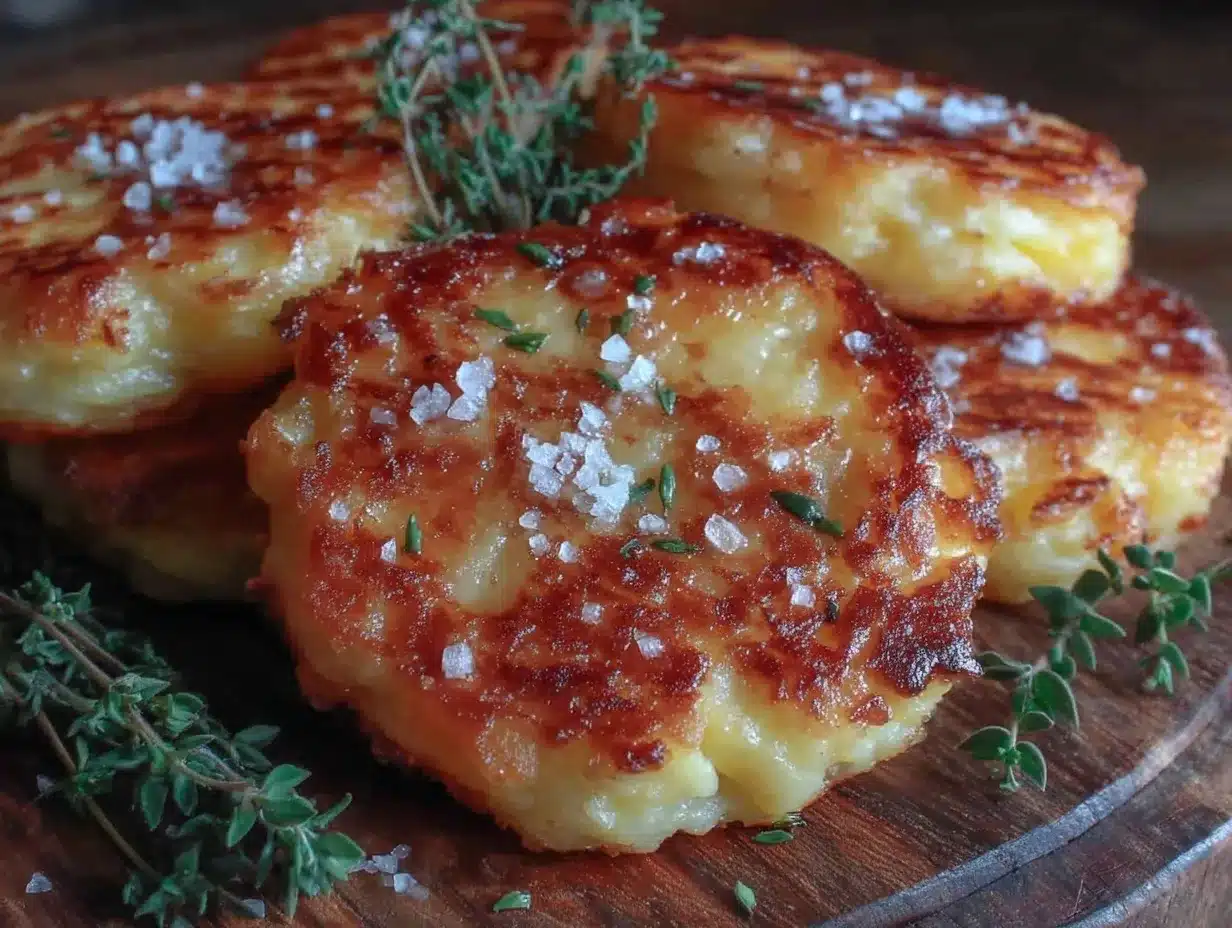
“You wouldn’t believe it,” my neighbor Tom said, holding up a slightly misshapen, golden-brown triangle, “these came from just potatoes and a bit of butter.” It was a blustery Thursday afternoon when I stopped by his place, drawn in by the irresistible smell wafting from his stove. Honestly, I was expecting something fancy or complicated, but instead, I found myself savoring these humble Irish potato farls that felt like a warm hug on a chilly day.
I’d always thought potato farls were something you’d only find on a cozy Irish breakfast plate, but Tom’s version was different—crispy, buttery, and sprinkled just right with sea salt. The way the edges curled up with a satisfying crunch, contrasting the soft, pillowy inside, was a revelation. I made a mess trying to recreate them later that evening—forgot to set my timer, and almost burned the first batch! Maybe you’ve been there, juggling pans while the phone rings and the dog’s barking. But that first bite? Totally worth the chaos.
These Irish potato farls have stuck with me ever since. They’re that kind of recipe you keep coming back to, whether it’s for an easy weekend breakfast or a late-night snack. Let me tell you, once you try this crispy buttery Irish potato farls recipe with sea salt, you’ll wonder how you ever lived without them.
Why You’ll Love This Crispy Buttery Irish Potato Farls Recipe
Having tested several recipes and methods, including some downright flaky disasters, I can say this one hits all the right spots. It’s a straightforward recipe that doesn’t mess around but still delivers incredible flavor and texture.
- Quick & Easy: Ready in about 30 minutes, perfect when you want something satisfying without a long wait.
- Simple Ingredients: Uses everyday pantry staples — you probably already have potatoes, butter, flour, and sea salt on hand.
- Perfect for Breakfast or Snack: Whether you’re hosting a brunch or craving a cozy bite, these farls fit the bill.
- Crowd-Pleaser: Both kids and adults love the crispy edges and buttery richness.
- Unbelievably Delicious: The sea salt finish brings out the best in the buttery, tender potato dough.
What sets this recipe apart is the balance between crispiness and softness, thanks to a special resting step and a gentle pan-fry in real butter. The sea salt isn’t just a sprinkle — it’s a final touch that makes each bite pop. Honestly, it’s like comfort food with a little something extra, without any fuss or complicated steps.
What Ingredients You Will Need
This recipe calls for straightforward, wholesome ingredients that come together beautifully to create those iconic crispy buttery Irish potato farls. No fancy shopping trips needed.
- Potatoes: 2 large starchy potatoes (about 500g / 1 lb), peeled and boiled — I prefer Russet for their fluffy texture.
- Unsalted Butter: 3 tablespoons, melted and some extra for frying (Irish Kerrygold is my top pick for that rich flavor).
- All-Purpose Flour: 1 cup (120g), plus extra for dusting — this holds everything together.
- Sea Salt: 1 teaspoon for the dough, plus flaky sea salt for finishing — Maldon salt flakes work wonderfully here.
- Black Pepper: Freshly ground, a pinch for seasoning.
- Optional: A small handful of chopped fresh parsley for a bit of color and freshness.
If you want a gluten-free version, swapping all-purpose flour with almond flour or a gluten-free blend works, but the texture will be slightly different — still tasty, just less traditional. Also, if you’re in a pinch, salted butter can be used; just reduce the added salt in the dough.
Equipment Needed
- Large Pot: For boiling the potatoes — a heavy-bottomed pot helps cook evenly.
- Potato Masher or Ricer: To get that smooth, lump-free potato base. I once tried a fork, but it took forever, and the texture wasn’t as silky.
- Mixing Bowl: A medium bowl to combine the dough ingredients.
- Rolling Pin: For gently flattening the dough — a clean wine bottle works in a pinch!
- Non-stick Skillet or Cast Iron Pan: Essential for frying the farls evenly without sticking.
- Spatula: A thin, flexible one makes flipping easier without breaking the farls.
For budget-friendly cooks, a standard non-stick pan is fine, but if you want that authentic, rustic crisp, a well-seasoned cast iron skillet really shines. Just make sure to keep it clean and lightly oiled after each use to maintain its seasoning.
Preparation Method
- Boil the Potatoes: Place peeled potatoes in a large pot and cover with cold water. Add a pinch of salt and bring to a boil. Cook until tender when pierced with a fork, about 15-20 minutes. Drain well and return to the pot.
- Mash the Potatoes: Using a potato masher or ricer, mash the potatoes until smooth. Let them cool slightly for about 5 minutes — hot potatoes can make the dough too sticky.
- Mix the Dough: Transfer mashed potatoes to a mixing bowl. Add melted unsalted butter, flour, sea salt, and black pepper. Stir gently to combine. The dough should be soft but not too sticky. If it’s sticky, add a little more flour, one tablespoon at a time.
- Shape the Dough: Lightly flour your work surface and turn out the dough. Pat it into a round disc about 1/2 inch (1.3 cm) thick. Use a sharp knife or a pizza cutter to slice the disc into 4 equal triangles (farls).
- Rest the Farls: Let the farls rest on a floured surface for 10 minutes — this step helps them hold together during cooking.
- Heat the Pan: Warm a non-stick skillet or cast iron pan over medium heat. Add 1 tablespoon of butter and let it melt, coating the pan evenly.
- Cook the Farls: Place the farls in the pan. Cook for about 4-5 minutes on each side or until golden brown and crispy. You’ll see the edges crisping up and smell that irresistible buttery aroma.
- Finish with Sea Salt: As soon as you remove them from the pan, sprinkle flaky sea salt over the farls while they’re still warm.
- Serve Warm: Best enjoyed fresh, but you can keep them warm in a low oven (about 200°F / 95°C) while finishing the batch.
Pro tip: If the farls start browning too fast, lower the heat slightly — you want a slow crisp, not a burnt one. Also, flipping gently is key, or you risk breaking those soft interiors.
Cooking Tips & Techniques
Getting those perfect crispy buttery Irish potato farls can be a bit of an art, but here are some tips to make it foolproof.
- Don’t Skip the Rest: Resting the dough after shaping helps it firm up, reducing the chance of falling apart in the pan.
- Use Real Butter: Margarine just won’t give you that rich flavor or golden crust. Butter’s milk solids brown beautifully, creating that signature taste and color.
- Control Your Heat: Medium heat works best — too high, and the outside burns before the inside cooks; too low, and you lose the crisp.
- Patience with Flipping: Flip only once or twice to keep the farls intact. Use a thin spatula and slide it carefully under the farl.
- Avoid Overworking the Dough: Mix just enough to combine. Overmixing can make the farls tough.
I once rushed cooking the farls, cranking up the heat to save time—big mistake! They burned on the outside and stayed doughy inside. Slowing down the process made all the difference. Also, I learned to keep a bowl of flaky sea salt nearby to finish immediately after cooking—trust me, it’s magic.
Variations & Adaptations
While this recipe sticks to a classic formula, you can tweak it to suit your preferences or dietary needs.
- Herb-Infused Farls: Add chopped fresh herbs like chives, parsley, or thyme into the dough for a fresh twist.
- Cheesy Potato Farls: Mix in grated sharp cheddar or Parmesan to the dough for an extra savory punch.
- Gluten-Free Version: Swap all-purpose flour with a gluten-free blend or almond flour, keeping in mind the texture will be a bit different but still tasty.
- Sweet Potato Farls: Substitute half or all potatoes with sweet potatoes for a sweeter, vibrant variation.
- Pan-Fried vs. Oven-Baked: For a lighter option, you can bake the farls at 400°F (200°C) for about 15 minutes per side—it won’t be as crispy but still delicious.
Personally, I tried adding a sprinkle of smoked paprika once—unexpected but delightful! Feel free to experiment and find your favorite version.
Serving & Storage Suggestions
These crispy buttery Irish potato farls are best served hot, straight from the pan, with a sprinkling of flaky sea salt. They pair beautifully with a dollop of sour cream or a smear of butter for extra indulgence.
For a full breakfast, serve alongside fried eggs, sautéed mushrooms, or your favorite rashers. They also make a cozy afternoon snack with a cup of tea or coffee.
If you have leftovers, store them in an airtight container in the fridge for up to 2 days. To reheat, pop them in a skillet over medium heat for a few minutes on each side to bring back the crispiness. Avoid microwaving if you want to keep that crunch.
Flavors actually deepen after a day, so leftovers can be surprisingly tasty. Just remember to re-crisp before serving.
Nutritional Information & Benefits
Each serving (1 farl) roughly contains:
| Calories | 180-200 kcal |
|---|---|
| Carbohydrates | 30g |
| Fat | 6g (mostly from butter) |
| Protein | 3g |
| Fiber | 2g |
Potatoes bring in potassium and vitamin C, while butter adds fat-soluble vitamins like A and E. Using sea salt instead of regular table salt can provide trace minerals and a more balanced seasoning. This recipe can fit well in a balanced diet when enjoyed in moderation.
For gluten-free eaters, the substitution options keep it accessible. Just watch the butter quantity if you’re watching fats.
Conclusion
Crispy buttery Irish potato farls with sea salt are more than just a simple recipe—they’re a comforting, satisfying treat that feels both nostalgic and fresh. Whether you’re new to Irish cooking or a seasoned fan, these farls offer an easy, delicious way to bring a little taste of Ireland into your kitchen.
Don’t hesitate to customize the recipe to your liking—add herbs, cheese, or try different potatoes. I love how this recipe welcomes experimentation while staying true to its roots.
Give this recipe a try, and don’t forget to share your favorite variations or stories in the comments below. Trust me, once you make these, they’ll become your go-to for cozy mornings or anytime snack cravings hit. Happy cooking!
FAQs About Crispy Buttery Irish Potato Farls
What type of potatoes should I use for the best farls?
Starchy potatoes like Russets are ideal because they mash up fluffy and help create a soft yet sturdy dough. Waxy potatoes can make the dough gummy.
Can I make the dough ahead of time?
Yes! You can prepare the dough and shape the farls up to a day in advance. Keep them covered in the fridge and bring to room temperature before cooking.
How do I store leftover farls?
Store cooled farls in an airtight container in the refrigerator for up to 2 days. Reheat in a skillet for best crispness.
Can I freeze Irish potato farls?
Absolutely. Freeze uncooked farls on a tray, then transfer to a freezer bag. Cook from frozen, adding a couple of extra minutes per side.
What’s the best way to get them crispy without burning?
Cook over medium heat with plenty of butter and flip gently once the bottom is golden. If the pan gets too hot, lower the heat to avoid burning while allowing the inside to cook through.
Pin This Recipe!
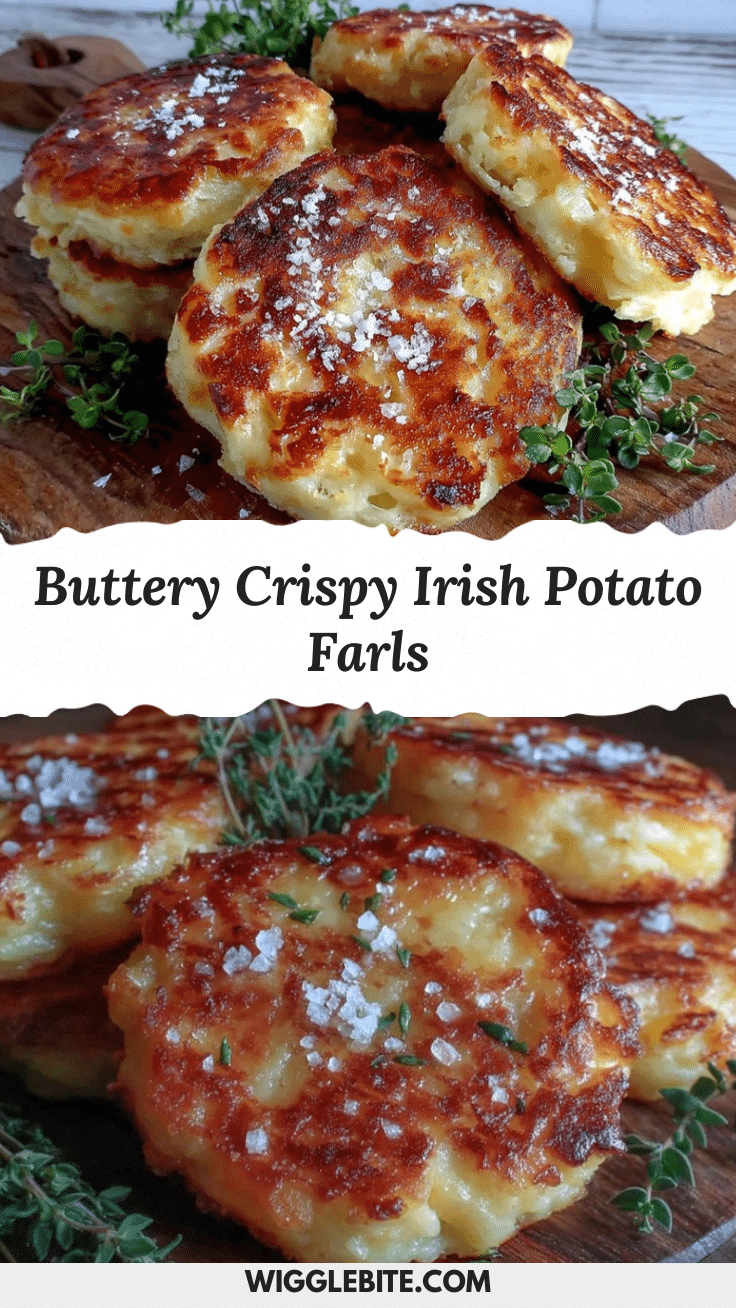
Crispy Buttery Irish Potato Farls Recipe Easy Homemade with Sea Salt

A simple and delicious recipe for crispy, buttery Irish potato farls sprinkled with sea salt, perfect for breakfast or a cozy snack.
- Prep Time: 10 minutes
- Cook Time: 15 minutes
- Total Time: 25 minutes
- Yield: 4 servings 1x
- Category: Breakfast, Snack
- Cuisine: Irish
Ingredients
- 2 large starchy potatoes (about 500g / 1 lb), peeled and boiled (Russet recommended)
- 3 tablespoons unsalted butter, melted, plus extra for frying
- 1 cup (120g) all-purpose flour, plus extra for dusting
- 1 teaspoon sea salt for the dough, plus flaky sea salt for finishing
- Pinch of freshly ground black pepper
- Optional: small handful of chopped fresh parsley
Instructions
- Place peeled potatoes in a large pot and cover with cold water. Add a pinch of salt and bring to a boil. Cook until tender when pierced with a fork, about 15-20 minutes. Drain well and return to the pot.
- Using a potato masher or ricer, mash the potatoes until smooth. Let them cool slightly for about 5 minutes.
- Transfer mashed potatoes to a mixing bowl. Add melted unsalted butter, flour, sea salt, and black pepper. Stir gently to combine. If dough is sticky, add more flour one tablespoon at a time.
- Lightly flour your work surface and turn out the dough. Pat it into a round disc about 1/2 inch (1.3 cm) thick. Slice the disc into 4 equal triangles (farls).
- Let the farls rest on a floured surface for 10 minutes.
- Warm a non-stick skillet or cast iron pan over medium heat. Add 1 tablespoon of butter and let it melt, coating the pan evenly.
- Place the farls in the pan. Cook for about 4-5 minutes on each side or until golden brown and crispy.
- Remove from pan and immediately sprinkle flaky sea salt over the farls while still warm.
- Serve warm. Keep warm in a low oven (about 200°F / 95°C) if finishing batches.
Notes
Resting the dough after shaping helps it hold together during cooking. Use real butter for best flavor and crispiness. Cook over medium heat and flip gently to avoid breaking. For gluten-free, substitute flour with almond or gluten-free blend. To reheat leftovers, use a skillet to maintain crispiness.
Nutrition
- Serving Size: 1 farl
- Calories: 190
- Sugar: 1
- Sodium: 300
- Fat: 6
- Saturated Fat: 4
- Carbohydrates: 30
- Fiber: 2
- Protein: 3
Keywords: Irish potato farls, crispy potato farls, buttery potato farls, sea salt potato farls, Irish breakfast, homemade potato farls