
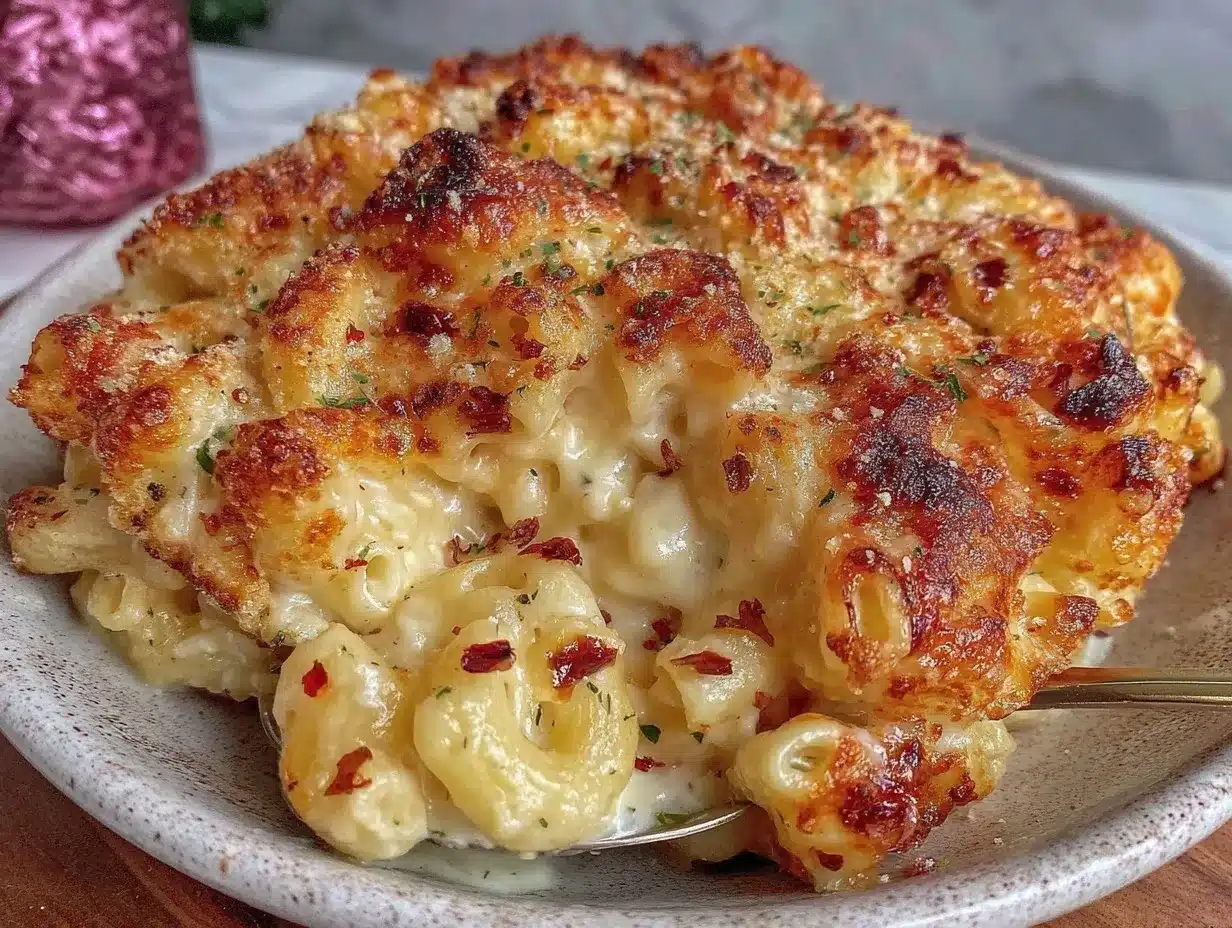
Let me paint you a picture—the smell of bubbling cheddar, buttery breadcrumbs, and a hint of nutmeg wafting through my kitchen is honestly enough to make anyone weak in the knees. The first time I pulled this creamy mac and cheese from the oven, the golden topping crackled as I scooped out a steaming spoonful, and the cheese sauce was so luxuriously smooth, I almost forgot about the rest of dinner. It’s the kind of moment where you pause, take a deep breath, and just grin because you know you’ve landed on something truly special. Years ago, when I was knee-high to a grasshopper, my grandma would make her famous baked mac and cheese for every holiday. I remember standing beside her, sneaking tastes of the sauce and marveling at how she always got the topping so crisp. This recipe is my ode to those childhood days—pure, nostalgic comfort, but with a little grown-up twist (and a secret ingredient or two).
You know what? My kids can’t stop snatching bites off the cooling rack (and I don’t really blame them). Even my husband, who claims he’s not a “mac and cheese person,” goes back for seconds—sometimes thirds. It’s become our go-to for potlucks, cozy weeknight dinners, and those “just because” days when you need a little extra warmth on your plate. I stumbled upon my own version after trying to recreate grandma’s recipe (with a pinch more cheese and a super creamy base), and now it’s a staple for family gatherings and gifting to friends. Let’s face it: life’s too short for bland mac and cheese. This creamy mac and cheese recipe easy classic with crispy topping delivers everything you crave—oozy cheese, tender pasta, crunchy topping, and that pure, soul-soothing comfort. I’ve tested it more times than I can count (all in the name of research, of course), and each time, it feels like a warm hug on a chilly night. Trust me, you’re going to want to bookmark this one and make it your new classic!
Why You’ll Love This Creamy Classic Mac and Cheese Recipe
After years spent tweaking and taste-testing (and, let’s be honest, cleaning up more cheese sauce spills than I care to admit), I can say with confidence that this creamy mac and cheese recipe easy classic with crispy topping is a keeper. Here’s what makes it shine—and why you’ll keep coming back for more:
- Quick & Easy: Comes together in under 45 minutes, so even on busy weeknights, you can whip up a pan without breaking a sweat.
- Simple Ingredients: No fancy grocery runs needed—just classic staples you probably already have in your fridge and pantry.
- Perfect for Any Occasion: Works for casual dinners, potlucks, brunches, or as a decadent side for holiday gatherings.
- Crowd-Pleaser: Kids, adults, picky eaters—everyone asks for seconds. It never fails to impress.
- Unbelievably Delicious: The creamy sauce hugs every noodle, while the topping adds addictive crunch. It’s comfort food at its best.
What sets this creamy mac and cheese apart from the rest? I use a blend of sharp cheddar and a hint of Gruyère for depth, plus a splash of evaporated milk for extra silkiness. The crispy topping isn’t just breadcrumbs—it’s tossed with melted butter, a pinch of paprika, and a sprinkle of parmesan for flavor you can actually taste. Some recipes go heavy-handed on flour or skimp on seasoning, but this one is perfectly balanced: just the right amount of tang, salt, and buttery goodness. I’ve tested this with all sorts of pasta shapes (elbows, shells, cavatappi), and it always comes out dreamy.
Honestly, this isn’t just good mac and cheese—it’s the kind that makes you close your eyes after the first bite. It’s familiar, but better. It’s the kind you make for guests and watch their faces light up. My favorite part is how you can make it for any mood, any meal, and it never disappoints. Whether you want to impress without stress or simply treat yourself to some creamy, cheesy comfort, this easy classic recipe brings all the heart and nostalgia you could ask for.
What Ingredients You Will Need
This creamy mac and cheese recipe easy classic with crispy topping uses straightforward, wholesome ingredients that deliver bold flavor and that irresistible texture we all crave. Most of these are pantry staples, and honestly, you can make easy swaps if needed. Here’s everything you’ll need to make the magic happen:
- Pasta: Elbow macaroni (about 12 oz / 340g, but shells or cavatappi work too)
- For the Cheese Sauce:
- Unsalted butter (4 tbsp / 56g, adds richness)
- All-purpose flour (1/4 cup / 30g, for thickening)
- Whole milk (2 cups / 480ml, or substitute 2% milk for lighter sauce)
- Evaporated milk (1 cup / 240ml, makes it extra creamy—can swap for half-and-half if needed)
- Sharp cheddar cheese, shredded (2 cups / 200g, I recommend Cabot or Tillamook)
- Gruyère or Swiss cheese, shredded (1 cup / 100g, optional for deeper flavor)
- Cream cheese (2 oz / 56g, cut into pieces, helps with silkiness)
- Salt (1 tsp, adjust to taste)
- Ground black pepper (1/2 tsp, freshly cracked is best)
- Ground mustard powder (1/2 tsp, adds a subtle kick)
- Paprika (1/2 tsp, for color and warmth)
- Freshly grated nutmeg (pinch, optional—trust me, it adds magic)
- For the Crispy Topping:
- Panko breadcrumbs (1 cup / 60g; regular breadcrumbs work in a pinch)
- Unsalted butter, melted (3 tbsp / 42g)
- Parmesan cheese, grated (1/3 cup / 30g, for extra crunch and flavor)
- Paprika (1/4 tsp, optional, for added color)
- Pinch of salt
Ingredient Tips: For best results, shred your cheese fresh from the block—pre-shredded cheese can make the sauce grainy. If you need a gluten-free option, swap the pasta and flour for gluten-free versions (Bob’s Red Mill makes a reliable flour). For a lighter version, use low-fat cheese and milk, or even swap out the butter for olive oil (I’ve tried, and it works in a pinch—though the flavor is a little different). In the summer, toss in a handful of fresh herbs like chives or parsley for extra brightness. For dairy-free folks, use oat milk and vegan cheese; the sauce won’t be quite as creamy, but it still satisfies.
Honestly, this list may look long, but trust me—each ingredient has a job to do. It’s all about layering flavor and texture. Once you’ve got everything lined up, you’re halfway to cheesy bliss!
Equipment Needed
You don’t need a restaurant kitchen for this creamy mac and cheese recipe easy classic with crispy topping. Here’s what I use every time:
- Large pot (for boiling pasta; a deep saucepan works too)
- Medium saucepan (for the cheese sauce—nonstick is ideal)
- Whisk (for smooth, lump-free sauce)
- Wooden spoon or silicone spatula (for stirring and folding)
- Colander (for draining pasta)
- Measuring cups and spoons (precision matters with cheese and milk!)
- 9×13-inch (23x33cm) baking dish (ceramic or glass, greased lightly)
- Small bowl (for mixing up the topping)
If you don’t have a whisk, a fork can work in a pinch (though your arms will get a workout). I’ve made this in everything from fancy enamel pans to basic aluminum trays—just grease the dish well to avoid sticking. For the topping, a food processor can blitz up homemade breadcrumbs, but honestly, panko from the bag is my go-to. Maintenance tip: if you use nonstick pans, avoid metal whisks to keep them scratch-free. Budget-wise, you don’t need expensive tools—my favorite baking dish cost less than $10 and still looks new. This recipe is as forgiving with equipment as it is with ingredients!
Preparation Method
- Prep Your Ingredients: Measure out all your cheese, milk, butter, and seasonings. Preheat your oven to 375°F (190°C). Grease your 9×13-inch (23x33cm) baking dish lightly with butter or cooking spray.
- Cook the Pasta: Bring a large pot of salted water to a boil. Add 12 oz (340g) elbow macaroni and cook until just al dente (about 7-8 minutes). Don’t overcook—the noodles will soften more in the oven. Drain and set aside.
- Make the Cheese Sauce: In a medium saucepan, melt 4 tbsp (56g) unsalted butter over medium heat. Sprinkle in 1/4 cup (30g) all-purpose flour and whisk constantly for 1-2 minutes, until the mixture bubbles but doesn’t brown. Gradually add 2 cups (480ml) whole milk and 1 cup (240ml) evaporated milk, whisking to avoid lumps. Keep whisking (about 4-5 minutes) until the sauce thickens and coats the back of a spoon.
- Add the Cheese: Reduce heat to low. Add 2 cups (200g) sharp cheddar, 1 cup (100g) Gruyère, and 2 oz (56g) cream cheese. Stir until melted and smooth. Sprinkle in 1 tsp salt, 1/2 tsp pepper, 1/2 tsp mustard powder, 1/2 tsp paprika, and a pinch of nutmeg. Taste the sauce—it should be creamy, tangy, and just a little sharp. Adjust seasoning as needed.
- Combine Pasta and Sauce: Fold the drained pasta into the cheese sauce, mixing gently until every noodle is coated. If the mixture seems thick, add a splash more milk. The sauce should be silky and hug the pasta.
- Prepare the Crispy Topping: In a small bowl, mix 1 cup (60g) panko breadcrumbs, 3 tbsp (42g) melted butter, 1/3 cup (30g) parmesan, 1/4 tsp paprika, and a pinch of salt. Stir until evenly coated.
- Assemble: Pour the mac and cheese mixture into the prepared baking dish. Sprinkle the breadcrumb topping evenly over the surface. If you like extra crunch, add a bit more parmesan on top.
- Bake: Place in the oven and bake for 20-25 minutes, until the topping is golden brown and the edges are bubbling. If you want more color, broil for 1-2 minutes (watch closely—it can burn fast!).
- Cool and Serve: Let the dish rest for 5-10 minutes before serving. This helps the sauce settle and makes for cleaner scoops. The topping should be crisp and the pasta perfectly creamy.
Troubleshooting: If the sauce looks grainy, it’s usually the cheese—try using freshly grated cheese next time. If the topping doesn’t brown, crank up the broiler for a minute (but don’t wander off!). For extra creaminess, add an extra splash of milk before baking. For efficiency, prep the topping while the pasta cooks.
Personal Tip: I always taste the sauce before combining—sometimes a dash more mustard or paprika makes all the difference. And don’t forget that “resting” time after baking; it’s tempting to dig in immediately, but waiting lets everything settle into cheesy perfection.
Cooking Tips & Techniques
Making a truly creamy mac and cheese recipe easy classic with crispy topping comes down to a few tried-and-true techniques (learned the hard way, you know?). Here’s what I’ve figured out over the years:
- Cheese Matters: Freshly shredded cheese melts smoother. Pre-shredded cheese sometimes has anti-caking agents that make the sauce grainy—been there, regretted that.
- Don’t Overcook Pasta: Always cook just to al dente. Too soft, and you’ll end up with mushy mac after baking.
- Low and Slow for Sauce: When making the roux and adding milk, keep the heat moderate and whisk constantly. If it thickens too fast, the sauce can get lumpy.
- Season Gradually: Taste as you go! It’s easy to oversalt, especially with sharp cheeses. Add spices little by little.
- Crunchy Topping Trick: Toss panko with melted butter and parmesan for real crunch. Dry breadcrumbs just don’t cut it.
- Multitasking: Prep the topping while your pasta cooks, and grate cheese while the sauce thickens. It saves time and keeps everything moving.
- Consistency Tip: If the sauce is too thick, a splash of milk will loosen it up. Too thin? Let it simmer a bit longer.
I’ve messed up by rushing the sauce—grainy, split, you name it. Now I always lower the heat and whisk (even if my arm gets tired). If you accidentally overcook the pasta, all is not lost—just shorten the baking time. For perfect results every time, use the same brand of cheese and pasta you love best. And, if you want a little extra tang, stir in a spoonful of sour cream before baking (it’s a game-changer for texture!).
Variations & Adaptations
One of the best parts about this creamy mac and cheese recipe easy classic with crispy topping is how easy it is to customize. Here are a few of my favorite tweaks and swaps:
- Gluten-Free: Use gluten-free pasta and flour—Bob’s Red Mill is my go-to. Swap panko for gluten-free breadcrumbs.
- Lighter Version: Use low-fat cheese and milk, and skip the cream cheese. The sauce won’t be quite as rich, but it still hits the spot.
- Veggie Boost: Fold in roasted broccoli, peas, or spinach before baking. Adds color and nutrition, and my kids barely notice.
- Spicy Kick: Stir in a few dashes of hot sauce or a sprinkle of cayenne for heat lovers.
- Meaty Variation: Add cooked bacon bits, diced ham, or shredded rotisserie chicken for a heartier meal.
- Dairy-Free: Use plant-based milk and vegan cheese. The sauce is a little less creamy, but still tasty.
I’ve tried tossing in caramelized onions and mushrooms—honestly, it’s fantastic for fall. You can also swap the topping for crushed potato chips or fried onions for extra crunch. If you want to try stovetop-only, skip the baking and serve straight from the pan (just toast the topping separately in a skillet and sprinkle before serving). It’s fun to play around—sometimes my favorite version is the one with a handful of leftover veggies or a splash of sriracha!
Serving & Storage Suggestions
This creamy mac and cheese recipe easy classic with crispy topping is best served piping hot, straight from the oven. The cheese sauce is at peak creaminess and the topping has that irresistible crunch. If you want a Pinterest-worthy presentation, sprinkle a few chopped chives or parsley on top—adds color and a little freshness.
Pair with grilled sausages, a crisp green salad, or roasted veggies for a complete meal. A cold glass of iced tea or a light beer goes great alongside. For brunch, serve with scrambled eggs or fruit salad. Leftovers keep well in the fridge for up to 4 days (though they rarely last that long!).
To store, let the mac and cheese cool completely, then cover tightly with foil or transfer to an airtight container. For best results, reheat in the oven at 350°F (175°C) for 15-20 minutes, covered loosely with foil to preserve moisture. The topping may soften in the fridge, but you can revive it by broiling for 1-2 minutes. Freezing is possible—wrap portions well and thaw in the fridge overnight before reheating. Flavors deepen over time, so leftovers are even richer the next day!
Nutritional Information & Benefits
Each serving of this creamy mac and cheese recipe easy classic with crispy topping (about 1 cup) has an estimated 420 calories, 22g fat, 16g protein, and 38g carbohydrates. The dish is a source of calcium (thanks to all that cheese), and the pasta provides energy-boosting carbs. Gruyère adds extra B vitamins, while the crispy topping gives satisfying flavor without going overboard on calories.
For gluten-free or low-carb diets, use alternative pasta and flour. If you’re watching sodium, opt for low-salt cheese. Allergens include dairy, wheat, and eggs (if you add an egg to the sauce). Personally, I love that this recipe is so satisfying—you don’t need a huge portion to feel full, and it’s easy to tweak for your own wellness goals. Comfort food, but with a little flexibility!
Conclusion
If you’re craving comfort, nostalgia, and just the right amount of crunch, this creamy mac and cheese recipe easy classic with crispy topping is the one to try. It’s easy, crowd-pleasing, and honestly feels like a warm hug after a long day. Whether you stick to the classic recipe or tweak it to fit your tastes, every bite is pure cheesy goodness.
I love how this dish brings people together—kids, grown-ups, skeptics, and cheese fanatics alike. Don’t be afraid to make it your own (add bacon, switch up the cheese, toss in veggies—you do you!). If you give this recipe a whirl, drop a comment below, share your tweaks, or tag your Pinterest creations. I can’t wait to see your spins and hear your family stories. So, grab your favorite baking dish and get cooking—cheesy happiness is just a spoonful away!
FAQs
Can I make creamy mac and cheese ahead of time?
Absolutely! Assemble and refrigerate before baking, then pop it in the oven when you’re ready. Add a splash of milk if the sauce thickens.
What’s the best cheese for mac and cheese?
Sharp cheddar is classic, but mixing in Gruyère, Monterey Jack, or mozzarella gives extra depth and creaminess. Freshly grated cheese melts best!
How do I keep my mac and cheese sauce from getting grainy?
Use freshly shredded cheese, whisk the sauce well, and don’t let it boil after adding cheese. Gentle heat is key.
Can I use different pasta shapes?
Yes! Elbows are traditional, but shells, cavatappi, or rotini work well. Just cook to al dente so they hold up in the sauce.
How do I make the topping extra crispy?
Toss panko with melted butter and parmesan, then broil for the last 1-2 minutes of baking (watch closely!). This gives the perfect crunch.
Pin This Recipe!

Creamy Mac and Cheese Recipe Easy Classic with Crispy Topping

This creamy mac and cheese is a nostalgic, crowd-pleasing classic with a luxuriously smooth cheese sauce and a buttery, crispy breadcrumb topping. It’s quick, easy, and perfect for weeknights, holidays, or potlucks—comfort food at its best.
- Prep Time: 15 minutes
- Cook Time: 25 minutes
- Total Time: 40 minutes
- Yield: 8 servings 1x
- Category: Main Course
- Cuisine: American
Ingredients
- 12 oz elbow macaroni (about 3 cups dry)
- 4 tbsp unsalted butter
- 1/4 cup all-purpose flour
- 2 cups whole milk
- 1 cup evaporated milk
- 2 cups sharp cheddar cheese, shredded
- 1 cup Gruyère or Swiss cheese, shredded (optional)
- 2 oz cream cheese, cut into pieces
- 1 tsp salt
- 1/2 tsp ground black pepper
- 1/2 tsp ground mustard powder
- 1/2 tsp paprika
- Pinch freshly grated nutmeg (optional)
- 1 cup panko breadcrumbs
- 3 tbsp unsalted butter, melted
- 1/3 cup parmesan cheese, grated
- 1/4 tsp paprika (for topping)
- Pinch of salt (for topping)
Instructions
- Preheat oven to 375°F (190°C). Lightly grease a 9×13-inch baking dish.
- Bring a large pot of salted water to a boil. Add elbow macaroni and cook until just al dente (7-8 minutes). Drain and set aside.
- In a medium saucepan, melt 4 tbsp butter over medium heat. Sprinkle in flour and whisk constantly for 1-2 minutes until bubbling but not browned.
- Gradually add whole milk and evaporated milk, whisking to avoid lumps. Cook, whisking, for 4-5 minutes until thickened.
- Reduce heat to low. Add cheddar, Gruyère, and cream cheese. Stir until melted and smooth.
- Add salt, pepper, mustard powder, paprika, and nutmeg. Taste and adjust seasoning as needed.
- Fold drained pasta into cheese sauce until evenly coated. Add a splash more milk if needed for a silky consistency.
- In a small bowl, mix panko breadcrumbs, melted butter, parmesan, paprika, and a pinch of salt until evenly coated.
- Pour mac and cheese mixture into prepared baking dish. Sprinkle breadcrumb topping evenly over the surface.
- Bake for 20-25 minutes until topping is golden brown and edges are bubbling. For extra color, broil for 1-2 minutes, watching closely.
- Let rest for 5-10 minutes before serving for best texture.
Notes
For best results, use freshly shredded cheese. Don’t overcook pasta—al dente is key. Taste the sauce before combining with pasta and adjust seasoning. For extra crunch, broil the topping briefly. Gluten-free and dairy-free adaptations are possible. Let the dish rest before serving for a creamier texture.
Nutrition
- Serving Size: About 1 cup per serv
- Calories: 420
- Sugar: 5
- Sodium: 650
- Fat: 22
- Saturated Fat: 13
- Carbohydrates: 38
- Fiber: 2
- Protein: 16
Keywords: mac and cheese, creamy mac and cheese, baked mac and cheese, classic mac and cheese, comfort food, easy mac and cheese, crispy topping, family dinner, potluck, holiday side