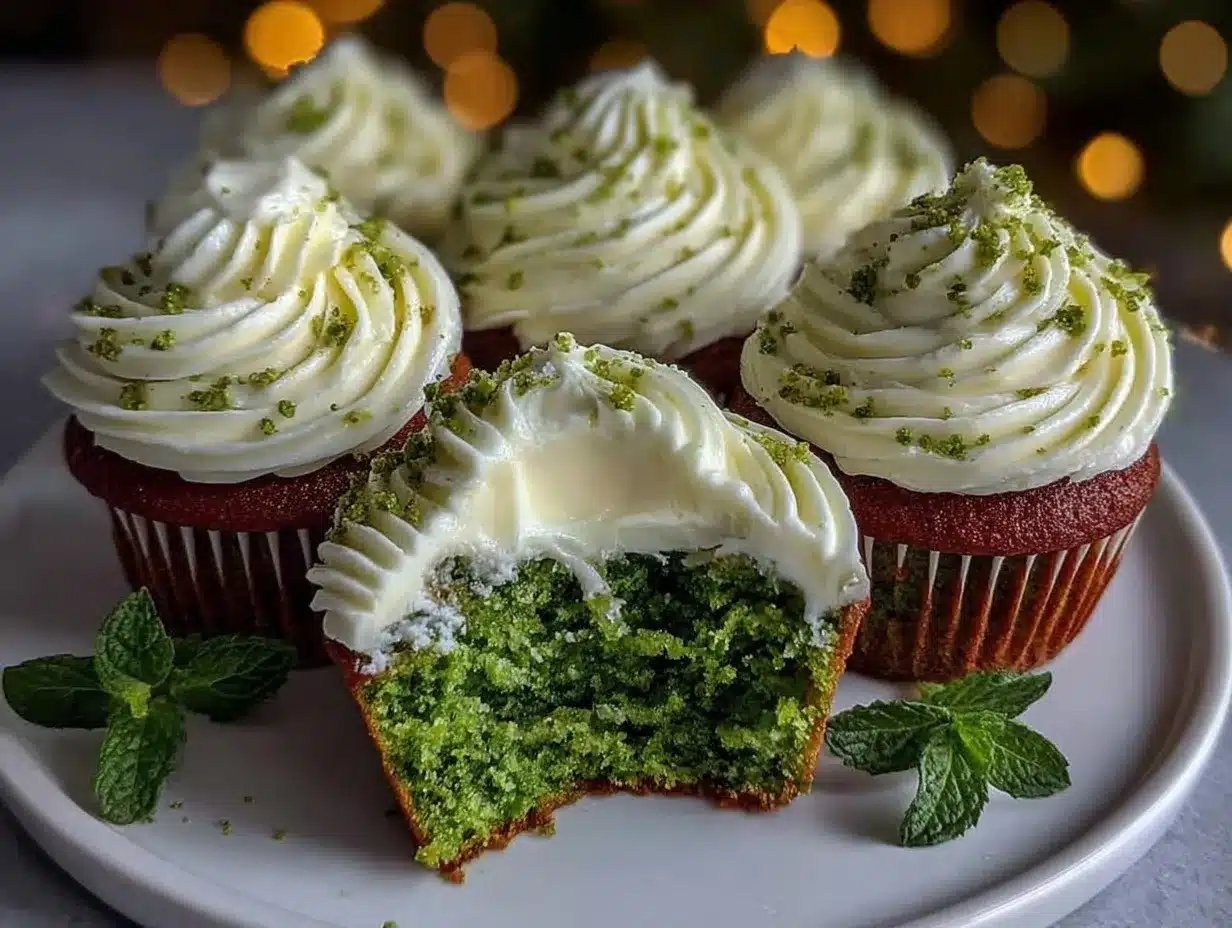
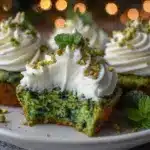
Let me tell you, the moment those lush Green Velvet Cupcakes start baking—the kitchen fills with this buttery, sweet aroma that’s just irresistible. The gentle scent of cocoa, mingled with a hint of vanilla, kind of wraps itself around you like a soft blanket. When I peeked into the oven the first time I made these, I was instantly hooked by that vibrant emerald hue. It’s the kind of moment where you pause, take a deep breath, and just smile because you know you’re onto something truly special.
Years ago, when I was knee-high to a grasshopper, my grandma used to whip up red velvet cakes for every big family occasion. But on a rainy weekend (when I was trying to jazz up a bake sale table), I stumbled onto the idea—what if I swapped the classic red for a lush green? Suddenly, these cupcakes became my signature. I wish I’d discovered the Green Velvet Cupcake recipe ages ago—seriously, it’s a showstopper and a conversation starter.
Honestly, my family couldn’t stop sneaking cupcakes off the cooling rack (and I can’t really blame them!). My kids love picking out the brightest ones, and even my husband—who’s usually more of a pie guy—keeps asking for “just one more.” They’re perfect for St. Patrick’s Day parties, Christmas gatherings, or just to brighten up your Pinterest dessert board. Sweet treats for your kids, or a jaw-dropping addition to a potluck spread—these cupcakes bring pure, nostalgic comfort in a totally fresh way. I’ve tested them more times than I can count (in the name of research, of course), and they’ve quickly become a staple for family gatherings and gifting. Every bite feels like a warm hug. Trust me, you’re going to want to bookmark this one!
Why You’ll Love This Green Velvet Cupcakes Recipe
Let’s face it—not all cupcakes are created equal, and these Green Velvet Cupcakes with Cream Cheese Frosting are in a league of their own. After plenty of trials (and a few kitchen mishaps), I’ve landed on a recipe that’s as easy as it is delicious. Here’s why you’ll love it:
- Quick & Easy: Comes together in under 45 minutes, perfect for busy weeknights or last-minute cravings.
- Simple Ingredients: No fancy grocery trips needed; you likely already have everything in your kitchen.
- Perfect for Every Occasion: Great for brunches, potlucks, cozy dinners, holiday mornings, and especially St. Patrick’s Day.
- Crowd-Pleaser: Always gets rave reviews from kids and adults alike—my family can’t get enough!
- Unbelievably Delicious: The texture is moist and tender, with a subtle cocoa flavor and a creamy, tangy frosting that’s pure comfort food.
What really sets this green velvet cupcake recipe apart? I use a touch of sour cream for extra moisture (learned that from a pastry chef friend), and a precise balance of cocoa and vanilla. Plus, the green color isn’t just for show—it gives these cupcakes a whimsical pop that makes them totally Pinterest-worthy. Unlike some recipes that skimp on flavor for color, mine keeps that classic “velvet” richness you expect.
This recipe isn’t just good—it’s the kind that makes you close your eyes after the first bite. It’s comfort food reimagined: healthier, faster, and still packed with that soul-soothing satisfaction. Whether you want to impress guests without the stress, or turn a simple meal into a memory, these cupcakes are always a hit. You know what? They’ve become my go-to for sharing happiness (and a little bit of green magic) with friends and family.
What Ingredients You Will Need
This Green Velvet Cupcakes recipe uses simple, wholesome ingredients to deliver bold flavor and satisfying texture without the fuss. Most are pantry staples, so you won’t need to hunt for anything exotic. Here’s what you’ll need:
- For the Green Velvet Cupcake Batter:
- 1 1/4 cups (160g) all-purpose flour (King Arthur is my go-to for consistent results)
- 1/4 cup (30g) unsweetened cocoa powder (Dutch-process or natural; I use Hershey’s for a nice mild flavor)
- 3/4 cup (150g) granulated sugar
- 1/2 teaspoon baking soda
- 1/4 teaspoon salt
- 1/2 cup (120ml) vegetable oil (canola works too; keeps cupcakes moist)
- 1 large egg, room temperature
- 1/3 cup (80ml) sour cream (adds richness; Greek yogurt works for a lighter version)
- 2 teaspoons vanilla extract (use pure for best flavor)
- 1/2 cup (120ml) buttermilk (whole milk with a splash of vinegar works in a pinch)
- 1 1/2 teaspoons distilled white vinegar (helps the color pop and reacts with baking soda)
- 1 tablespoon green food coloring (gel works best for vibrant color; I recommend Wilton or Americolor)
- For the Cream Cheese Frosting:
- 8 oz (225g) cream cheese, softened (Philadelphia is my favorite)
- 1/2 cup (115g) unsalted butter, softened
- 2 cups (240g) powdered sugar (sifted for smoothness)
- 1 teaspoon vanilla extract
- Pinch of salt (balances the sweetness)
Ingredient Selection Tips: For the green coloring, gel is much more vibrant and won’t water down your batter. If you want a gluten-free version, swap in your favorite 1:1 gluten-free flour blend. For dairy-free adaptations, coconut yogurt and dairy-free cream cheese work nicely—just watch the consistency. In summer, you can add lime zest for a citrus twist, or sprinkle crushed pistachios for crunch.
Honestly, once you get the hang of these ingredients, you’ll find endless ways to customize. Pantry staples with a splash of color—what’s not to love?
Equipment Needed
You don’t need a fancy kitchen to whip up these Green Velvet Cupcakes. Here’s the gear I use every time:
- Muffin tin or cupcake pan (12-count): Nonstick or lined with paper liners; I use Wilton pans for even baking.
- Mixing bowls: At least two—one for dry ingredients, one for wet.
- Electric mixer or stand mixer: Makes frosting a breeze, but a handheld whisk works in a pinch (just a bit of elbow grease required).
- Rubber spatula: For scraping batter and folding gently.
- Measuring cups and spoons: Precision counts, especially for baking. I love stainless steel sets—they last forever.
- Wire cooling rack: Helps cupcakes cool evenly and prevents soggy bottoms.
- Piping bag and star tip (optional): For picture-perfect frosting swirls. You can use a zip-top bag with the corner snipped off if you’re on a budget.
Honestly, I’ve used everything from thrift shop finds to family hand-me-downs. Just make sure your muffin tin is well cared for—wash it gently and dry it thoroughly to avoid rust spots. If you don’t have a mixer, a sturdy whisk gets the job done (just a little more muscle). Cupcake liners are a must for easy cleanup and pretty presentation. Simple tools, big results!
Preparation Method
- Preheat and Prep:
Preheat your oven to 350°F (175°C). Line a 12-count muffin tin with cupcake liners. If you want extra insurance against sticking, lightly mist the liners with nonstick spray. - Combine Dry Ingredients:
In a medium bowl, whisk together 1 1/4 cups (160g) flour, 1/4 cup (30g) cocoa powder, 3/4 cup (150g) sugar, 1/2 teaspoon baking soda, and 1/4 teaspoon salt. The mixture should look even and lump-free. - Mix Wet Ingredients:
In a large bowl, add 1/2 cup (120ml) oil, 1 large egg, 1/3 cup (80ml) sour cream, and 2 teaspoons vanilla extract. Whisk until smooth. Add 1/2 cup (120ml) buttermilk, 1 1/2 teaspoons vinegar, and 1 tablespoon green food coloring. Mix again until the color is evenly distributed and the mixture is vivid green. - Combine Wet and Dry:
Gently fold the dry ingredients into the wet mixture using a rubber spatula. Don’t overmix—stop as soon as you see no streaks of flour. The batter should feel silky and look bright green. If it’s too thick, add a splash of extra buttermilk. - Fill the Cupcake Liners:
Using a medium cookie scoop or two spoons, fill each liner about 2/3 full. This helps the cupcakes rise tall without overflowing. If you overfill, they might spill—learned that one the hard way! - Bake:
Bake for 18-22 minutes, or until a toothpick inserted in the center comes out clean. The tops should spring back lightly when touched. If using a dark pan, check at 18 minutes; lighter pans may need a couple more minutes. - Cool:
Remove cupcakes from the oven and let them cool in the pan for 5 minutes. Transfer to a wire rack to cool completely—this prevents sogginess and helps set the crumb. - Prepare the Cream Cheese Frosting:
In a large bowl, beat 8 oz (225g) cream cheese and 1/2 cup (115g) butter until creamy and fluffy (about 2 minutes). Gradually add 2 cups (240g) powdered sugar, 1 teaspoon vanilla, and a pinch of salt. Mix until smooth. If frosting feels too soft, chill for 10-15 minutes. - Frost the Cupcakes:
Once cupcakes are completely cool, pipe or spread the frosting on top. For swirls, use a star tip—just start at the outer edge and circle inward. If you’re feeling fancy, add sprinkles or edible glitter. - Final Touches:
Serve immediately, or store in an airtight container. If you want the frosting to set up a bit, chill for 15-20 minutes before serving.
Notes: If your cupcakes sink in the middle, you might’ve overmixed or used too much baking soda. If the color isn’t popping, add a smidge more gel coloring. For extra efficiency, prep your frosting while the cupcakes bake—it saves time and keeps things moving. The batter should be thick but pourable, and the finished cakes should be moist with a fine crumb (like a velvet ribbon!).
Cooking Tips & Techniques
There are a few tricks to getting these Green Velvet Cupcakes just right, and I’ve learned some of them the hard way. Here’s what will help you nail it every time:
- Use Room Temperature Ingredients: This helps everything blend smoothly and leads to even, tender cupcakes. Cold eggs or cream cheese can cause lumps—trust me, I’ve tried shortcuts and regretted it!
- Don’t Overmix: Once you add the flour, mix just until combined. Overmixing leads to dense, chewy cupcakes (a rookie mistake I made more than once).
- Color Control: Gel food coloring is your friend—it’s concentrated and won’t water down the batter. Start with a little and add more for the shade you want.
- Baking Time Watch: Cupcakes can go from perfect to dry in a flash. Set a timer and check early. If you’re baking more than one tray, rotate halfway for even baking.
- Frosting Consistency: If your cream cheese frosting is too runny, chill it for a bit before piping. If it’s too thick, add a splash of milk.
- Multitasking: Prep your frosting while the cupcakes are baking, and clean up as you go. Makes the whole process much smoother.
- Consistency for Success: Use a cookie scoop for uniform cupcakes. This helps them bake evenly and look extra professional.
I’ve had cupcakes stick to the pan, frosting slide off because the cakes were warm, and color look more swamp than velvet. It happens! If you hit a snag, just keep going—these cupcakes are forgiving and always taste great, even if they aren’t picture-perfect.
Variations & Adaptations
One of the best things about this Green Velvet Cupcakes recipe is how easy it is to make it your own. Here are some favorite variations:
- Gluten-Free: Swap the all-purpose flour for a trusted 1:1 gluten-free blend (like Bob’s Red Mill). The cupcakes stay moist and fluffy.
- Dairy-Free: Use coconut yogurt in place of sour cream and dairy-free cream cheese and butter for the frosting. The flavor stays rich, but it’s allergen-friendly.
- Seasonal Flavors: Add 1 teaspoon lime or lemon zest to the batter for a citrusy twist, or sprinkle crushed pistachios on top for a nutty crunch.
- Different Cooking Methods: If you want mini cupcakes, use a mini tin and bake for 10-12 minutes. For a cake version, double the recipe and bake in a 9-inch round pan.
- Personal Touch: I sometimes add a handful of white chocolate chips to the batter—the creamy bits melt in and make every bite a surprise.
If you need to avoid eggs, try using a flaxseed egg (1 tablespoon ground flaxseed mixed with 3 tablespoons water, let sit 5 minutes). For nut allergies, skip any add-ins and check your coloring for cross-contamination warnings. You know what? Every batch is a little different, and that’s part of the fun!
Serving & Storage Suggestions
Green Velvet Cupcakes are best served at room temperature, so the frosting is creamy and the cake is tender. Arrange them on a pretty platter or a tiered stand for parties—they look gorgeous against white dishes or with gold sprinkles for extra sparkle.
Pair with cold milk, hot coffee, or even a matcha latte for a green-on-green treat. These cupcakes also play well with fresh berries or a scoop of vanilla ice cream if you want to turn dessert into a celebration.
For storage, place cupcakes in an airtight container and refrigerate for up to 4 days. The frosting stays fresh and the cakes hold their moisture. You can freeze unfrosted cupcakes for up to 2 months; thaw and frost before serving. To reheat (if you like a warm cupcake), zap in the microwave for 10 seconds—just enough to soften but not melt the frosting.
Honestly, the flavor deepens after a day or two—almost like the cocoa and vanilla get cozier together. If you’re making them ahead, frost right before serving for the freshest look.
Nutritional Information & Benefits
Each Green Velvet Cupcake with Cream Cheese Frosting comes in around 230-250 calories, with roughly 12g fat, 30g carbs, and 2g protein. They’re a treat, for sure—but the cocoa provides antioxidants and the cream cheese offers a little calcium and protein.
If you opt for Greek yogurt or dairy-free substitutes, you can cut some saturated fat. Gluten-free flour makes these accessible to those with sensitivities. There are eggs and dairy, so watch for allergens if you’re baking for a crowd.
From a personal wellness perspective, these cupcakes are all about balance: a sweet indulgence that’s worth every bite, especially when shared with friends. They’re a bright spot on any table, and that’s good for the soul!
Conclusion
There’s just something magical about Green Velvet Cupcakes—the color, the flavor, the way people’s eyes light up when you serve them. They’re not only easy to make but also endlessly adaptable, so you can tweak them to fit your cravings or dietary needs. I love this recipe because it brings together everything I want in a dessert: nostalgia, a bit of whimsy, and pure comfort.
Go ahead and experiment—swap out flavors, play with toppings, or try minis for bite-sized joy. If you give these cupcakes a whirl, let me know how they turn out! Drop a comment below, share your pics on Pinterest, or tell me your favorite twist. Baking should be fun, and these cupcakes are proof that a little color can go a long way. Wishing you happy baking and even happier eating!
Frequently Asked Questions (FAQs)
Can I make Green Velvet Cupcakes without buttermilk?
Absolutely! Just mix 1/2 cup (120ml) regular milk with 1 teaspoon vinegar or lemon juice—let it sit for 5 minutes and you’re good to go.
What’s the best food coloring for a vibrant green?
Gel food coloring is best. Wilton and Americolor both give a rich, vivid shade without watering down your batter.
How do I prevent cupcakes from sticking to the liners?
Use quality liners and let the cupcakes cool completely before removing. A quick mist of nonstick spray also helps.
Can I freeze these cupcakes?
Yes! Freeze unfrosted cupcakes for up to 2 months. Thaw overnight, then frost fresh before serving for best texture.
Is it possible to make these cupcakes gluten-free?
Definitely—swap the all-purpose flour for a 1:1 gluten-free baking blend. The cupcakes stay light, moist, and delicious.
Pin This Recipe!

Green Velvet Cupcakes Recipe Easy Homemade with Cream Cheese Frosting
These vibrant Green Velvet Cupcakes are moist, tender, and topped with a creamy, tangy cream cheese frosting. Perfect for celebrations like St. Patrick’s Day or Christmas, they’re a showstopper that’s easy to make and always a crowd-pleaser.
- Prep Time: 15 minutes
- Cook Time: 18-22 minutes
- Total Time: 40 minutes
- Yield: 12 cupcakes 1x
- Category: Dessert
- Cuisine: American
Ingredients
- 1 1/4 cups all-purpose flour
- 1/4 cup unsweetened cocoa powder
- 3/4 cup granulated sugar
- 1/2 teaspoon baking soda
- 1/4 teaspoon salt
- 1/2 cup vegetable oil
- 1 large egg, room temperature
- 1/3 cup sour cream (or Greek yogurt)
- 2 teaspoons vanilla extract
- 1/2 cup buttermilk (or whole milk with a splash of vinegar)
- 1 1/2 teaspoons distilled white vinegar
- 1 tablespoon green food coloring (gel recommended)
- 8 oz cream cheese, softened
- 1/2 cup unsalted butter, softened
- 2 cups powdered sugar, sifted
- 1 teaspoon vanilla extract
- Pinch of salt
Instructions
- Preheat your oven to 350°F (175°C). Line a 12-count muffin tin with cupcake liners and lightly mist with nonstick spray if desired.
- In a medium bowl, whisk together flour, cocoa powder, sugar, baking soda, and salt until evenly combined.
- In a large bowl, whisk together oil, egg, sour cream, and vanilla extract until smooth. Add buttermilk, vinegar, and green food coloring, mixing until the color is evenly distributed.
- Gently fold the dry ingredients into the wet mixture using a rubber spatula. Mix just until no streaks of flour remain; do not overmix.
- Fill each cupcake liner about 2/3 full with batter.
- Bake for 18-22 minutes, or until a toothpick inserted in the center comes out clean. Tops should spring back lightly when touched.
- Let cupcakes cool in the pan for 5 minutes, then transfer to a wire rack to cool completely.
- For the frosting: In a large bowl, beat cream cheese and butter until creamy and fluffy (about 2 minutes). Gradually add powdered sugar, vanilla, and a pinch of salt, mixing until smooth. Chill frosting for 10-15 minutes if too soft.
- Pipe or spread frosting onto cooled cupcakes. Decorate with sprinkles or edible glitter if desired.
- Serve immediately, or chill cupcakes for 15-20 minutes to set the frosting. Store leftovers in an airtight container in the refrigerator.
Notes
Use room temperature ingredients for best results. Don’t overmix the batter to keep cupcakes tender. Gel food coloring gives the most vibrant color. Prep frosting while cupcakes bake to save time. For gluten-free or dairy-free adaptations, substitute with 1:1 gluten-free flour or coconut yogurt and dairy-free cream cheese. Cupcakes can be frozen unfrosted for up to 2 months.
Nutrition
- Serving Size: 1 cupcake
- Calories: 240
- Sugar: 22
- Sodium: 180
- Fat: 12
- Saturated Fat: 7
- Carbohydrates: 30
- Fiber: 1
- Protein: 2
Keywords: green velvet cupcakes, cream cheese frosting, St. Patrick's Day dessert, easy cupcakes, homemade cupcakes, velvet cake, holiday baking, party treats, colorful cupcakes