
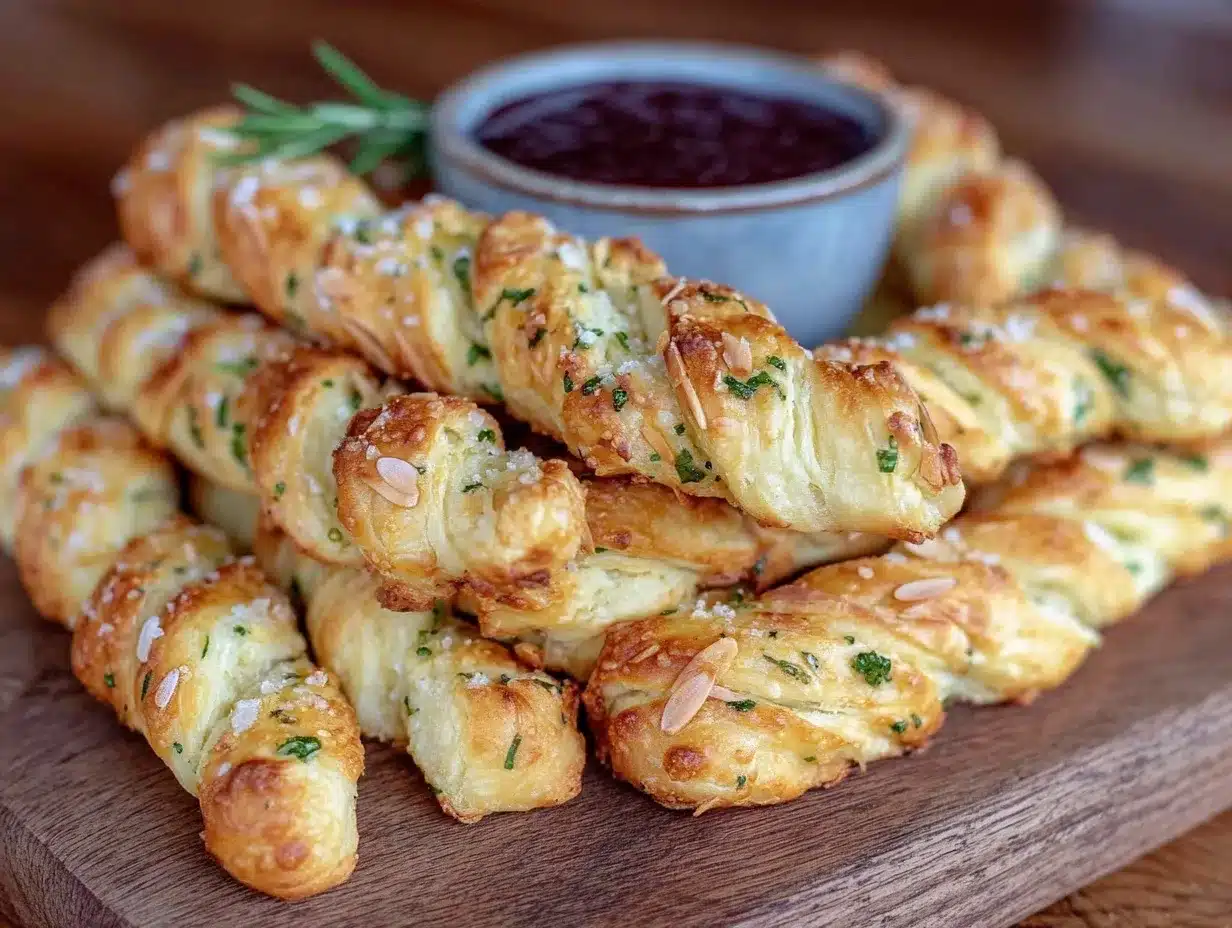
Third time this week I rolled out dough, carefully pinched knuckle bumps, and nestled almond “fingernails” just right. The crispy witch finger breadsticks were shaping up to be exactly as eerie and delicious as I imagined. Honestly, I never thought breadsticks could be such an obsession — I mean, how often do you find yourself compulsively tweaking a recipe to get that perfect crunch and that just-right garlic butter marinara dip? But here I was, Friday night again, fingers dusted with flour, anxiously waiting for the oven timer to chime. It’s not just the spooky vibe that pulled me back; it’s the way the golden crust snaps and the scent of garlic butter swirling together with the richness of marinara that feels like a cozy little magic trick you can eat.
There’s something oddly satisfying about shaping each breadstick into a creepy finger with knuckles and nails—yes, those slivered almonds really do make a difference! And the garlic butter marinara? That dip has this buttery, garlicky depth that’s unlike your usual tomato sauce; it’s like they had a secret meeting and decided to be best friends forever. I kept thinking, “Could this be the ultimate Halloween party starter?” I even made a batch for a game night, and the way those crispy fingers disappeared was kind of wild.
After baking these crispy witch finger breadsticks multiple times, I realized it’s not just a seasonal gimmick. It’s comfort food with a twist — playful, crunchy, and utterly addictive. The recipe stuck with me because it’s a little bit spooky but mostly just ridiculously good. And you know, if you ever find yourself craving something crispy, buttery, and garlicky, this recipe has your name on it. No tricks, just tasty treats that bring a little fun to the table.
Why You’ll Love This Recipe
Having tested this crispy witch finger breadsticks recipe over and over (I’m not even kidding, the obsession is real), I can say it’s one of those rare recipes that checks all the boxes. Here’s why it might become your new go-to snack or party appetizer:
- Quick & Easy: Ready in under 45 minutes, including prep and baking—perfect for last-minute gatherings or Halloween parties.
- Simple Ingredients: No weird stuff here. Just pantry staples like flour, yeast, butter, and garlic, plus a few fun extras like sliced almonds.
- Perfect for Spooky Celebrations: Whether it’s a Halloween bash or a fun family night, these breadsticks bring a playful vibe without the fuss.
- Crowd-Pleaser: Both kids and adults love the crunchy texture and flavorful dip—expect lots of “can I have another?”
- Unbelievably Delicious: The crispy exterior and tender inside paired with that buttery garlic marinara dip are straight-up addictive.
- Unique Twist: The almond “nails” and knuckle details add visual fun, and the garlic butter in the marinara makes it stand out from your typical tomato dip.
This isn’t just another breadstick recipe you scroll past. It’s that one you remember because it’s fun to make, fun to eat, and just a little bit spooky. Plus, if you love bold flavors with a crispy bite, this recipe delivers in spades. Just like my crispy chicken Caesar salad with easy homemade croutons that mixes crunch and flavor perfectly, these breadsticks bring that same satisfying texture combo you crave.
What Ingredients You Will Need
This recipe uses straightforward, wholesome ingredients to build those delightfully crispy witch finger breadsticks with a side of rich, garlicky marinara that’s easy to whip up. Most ingredients are pantry staples, and you can swap a few to suit your preferences or dietary needs.
- For the Breadsticks:
- 2 ½ cups (315g) all-purpose flour (I like King Arthur for reliable texture)
- 1 packet (2 ¼ tsp or 7g) active dry yeast
- ¾ cup (180ml) warm water (around 110°F / 43°C)
- 1 tbsp granulated sugar (feeds the yeast)
- 1 tsp salt
- 2 tbsp unsalted butter, melted (adds richness)
- Sliced almonds (for “fingernails”)
- Optional: pinch of smoked paprika or chili flakes for a little heat
- For the Garlic Butter Marinara Dip:
- 1 cup (240ml) marinara sauce (homemade or your favorite store-bought brand)
- 3 tbsp unsalted butter
- 2 cloves garlic, minced (fresh is best for punchy flavor)
- 1 tsp dried Italian herbs (oregano, basil mix works well)
- Salt and pepper to taste
If you need gluten-free options, almond flour works well for the breadsticks but expect a softer texture. You can also swap regular butter for dairy-free margarine to make the dip vegan-friendly (just skip the butter or use olive oil). For a seasonal twist, try adding a little roasted pumpkin puree into the dough for a subtle autumn flavor. Just remember to adjust the flour slightly to keep the dough consistency right.
Equipment Needed
- Mixing bowls – a large one for dough mixing and a small one for the dip
- Measuring cups and spoons – accuracy is key for yeast-based dough
- Whisk or wooden spoon – for stirring ingredients
- Baking sheet lined with parchment paper or a silicone baking mat (helps prevent sticking)
- Pastry brush – for brushing melted butter on breadsticks
- Sharp knife or kitchen scissors – to shape the “knuckles” and cut dough strips
- Small saucepan – to melt butter and gently cook garlic for the dip
If you don’t have a pastry brush, a clean spoon or your fingertips work just fine for spreading melted butter. When I first made these, I used a baking stone instead of a sheet, which gave an extra crisp bottom, but either works well. Just keep an eye on the baking time if you switch equipment. For mixing dough, I recommend a stand mixer if you have one—it makes kneading much easier, but hand kneading works perfectly too (just a bit more arm workout!).
Preparation Method
- Activate the Yeast (5-7 minutes): Combine the warm water (110°F / 43°C), sugar, and yeast in a small bowl. Stir gently and let it sit until it becomes foamy and bubbly on top, about 5 minutes. This means the yeast is alive and kicking.
- Mix the Dough (10 minutes): In a large bowl, whisk the flour and salt together. Pour in the melted butter and the yeast mixture. Stir with a wooden spoon until the dough starts to come together.
- Knead the Dough (8-10 minutes): Transfer the dough to a floured surface and knead it until smooth and elastic. It should be soft but not sticky. If it’s too sticky, sprinkle a little flour as you knead. This step builds the gluten network for that perfect chewy texture.
- First Rise (45-60 minutes): Place the dough in a lightly oiled bowl, cover with a clean towel or plastic wrap, and let it rise in a warm spot until doubled in size. This usually takes about an hour. The dough should feel pillowy and spring back slowly to the touch.
- Shape the Breadsticks (15 minutes): Punch down the dough to release air. Divide it into 12 equal pieces. Roll each piece into a finger shape about 6 inches (15 cm) long and 1 inch (2.5 cm) thick. Pinch and wrinkle the dough to form knuckle-like bumps. Press a sliced almond at one end for the “nail.”
- Second Rise (20 minutes): Arrange the shaped fingers on a parchment-lined baking sheet, leaving some space between them. Cover loosely and let rise again for 20 minutes. This second rise helps keep them soft inside while crisping up outside.
- Preheat Oven & Prepare Dip (15 minutes): Preheat your oven to 375°F (190°C). While the breadsticks rise, melt butter in a small saucepan over medium heat. Add minced garlic and sauté until fragrant (about 1 minute). Remove from heat and stir in marinara sauce and dried Italian herbs. Season with salt and pepper. Keep warm.
- Bake (15-18 minutes): Brush the breadsticks lightly with melted butter before baking. Bake until golden brown and crispy on the outside, about 15-18 minutes. If you want extra crispiness, switch the oven to broil for the last 1-2 minutes—just watch closely so they don’t burn.
- Serve Warm: Serve the crispy witch finger breadsticks hot with the garlic butter marinara dip on the side. The contrast of warm, crunchy breadsticks and rich, buttery dip is pure magic.
If you notice the breadsticks puffing up too much and losing their finger shape, try chilling the dough a few minutes before shaping next time. Also, don’t skip the second rise; it’s key for that tender inside.
Cooking Tips & Techniques
Getting these witch finger breadsticks just right took a few rounds of trial and error, so here’s what I learned:
- Yeast Activation: The water temperature must be warm but not hot (110°F/43°C). Too hot and the yeast dies; too cold and it won’t activate. Always test with a thermometer or just the tip of your finger.
- Kneading Matters: Don’t rush it. Kneading develops gluten, which makes the breadsticks chewy, not crumbly. If you under-knead, they might be dense; over-kneading can make them tough.
- Shaping Details: Pinching and twisting the dough to create knuckles adds that spooky effect and texture variation. Press sliced almonds gently so they don’t fall off during baking.
- Butter Brush: Brushing melted butter before baking creates a golden, crispy crust. For extra flavor, add a pinch of garlic powder or smoked paprika to your butter.
- Garlic Butter Marinara: Cook the garlic gently in butter to bring out sweetness; don’t brown it or it turns bitter. Stir the sauce off heat to keep that buttery richness.
- Timing: Bake breadsticks right after the second rise for best texture. If you wait too long, they may lose their fluffiness.
One time, I skipped the second rise (don’t do that), and the breadsticks came out flat and dense. Letting the dough rest again after shaping really makes a difference. Also, multitasking helps here: while the dough rises, I prep the dip and clean up. A little organization keeps everything smooth.
Variations & Adaptations
Since these crispy witch finger breadsticks have become a staple at my seasonal parties, I’ve tried a few fun twists to keep things interesting:
- Cheesy Fingers: Add shredded mozzarella or Parmesan into the dough or sprinkle on top before baking for a cheesy crust variation.
- Spicy Dip: Stir in a pinch of red pepper flakes or a dash of hot sauce into the garlic butter marinara for a kick.
- Herb-Infused Breadsticks: Mix dried rosemary, thyme, or sage into the dough for an earthy flavor—great for fall vibes.
- Gluten-Free Option: Use a gluten-free flour blend suitable for yeast breads and adjust water slightly. Expect a softer texture, but still tasty.
- Vegan Version: Swap butter for olive oil or vegan margarine and use a dairy-free marinara for the dip.
One favorite adaptation I tried was adding finely chopped roasted red pepper into the marinara dip, which gave a smoky sweetness that paired surprisingly well with the crispy breadsticks. If you’re into fun twists, try pairing these with my creamy buffalo chicken dip with blue cheese crumbles for a game-day spread that’s sure to impress.
Serving & Storage Suggestions
Serve these crispy witch finger breadsticks warm for the best experience. Their crispy edges and tender insides are most delightful fresh from the oven. Present them on a platter with small bowls of garlic butter marinara dip for easy grazing. They pair wonderfully with a crisp green salad or a hearty soup for a complete meal.
To store leftovers, place breadsticks in an airtight container at room temperature for up to 2 days. Reheat in a 350°F (175°C) oven for 5-7 minutes to restore crispness—microwaving can make them chewy and soggy.
The garlic butter marinara can be refrigerated in a sealed jar for up to 5 days. Warm gently on the stovetop before serving again. Fun fact: the flavors meld and deepen overnight, so leftovers sometimes taste even better the next day.
Nutritional Information & Benefits
Each serving of crispy witch finger breadsticks (about 2 fingers with dip) contains approximately:
| Calories | 220 kcal |
|---|---|
| Carbohydrates | 28g |
| Protein | 5g |
| Fat | 8g |
| Fiber | 1.5g |
Thanks to the whole wheat flour option and minimal added sugar, these breadsticks offer a reasonable balance of carbs and fats. Garlic is well-known for its antioxidant properties and potential heart health benefits, while the butter adds richness (moderation is key!). This recipe is free from nuts except for the sliced almonds on top—if you have allergies, simply omit or replace with sesame seeds for a different crunch.
Conclusion
Looking back at all those batches of crispy witch finger breadsticks, I realize why this recipe became such a go-to. It’s playful enough to bring a smile (or a shiver) but also seriously satisfying with its crispy texture and that garlicky, buttery marinara dip. Whether you’re serving it up for a Halloween party or just want a fun twist on classic breadsticks, this recipe is a winner.
Feel free to make it your own by adding herbs, cheese, or a little spice in the dip. I love how easy it is to customize without losing the magic. Honestly, after trying this, you might never look at breadsticks the same way again. And hey, if you’re curious about other fun, crowd-pleasing recipes, you might enjoy my grilled lemon herb chicken kabobs—they go great with a side of crispy breadsticks, too.
Can’t wait to hear how your crispy witch finger breadsticks turn out. Share your spooky tweaks or favorite dips in the comments below!
Frequently Asked Questions
How do I make sure my witch finger breadsticks stay crispy?
Brush them with melted butter before baking and bake until golden brown. Reheat in the oven to restore crispness rather than microwaving.
Can I prepare the dough ahead of time?
Yes! You can prepare the dough, shape the fingers, and refrigerate them covered overnight. Let them come to room temperature and rise a bit before baking.
What can I use instead of sliced almonds for the “fingernails”?
Try pumpkin seeds, sunflower seeds, or even small pieces of bell pepper for a fun twist.
Is the garlic butter marinara dip freezer-friendly?
It can be frozen in an airtight container for up to 3 months. Thaw overnight in the fridge and warm gently before serving.
Can I make these breadsticks vegan?
Absolutely! Replace butter with olive oil or vegan butter and use a vegan marinara sauce for the dip.
Pin This Recipe!
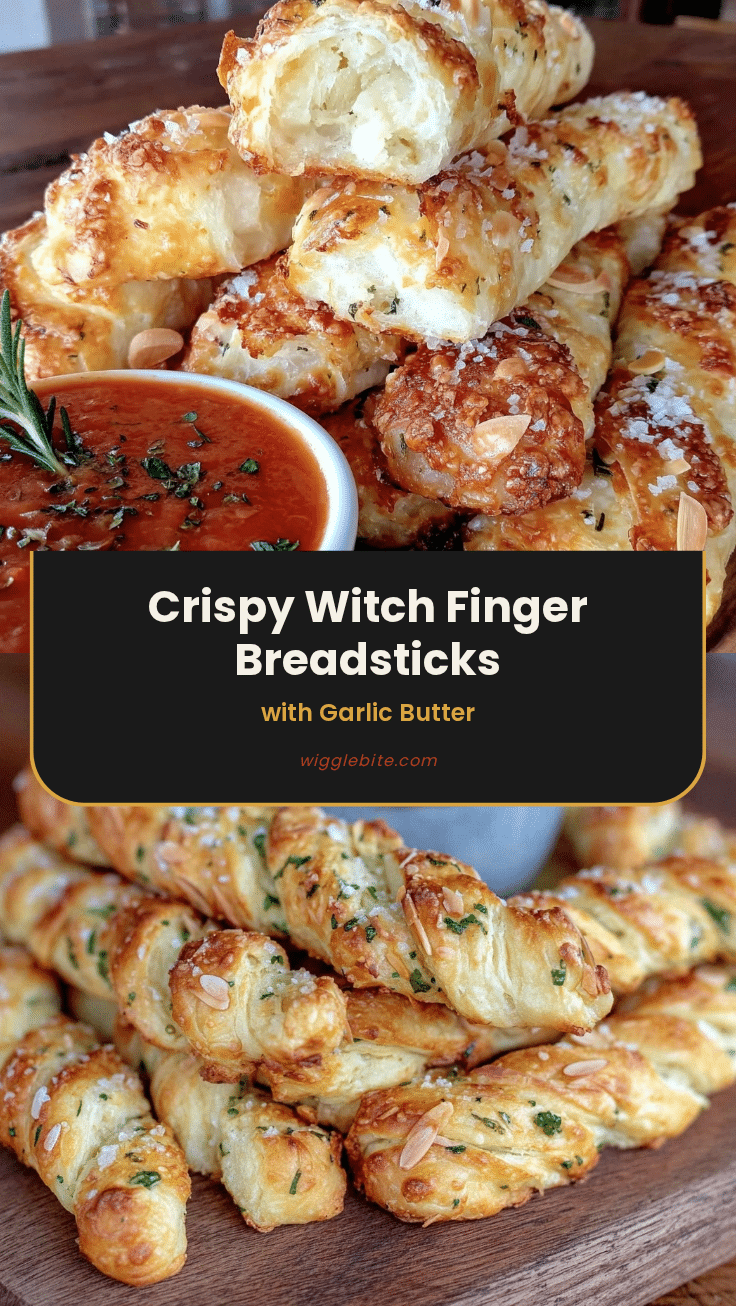
Crispy Witch Finger Breadsticks Recipe with Easy Garlic Butter Marinara Dip

These crispy witch finger breadsticks are a fun and spooky twist on classic breadsticks, featuring knuckle details and almond ‘fingernails,’ served with a rich garlic butter marinara dip. Perfect for Halloween parties or any cozy gathering.
- Prep Time: 35 minutes
- Cook Time: 15-18 minutes
- Total Time: 50-53 minutes
- Yield: 12 breadsticks (serves 6) 1x
- Category: Appetizer
- Cuisine: American
Ingredients
- 2 ½ cups (315g) all-purpose flour
- 1 packet (2 ¼ tsp or 7g) active dry yeast
- ¾ cup (180ml) warm water (around 110°F / 43°C)
- 1 tbsp granulated sugar
- 1 tsp salt
- 2 tbsp unsalted butter, melted
- Sliced almonds (for fingernails)
- Optional: pinch of smoked paprika or chili flakes
- 1 cup (240ml) marinara sauce
- 3 tbsp unsalted butter
- 2 cloves garlic, minced
- 1 tsp dried Italian herbs (oregano, basil mix)
- Salt and pepper to taste
Instructions
- Activate the yeast by combining warm water (110°F / 43°C), sugar, and yeast in a small bowl. Stir gently and let sit until foamy, about 5 minutes.
- In a large bowl, whisk flour and salt together. Pour in melted butter and yeast mixture. Stir until dough starts to come together.
- Knead the dough on a floured surface for 8-10 minutes until smooth and elastic. Add flour if too sticky.
- Place dough in a lightly oiled bowl, cover, and let rise in a warm spot until doubled in size, about 45-60 minutes.
- Punch down dough and divide into 12 equal pieces. Roll each into a 6-inch long finger shape about 1 inch thick. Pinch knuckle bumps and press sliced almonds at one end for nails.
- Arrange shaped breadsticks on parchment-lined baking sheet, cover loosely, and let rise for 20 minutes.
- Preheat oven to 375°F (190°C). Melt butter in a small saucepan over medium heat, add minced garlic and sauté until fragrant (about 1 minute). Remove from heat, stir in marinara sauce and Italian herbs. Season with salt and pepper and keep warm.
- Brush breadsticks lightly with melted butter and bake for 15-18 minutes until golden and crispy. Optionally broil for 1-2 minutes for extra crispiness, watching closely.
- Serve warm with garlic butter marinara dip.
Notes
Use warm water at 110°F to activate yeast properly. Knead dough until smooth and elastic for best texture. Don’t skip the second rise to keep breadsticks tender inside. Brush with melted butter before baking for a golden crust. For extra crispiness, broil for 1-2 minutes at the end but watch carefully. For gluten-free option, use gluten-free flour blend and expect softer texture. Vegan version can be made by substituting butter with olive oil or vegan margarine and using vegan marinara sauce.
Nutrition
- Serving Size: About 2 breadsticks
- Calories: 220
- Sugar: 2
- Sodium: 350
- Fat: 8
- Saturated Fat: 5
- Carbohydrates: 28
- Fiber: 1.5
- Protein: 5
Keywords: witch finger breadsticks, Halloween breadsticks, garlic butter marinara dip, spooky appetizer, crispy breadsticks, almond fingernails, party snack