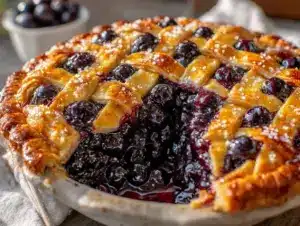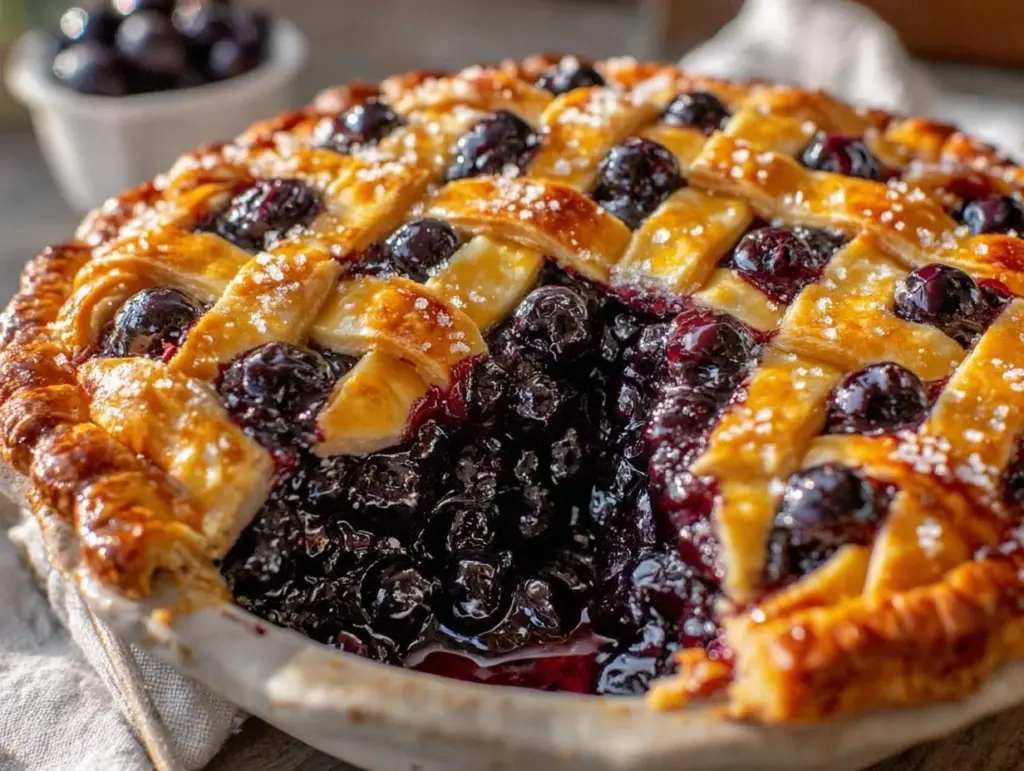
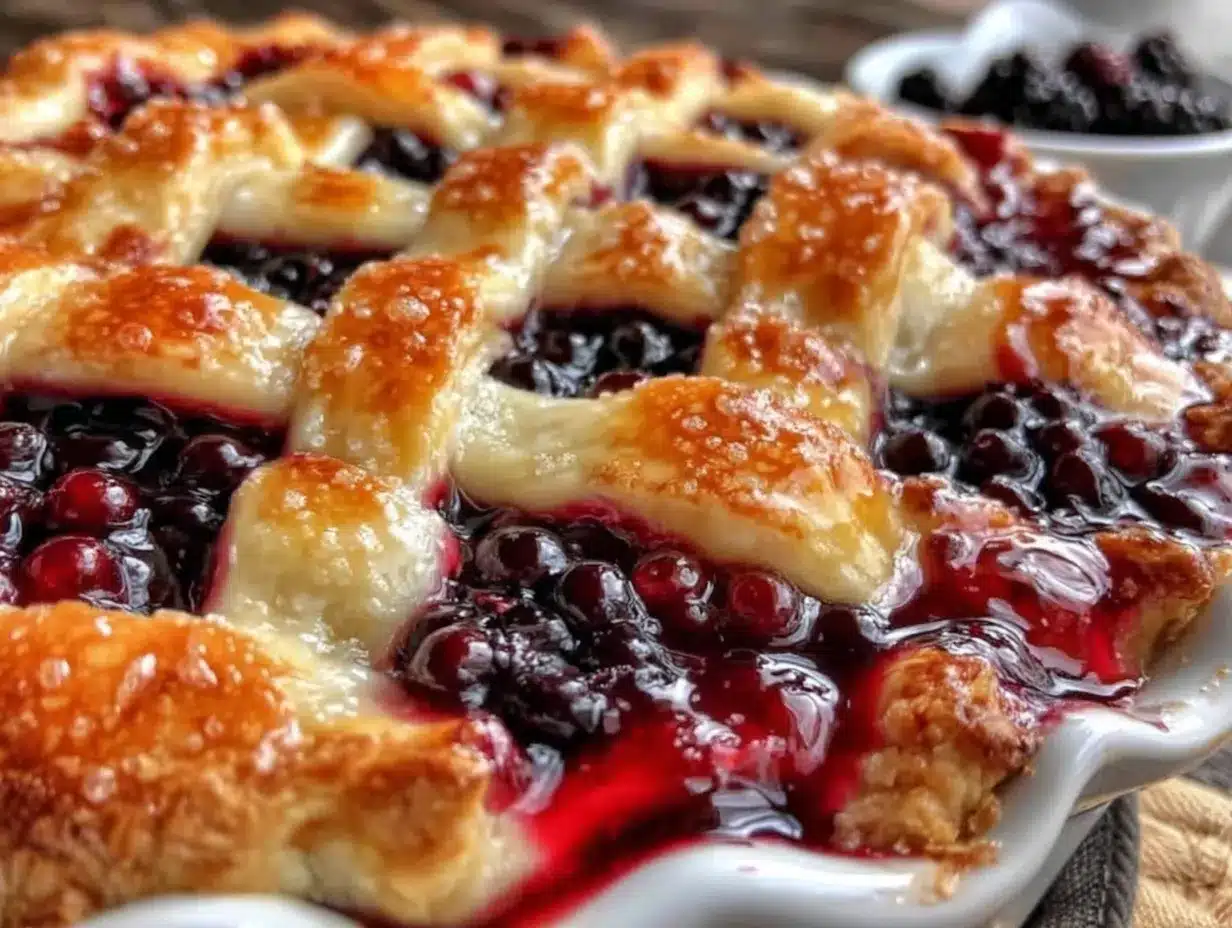
My partner took one bite of this fresh huckleberry pie and just stopped talking, eyes wide, face lighting up like it was a tiny celebration all on its own. Honestly, I had to laugh because I wasn’t even sure if the pie would turn out – I was experimenting with a lattice crust technique I’d barely practiced. The scent of warm berries mingled with buttery crust filled the kitchen, the sweet-tart huckleberries bubbling quietly beneath the golden lattice. It was that moment, watching someone savor a pie I’d pulled together with not much more than a bag of fresh huckleberries and a bit of kitchen whimsy, that I realized this recipe was something special. It’s not just about the taste, but the way a simple pie can pause a day, turn a casual snack into a small event.
The texture of the crust was flaky yet sturdy, with that delicate weave pattern letting the berry juices peek through, glistening and inviting. I thought back to the many times I’d tried other berry pies—sometimes too mushy, sometimes crust that just didn’t hold up. This fresh huckleberry pie with lattice crust struck that perfect balance, the kind that makes you want to keep a slice in the fridge just to enjoy again later. And the best part? You don’t have to be a pastry pro to get it right. That quiet kitchen moment made me realize this pie is worth sharing — not just because it’s delicious, but because it’s genuinely easy enough to become a weekend tradition.
Why You’ll Love This Irresistible Fresh Huckleberry Pie Recipe
This fresh huckleberry pie recipe isn’t just another berry dessert — it’s been through the trenches of my kitchen experiments and comes out shining every single time. Here’s why it might just become your new go-to pie:
- Quick & Easy: From mixing the filling to finishing the lattice crust, you can have this pie ready in about 1 hour 15 minutes, perfect for last-minute berry finds or spontaneous baking urges.
- Simple Ingredients: No weird additives or specialty flours here. Just fresh huckleberries, pantry staples like sugar and flour, and a classic butter crust that you can make from scratch or buy pre-made if you’re in a pinch.
- Perfect for Summer Gatherings: Whether it’s a backyard picnic, a casual family dinner, or an outdoor party, this pie adds that sweet, fresh fruit touch everyone appreciates.
- Crowd-Pleaser: Kids and adults alike have given this pie rave reviews. The tartness of the huckleberries balances beautifully with the buttery, flaky crust, making it a dessert that rarely lasts beyond seconds.
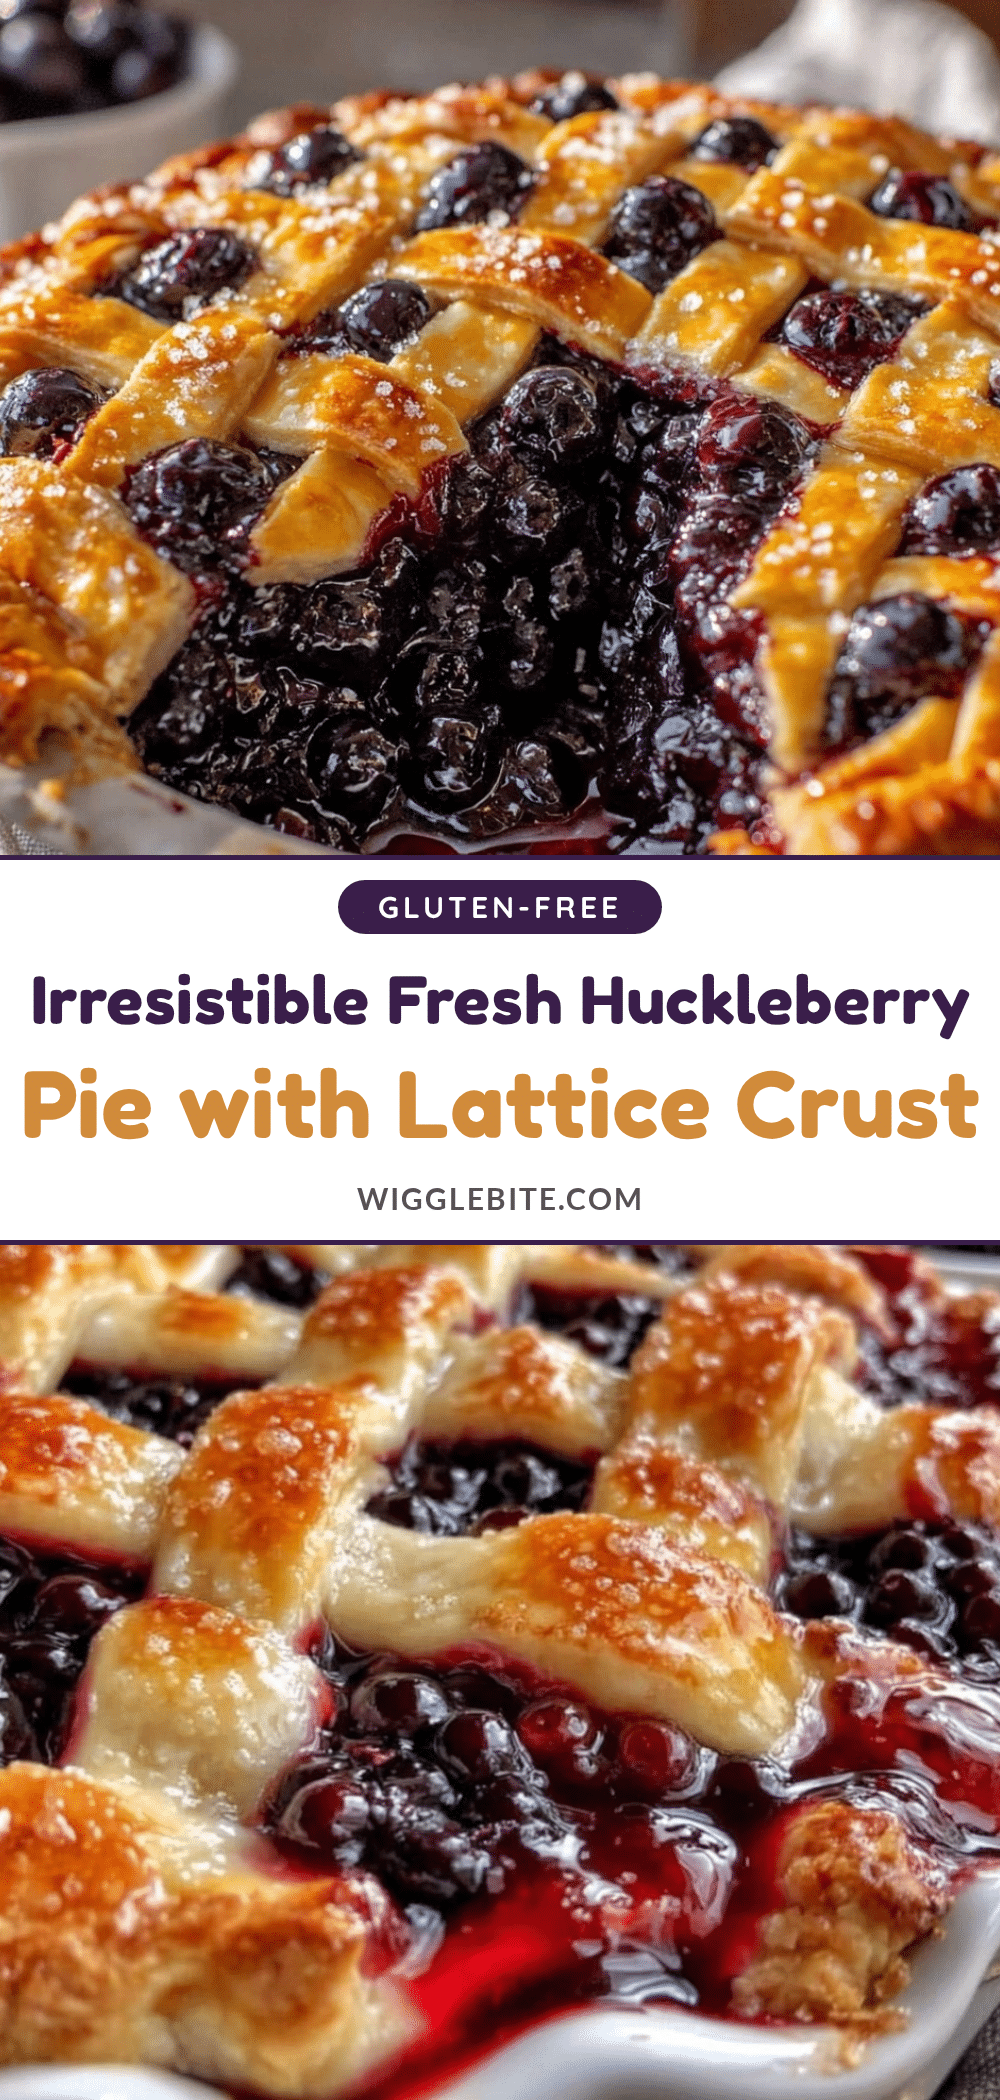
- Unbelievably Delicious: The lattice crust isn’t just pretty — it bakes to a perfect crisp while allowing the filling to bubble up just right, delivering those gorgeous golden edges and juicy bites.
- A Step Above Traditional Berry Pies: The secret is in the crust technique and a touch of lemon zest in the filling that brings out the huckleberries’ natural brightness without overpowering their unique flavor.
Honestly, this pie isn’t just a recipe; it’s a little celebration of fresh berries with a crust that feels both rustic and refined. It’s the kind of dessert that makes you close your eyes after the first bite and say, “Yep, this is why I bake.”
What Ingredients You Will Need
This fresh huckleberry pie recipe uses simple, wholesome ingredients to deliver bold flavor and a satisfyingly flaky texture without fussing over complicated steps. The ingredients are mostly pantry staples, with fresh huckleberries stealing the show. Feel free to grab your berries from a trusted local market or farmer’s stand for the best taste experience.
- For the Pie Crust:
- 2 ½ cups all-purpose flour (I prefer King Arthur for consistent texture)
- 1 tsp salt
- 1 cup unsalted butter, cold and cut into small cubes (use Kerrygold if you want that rich, creamy flavor)
- 6-8 tbsp ice water, as needed
- For the Huckleberry Filling:
- 4 cups fresh huckleberries, rinsed and drained (substitute with blueberries if huckleberries aren’t available)
- ¾ cup granulated sugar (adjust to taste depending on the berry sweetness)
- 3 tbsp cornstarch (or arrowroot powder for a cleaner label)
- 1 tbsp fresh lemon juice (brightens the berries’ natural tartness)
- 1 tsp lemon zest (adds a subtle zing)
- ½ tsp ground cinnamon (optional but adds warmth)
- Pinch of salt
- For the Lattice Top:
- 1 egg, beaten (for egg wash to get that golden shine)
- 1 tbsp coarse sugar, for sprinkling
If you want to make things simpler, store-bought pie dough works well, but making your own butter crust really makes this pie stand out. And if you ever want a gluten-free option, you can swap the all-purpose flour for a gluten-free blend, though the texture will be a bit different.
Equipment Needed
- 9-inch (23 cm) pie dish – ceramic or glass works best for even baking
- Mixing bowls – one large for dough, one medium for filling
- Rolling pin – a classic wooden one or silicone, whichever you prefer
- Pastry cutter or two forks – for cutting butter into flour
- Pastry brush – to apply egg wash
- Measuring cups and spoons – precise measurements make a difference
- Sharp knife or pizza cutter – for cutting lattice strips
- Cooling rack – to let the pie rest after baking
If you don’t have a pastry cutter, you can always use your fingers (cold hands help!) or two forks pressing and cutting the butter into the flour. A pizza cutter makes quick work of slicing perfect lattice strips, but a sharp knife works just fine if you’re careful. For budget-friendly options, a simple rolling pin and a glass pie dish can totally do the trick without breaking the bank.
Preparation Method
- Prepare the Pie Dough: In a large bowl, whisk together 2 ½ cups flour and 1 tsp salt. Add the cold, cubed butter. Using a pastry cutter (or fingers), cut the butter into the flour until the mixture resembles coarse crumbs with pea-sized bits. Slowly add ice water, 1 tablespoon at a time, mixing gently until the dough just comes together. Be careful not to overwork it – you want it shaggy but holding.
- Chill the Dough: Divide dough into two discs, flatten slightly, wrap in plastic wrap, and refrigerate for at least 1 hour. This resting step helps the gluten relax and ensures a flaky crust.
- Make the Huckleberry Filling: In a medium bowl, combine 4 cups fresh huckleberries, ¾ cup sugar, 3 tbsp cornstarch, 1 tbsp lemon juice, 1 tsp lemon zest, ½ tsp cinnamon, and a pinch of salt. Gently toss to coat the berries evenly. Let sit while you prepare the crust – this helps the sugar start drawing out the juices.
- Roll Out the Bottom Crust: On a floured surface, roll out one dough disc to about 12 inches (30 cm) diameter. Transfer it gently to a 9-inch pie dish, pressing it into the edges without stretching. Trim excess dough, leaving about an inch overhang.
- Add the Filling: Pour the huckleberry mixture into the crust, spreading evenly. You’ll notice the filling looks a bit thick from the cornstarch; that’s the magic for a non-runny pie.
- Prepare and Assemble the Lattice Top: Roll out the second dough disc to a similar size. Using a sharp knife or pizza cutter, slice into ½-inch (1.25 cm) wide strips. Lay out half the strips horizontally across the pie, spaced evenly. Fold back every other strip halfway, then place a strip vertically, unfold the folded strips over it. Alternate folding strips back and adding vertical strips until the lattice covers the pie. Trim and tuck the edges under the bottom crust. Crimp or flute edges to seal.
- Apply Egg Wash and Sugar: Brush the lattice crust with beaten egg, making sure to get every nook. Sprinkle coarse sugar over the top for that irresistible sparkle and crunch.
- Bake the Pie: Place the pie on a baking sheet (to catch any drips) and bake in a preheated 400°F (200°C) oven for 20 minutes. Then reduce heat to 350°F (175°C) and bake for another 30-35 minutes, or until the crust is golden and the filling is bubbling thickly.
- Cool and Serve: Let the pie cool on a wire rack for at least 2 hours before slicing. This cooling time lets the filling set properly, so your slices hold together beautifully.
One tip I learned the hard way: don’t skip the initial high heat blast. It helps set the crust quickly and keeps it flaky, so it doesn’t get soggy from the juicy filling. Also, if your crust edges brown too fast, tent with foil halfway through baking. Trust me, it saves the crust without sacrificing that rich golden color.
Cooking Tips & Techniques
The lattice crust is where this pie really shines, but it can be a bit intimidating at first. Here’s what I figured out to make it doable and enjoyable:
- Keep everything cold: Cold butter and ice water are key for flaky crust. When the dough warms up, the butter melts, and you lose that flaky texture.
- Use just enough water: Too much makes dough sticky and tough; too little and it crumbles. Add water gradually until the dough holds together with no dry spots.
- Don’t overwork the dough: Mixing too much develops gluten, which means a tough crust. Mix gently and only until combined.
- Practice lattice weaving on parchment: Before laying strips on the pie, try weaving on a sheet of parchment paper. It gives you confidence and control.
- Trim and chill the assembled pie: If your kitchen is warm, pop the pie in the fridge for 15 minutes before baking. This helps the butter firm back up and prevents shrinking.
- Watch the edges: Use foil or a pie shield if edges brown too fast. A few minutes of tenting can save your crust from burning.
One memorable kitchen blunder was rushing the lattice assembly — I ended up with uneven strips and a messy crust. Since then, I take my time, and it makes all the difference in the pie’s final look. Plus, the lattice crust isn’t just about looks; it lets steam escape so the filling thickens without boiling over.
Variations & Adaptations
This fresh huckleberry pie recipe is a fantastic base to tweak and make your own. Here are some ideas I’ve tried or recommend:
- Fruit Mix: Combine fresh huckleberries with blackberries or raspberries for a mixed berry pie. It adds complexity and a burst of different flavors.
- Gluten-Free Crust: Use a gluten-free flour blend and add a tablespoon of xanthan gum for elasticity. The crust texture will be slightly different but still delicious.
- Vegan Version: Substitute butter with a plant-based margarine and swap the egg wash for a mixture of maple syrup and almond milk to get a golden crust.
- Spice Variations: Add a pinch of ground ginger or nutmeg to the filling for extra warmth, especially nice in cooler months.
- Alternative Sweeteners: Swap granulated sugar for coconut sugar or honey (adjust quantity as honey is sweeter) for a different flavor profile.
One personal favorite variation is adding a splash of bourbon to the filling — it adds a subtle depth that pairs beautifully with those tart berries. For a no-bake twist, try turning the filling into a chilled cobbler served over a triple berry crisp to make a layered summer treat.
Serving & Storage Suggestions
This pie is best served slightly warm or at room temperature. I like to slice a piece and add a scoop of vanilla ice cream or a dollop of whipped cream — the cold cream melting over the warm pie is honestly unbeatable. It also pairs wonderfully with a cup of coffee or a refreshing iced tea, making it perfect for afternoon treats or dessert after a cozy dinner.
Store leftover pie covered loosely with foil or plastic wrap in the refrigerator. It keeps well for 3-4 days. The filling thickens as it chills, which some folks love for firmer slices. To reheat, pop a slice in a 350°F (175°C) oven for 10-15 minutes to warm the crust back to that flaky goodness. Avoid the microwave if you want to keep the crust crisp.
Flavors deepen and meld after a day, so leftovers can taste even better. Just remember that the lattice crust is most crisp fresh out of the oven, so if you’re serving it later, a quick reheat helps revive that perfect texture.
Nutritional Information & Benefits
Each serving of this fresh huckleberry pie (based on 8 slices) provides approximately:
| Nutrient | Amount |
|---|---|
| Calories | 320 kcal |
| Carbohydrates | 45 g |
| Fat | 13 g |
| Protein | 3 g |
| Fiber | 4 g |
| Sugar | 25 g |
Huckleberries are packed with antioxidants, vitamin C, and dietary fiber which support immune health and digestion. The fresh berries offer a sweet-tart flavor with natural nutrients, making this pie a more wholesome dessert option compared to heavily processed sweets. While the crust adds some fat and calories, using unsalted butter and moderating sugar keeps it balanced for an occasional treat.
If you’re watching gluten or dairy, the recipe can be adapted as mentioned earlier, making it accessible for various dietary needs without sacrificing taste.
Conclusion
This irresistible fresh huckleberry pie with lattice crust is one of those recipes that feels both comforting and a little fancy all at once. It’s approachable enough for a weekday treat but stunning enough to bring to a summer potluck or family gathering. What I love most is how it captures the pure flavor of fresh berries with a buttery crust that’s flaky and golden, plus the satisfying crackle of that lattice top. It’s a recipe that invites you to slow down, enjoy the moment, and maybe even share a quiet smile over a slice.
Feel free to tweak the filling or crust to fit your taste, and don’t shy away from making the lattice your own — it’s easier than it looks, promise. If you’re curious about other homemade desserts with fresh berries, you might find inspiration in my triple berry crisp recipe or even try pairing this pie with a refreshing blueberry bourbon smash cocktail for an extra special occasion.
Thanks for letting me share this recipe — I’d love to hear how your pie turns out or any fun twists you try!
Frequently Asked Questions About Fresh Huckleberry Pie
Can I use frozen huckleberries for this pie?
Yes, you can use frozen huckleberries. Thaw and drain them well to avoid excess liquid, then adjust the cornstarch slightly if needed for a thicker filling.
How do I prevent the crust edges from burning?
Cover the edges with foil or a pie shield halfway through baking. This protects them from overbrowning while the rest of the pie finishes baking.
What if I don’t have cornstarch for the filling?
You can substitute with arrowroot powder or tapioca starch in the same quantity. These alternatives also help thicken the berry juices nicely.
Can I make the pie crust ahead of time?
Absolutely. The dough can be made and refrigerated for up to 2 days or frozen for a month. Just thaw and roll out when ready to bake.
How do I store leftover pie?
Cover the pie loosely and refrigerate for 3-4 days. Reheat slices in the oven to revive the crust before serving.
Pin This Recipe!
Irresistible Fresh Huckleberry Pie Recipe Easy Homemade Lattice Crust Tutorial

A delicious fresh huckleberry pie with a flaky, buttery lattice crust that balances sweet-tart berries and golden crisp edges. Easy enough for beginners and perfect for summer gatherings.
- Prep Time: 20 minutes
- Cook Time: 55 minutes
- Total Time: 1 hour 15 minutes
- Yield: 8 servings 1x
- Category: Dessert
- Cuisine: American
Ingredients
- 2 ½ cups all-purpose flour
- 1 tsp salt
- 1 cup unsalted butter, cold and cut into small cubes
- 6–8 tbsp ice water, as needed
- 4 cups fresh huckleberries, rinsed and drained
- ¾ cup granulated sugar
- 3 tbsp cornstarch
- 1 tbsp fresh lemon juice
- 1 tsp lemon zest
- ½ tsp ground cinnamon (optional)
- Pinch of salt
- 1 egg, beaten (for egg wash)
- 1 tbsp coarse sugar, for sprinkling
Instructions
- In a large bowl, whisk together 2 ½ cups flour and 1 tsp salt. Add the cold, cubed butter. Using a pastry cutter or fingers, cut the butter into the flour until the mixture resembles coarse crumbs with pea-sized bits.
- Slowly add ice water, 1 tablespoon at a time, mixing gently until the dough just comes together. Be careful not to overwork it.
- Divide dough into two discs, flatten slightly, wrap in plastic wrap, and refrigerate for at least 1 hour.
- In a medium bowl, combine 4 cups fresh huckleberries, ¾ cup sugar, 3 tbsp cornstarch, 1 tbsp lemon juice, 1 tsp lemon zest, ½ tsp cinnamon, and a pinch of salt. Gently toss to coat the berries evenly and let sit.
- On a floured surface, roll out one dough disc to about 12 inches diameter. Transfer to a 9-inch pie dish, pressing into edges without stretching. Trim excess dough, leaving about an inch overhang.
- Pour the huckleberry mixture into the crust, spreading evenly.
- Roll out the second dough disc to a similar size. Using a sharp knife or pizza cutter, slice into ½-inch wide strips.
- Lay out half the strips horizontally across the pie, spaced evenly. Fold back every other strip halfway, then place a strip vertically, unfold the folded strips over it. Alternate folding strips back and adding vertical strips until the lattice covers the pie.
- Trim and tuck the edges under the bottom crust. Crimp or flute edges to seal.
- Brush the lattice crust with beaten egg, making sure to get every nook. Sprinkle coarse sugar over the top.
- Place the pie on a baking sheet and bake in a preheated 400°F oven for 20 minutes.
- Reduce heat to 350°F and bake for another 30-35 minutes, or until crust is golden and filling is bubbling thickly.
- Let the pie cool on a wire rack for at least 2 hours before slicing.
Notes
Do not skip the initial high heat blast at 400°F to set the crust and keep it flaky. Tent the edges with foil if they brown too fast. Keep ingredients cold for best crust texture. Practice lattice weaving on parchment paper before assembling. Chill the assembled pie for 15 minutes if kitchen is warm.
Nutrition
- Serving Size: 1 slice (1/8 of pie)
- Calories: 320
- Sugar: 25
- Fat: 13
- Carbohydrates: 45
- Fiber: 4
- Protein: 3
Keywords: huckleberry pie, lattice crust, fresh berries, homemade pie, summer dessert, easy pie recipe, berry pie