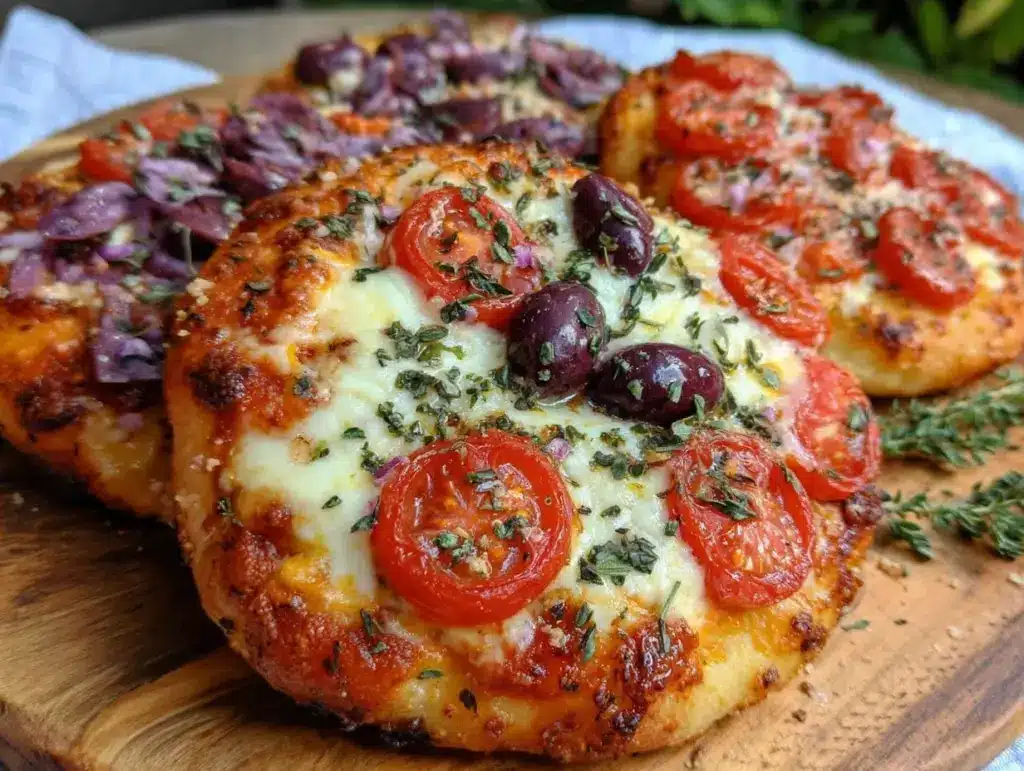
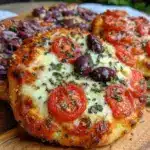
“You’ve got to see this,” my neighbor texted me one afternoon, sending a quick snap of these tiny, colorful pizzas decorated like little flags. I was skeptical at first—mini pizzas with olive stars? Honestly, it sounded a bit gimmicky, the kind of thing that looks cute but falls flat on flavor. But curiosity got the better of me, and when I finally tried making these Flavorful Mini Flag Pizzas with Tomato, Mozzarella & Olive Stars, I was surprised how much they hit the mark. They’re not just adorable; they’re genuinely delicious, with that perfect blend of fresh tomato, gooey mozzarella, and briny olives that somehow feels both festive and comforting.
The whole idea came from a last-minute idea for a neighborhood potluck. I wanted something fun and easy, not too fussy but a little playful—something that would make people smile even before taking a bite. It was a bit chaotic, because, you know, juggling kids, prepping food, and keeping an eye on the clock tends to be a juggling act. But these mini pizzas came together fast and ended up stealing the show. I’ve found myself making them a few times since, tweaking the toppings, and honestly, they’ve become my go-to for casual gatherings or just a quick snack that feels special.
What stuck with me is how this recipe manages that balance: simple ingredients but with a spark of creativity, and a flavor profile that makes you want to close your eyes for a moment after the first bite. It’s a small thing, really, but sometimes small things make the biggest difference in the kitchen. That’s why I’m sharing it here—because it’s one of those recipes that’s easy to love and surprisingly versatile, perfect for both quick weekday bites and festive occasions.
Why You’ll Love This Recipe
After testing this recipe multiple times, I can honestly say it’s a winner for several reasons:
- Quick & Easy: Ready in under 30 minutes, making it ideal for busy weeknights or last-minute guests.
- Simple Ingredients: Uses pantry staples and fresh produce that you likely have on hand—no fancy trips needed.
- Perfect for Parties: Mini size makes them great for potlucks, game days, or casual get-togethers.
- Crowd-Pleaser: The combination of tomato, mozzarella, and olives wins over both kids and adults alike.
- Unbelievably Delicious: The fresh, bright tomato pairs with melty mozzarella and a hint of olive saltiness for a flavor punch that feels both comforting and festive.
What sets this recipe apart is the use of olive stars as a decorative and flavorful touch—trust me, it’s not just pretty. The olives add a sharp briny note that balances the creamy mozzarella and juicy tomatoes perfectly. Plus, the mini size makes it fun to eat without the mess of a big slice. I’ve tried other mini pizzas before, but this version combines a crisp crust with fresh, vibrant toppings that never get soggy or boring.
Honestly, it’s the kind of recipe that has you making it over and over in a week because it’s so versatile and satisfying. Whether you’re looking to impress guests without stress or just want a comforting snack that feels a little festive, these mini flag pizzas deliver every time.
What Ingredients You Will Need
This recipe uses straightforward, fresh ingredients to deliver flavor and texture without fuss. Most are pantry staples, and the fresh ones are easy to find year-round.
- Pizza Dough: Store-bought or homemade (about 1 pound / 450 g). I prefer using Caputo brand for a nice chewy texture, but any good quality dough works.
- Tomato Sauce: About ½ cup (120 ml) of a simple marinara or crushed tomato sauce. You can make your own or use a trusted brand like Muir Glen.
- Fresh Mozzarella: 8 ounces (225 g), sliced or torn into small pieces. Look for small-curd, fresh mozzarella for the best melt and flavor.
- Cherry Tomatoes: 1 cup (150 g), halved or sliced thin. These add sweetness and a juicy pop.
- Black Olives: ½ cup (75 g), pitted and sliced. Kalamata or black olives both work well; Kalamata adds a more robust flavor.
- Green Olives: ¼ cup (40 g), pitted and sliced for contrast in the olive stars.
- Fresh Basil Leaves: A handful, torn for garnish and a fresh herbal note.
- Olive Oil: 2 tablespoons (30 ml), preferably extra virgin for drizzling.
- Salt & Pepper: To taste, for seasoning the tomatoes and dough edges.
- Garlic Powder: ¼ teaspoon (optional), for a subtle savory kick in the crust.
You can easily swap ingredients depending on what you have. For example, use dairy-free mozzarella for a vegan option or swap cherry tomatoes with grape tomatoes. If you want a gluten-free crust, almond flour or cauliflower crusts make a good base. The key is keeping those fresh, vibrant flavors balanced. In summer, I love swapping in heirloom tomatoes for a colorful twist. For olives, I’ve found that mixing black and green olives gives the stars a nice visual pop and flavor depth.
Equipment Needed
- Baking Sheet or Pizza Stone: A rimmed baking sheet works perfectly. A pizza stone can crisp the crust more but isn’t necessary.
- Rolling Pin: To roll out the pizza dough thinly and evenly. If you don’t have one, a clean wine bottle can do the trick.
- Sharp Knife or Cookie Cutters: For cutting the dough into mini rectangles or squares and shaping olive stars. Small star-shaped cookie cutters make the olive stars easier and look neat.
- Mixing Bowls: For tossing tomatoes with seasoning and prepping olives.
- Basting Brush: Handy for brushing olive oil on dough edges.
I’ve used everything from simple baking sheets to my cast iron pizza pan for this recipe, and each gives a slightly different crust texture. For crispier edges, the pizza stone is my go-to, but I always keep a silicone baking mat under the dough to prevent sticking and make cleanup easier. Also, a small paring knife is essential for cutting the olives into star shapes with control and precision. If you’re on a budget, cookie cutters can be found cheaply online or in the baking aisle.
Preparation Method

- Preheat your oven to 475°F (245°C). If using a pizza stone, place it in the oven to heat up at least 30 minutes before baking.
- Roll out the pizza dough. On a lightly floured surface, roll the dough into a rectangle about ¼-inch (6 mm) thick. Aim for roughly 12 x 10 inches (30 x 25 cm).
- Cut the dough into mini rectangles. Use a sharp knife or pizza cutter to slice the dough into about 12 equal mini pizzas, each roughly 3 x 2.5 inches (7.5 x 6.5 cm).
- Prepare the olive stars. Take black and green olives, slice them thinly, and use a small star-shaped cookie cutter to cut out olive stars. This can take about 10 minutes but adds a festive touch.
- Spread tomato sauce evenly. Using the back of a spoon, spread about 1 tablespoon (15 ml) of tomato sauce on each mini pizza, leaving a small border around the edges.
- Add mozzarella and tomatoes. Place small pieces of fresh mozzarella evenly on each pizza, followed by halved cherry tomatoes. Sprinkle a pinch of salt, pepper, and optional garlic powder over the top.
- Arrange the olive stars. Carefully place the olive stars on top of the pizzas in a flag-like pattern. Alternate black and green stars for visual contrast.
- Brush the edges. Lightly brush olive oil over the dough borders. This helps the crust turn golden and crisp.
- Bake the mini pizzas. Transfer the mini pizzas to the baking sheet or pizza stone. Bake for 10-12 minutes until the crust is golden and cheese is bubbly and slightly browned.
- Finish with fresh basil. Remove from the oven and immediately scatter torn fresh basil leaves over the hot pizzas for an herbal brightness.
- Serve warm. Let the pizzas cool for a minute or two, then enjoy their fresh, melty goodness.
Pro tip: If your dough feels sticky, dust it lightly with flour but avoid adding too much or it can dry out the crust. Also, keep an eye on the pizzas in the last few minutes to prevent burning the olive stars. The perfect bake is golden crust with bubbling cheese and just-soft tomatoes.
Cooking Tips & Techniques
Getting mini pizzas just right requires a few little tricks I’ve picked up over the years. First, rolling the dough evenly is crucial—too thin and the crust crisps up like a cracker, too thick and it feels doughy. I usually aim for about a quarter-inch thickness, which balances chewiness and crisp.
When it comes to the olive stars, patience is key. I learned the hard way that using a dull knife or trying to freehand the stars makes them look messy and uneven. Small cookie cutters really help, and chilling the olives briefly makes cutting cleaner. Also, placing the stars gently on top after the cheese ensures they don’t sink in or burn.
Another tip: brush the crust edges with olive oil before baking to get that lovely golden color and slight crunch. It’s a small step but makes a big difference in texture and appearance.
Don’t overload toppings—mini pizzas bake fast, and heavy toppings can lead to soggy crusts. Keep it simple with fresh mozzarella and tomatoes, and save heavier add-ons for bigger pizzas. If you want a little extra flavor, a sprinkle of red pepper flakes or a drizzle of balsamic glaze after baking adds a nice touch.
Finally, multitasking helps. While the pizzas bake, I usually prepare a fresh salad or whip up a quick dipping sauce (like basil pesto or garlic aioli). This way, everything comes together seamlessly, perfect for a casual dinner or gathering.
Variations & Adaptations
- Vegan Version: Use dairy-free mozzarella or cashew cheese and swap olive oil for a flavored oil like garlic-infused for extra punch.
- Seasonal Twist: Swap cherry tomatoes for roasted red peppers or sun-dried tomatoes in fall and winter. Add a sprinkle of fresh thyme instead of basil for a cozy flavor.
- Spicy Kick: Add thin slices of pickled jalapeños or a dash of crushed red pepper flakes on each pizza before baking for some heat.
- Alternate Shapes: Instead of rectangles, cut dough into circles or mini hearts for special occasions like birthdays or holidays.
- Personal Favorite: I once added a drizzle of honey and fresh arugula after baking for a sweet and peppery contrast that surprised everyone.
These mini pizzas adapt well to different cooking methods too. You can bake them on a grill pan for a smoky char or even try an air fryer for a quick, crispy finish. Just keep an eye on cooking times—they’ll vary slightly depending on your method.
Serving & Storage Suggestions
These mini flag pizzas are best served warm right out of the oven when the cheese is melty and the crust still crisp. I like to arrange them on a large platter with fresh basil sprinkled on top for a casual yet inviting presentation. They pair beautifully with a simple green salad or a zesty side like fresh corn and avocado black bean salsa, which adds a cool, refreshing contrast.
For storage, place any leftovers in an airtight container and refrigerate for up to 2 days. Reheat in a toaster oven or conventional oven at 350°F (175°C) for 5-7 minutes to bring back crispness. Avoid microwaving if you want to keep the crust from getting soggy.
Flavors actually deepen after a day, especially the blend of tomato and olive, so these mini pizzas can taste even better the next day. Just reheat gently and add fresh basil right before serving to brighten them up.
Nutritional Information & Benefits
Each mini pizza (about 1/12 of the batch) contains approximately:
| Nutrient | Amount |
|---|---|
| Calories | 120-140 kcal |
| Protein | 6-7 g |
| Fat | 7-9 g |
| Carbohydrates | 10-12 g |
| Fiber | 1-2 g |
Fresh tomatoes provide antioxidants like lycopene, while mozzarella offers a good source of calcium and protein. Olives bring healthy monounsaturated fats and a boost of flavor without added calories. This recipe can easily fit into a balanced diet and be adjusted for gluten-free or dairy-free needs.
Personally, I appreciate that this recipe combines comfort food vibes with fresh, wholesome ingredients that don’t weigh you down. It’s a way to enjoy pizza without the heaviness, and that makes it a go-to when I want something tasty but not overly indulgent.
Conclusion
These Flavorful Mini Flag Pizzas with Tomato, Mozzarella & Olive Stars have become a staple for me, mostly because they’re simple, quick, and endlessly fun to make. They bring a bit of joy to everyday meals and a splash of festivity to casual gatherings. Plus, they’re adaptable enough to suit whatever mood I’m in or ingredients I have on hand.
I hope you find as much pleasure in making and sharing them as I do. Feel free to play around with toppings or shapes to make them your own. If you try this recipe, drop a comment with your favorite variations or any little tweaks you made—I love hearing how these mini pizzas fit into your kitchen stories.
Here’s to many delicious, colorful bites and moments of simple food happiness!
FAQs
- Can I make the dough from scratch for these mini pizzas?
Absolutely! Homemade dough works wonderfully here. Just roll it out to about ¼-inch thick and follow the same steps. - What if I don’t have cookie cutters for olive stars?
No worries—cut olives into small triangles or circles with a knife for a similar effect. Even uneven shapes add charm! - Can I prepare these mini pizzas ahead of time?
Yes, you can assemble them and refrigerate for up to 4 hours before baking. Just bring them to room temperature before popping into the oven. - Are these mini pizzas freezer-friendly?
They freeze well before baking. Freeze assembled pizzas on a tray, then transfer to a bag. Bake from frozen, adding a few extra minutes to the cooking time. - What’s a good dipping sauce to serve with these?
Simple marinara, garlic aioli, or basil pesto all complement these pizzas beautifully and add an extra flavor punch.
Pin This Recipe!
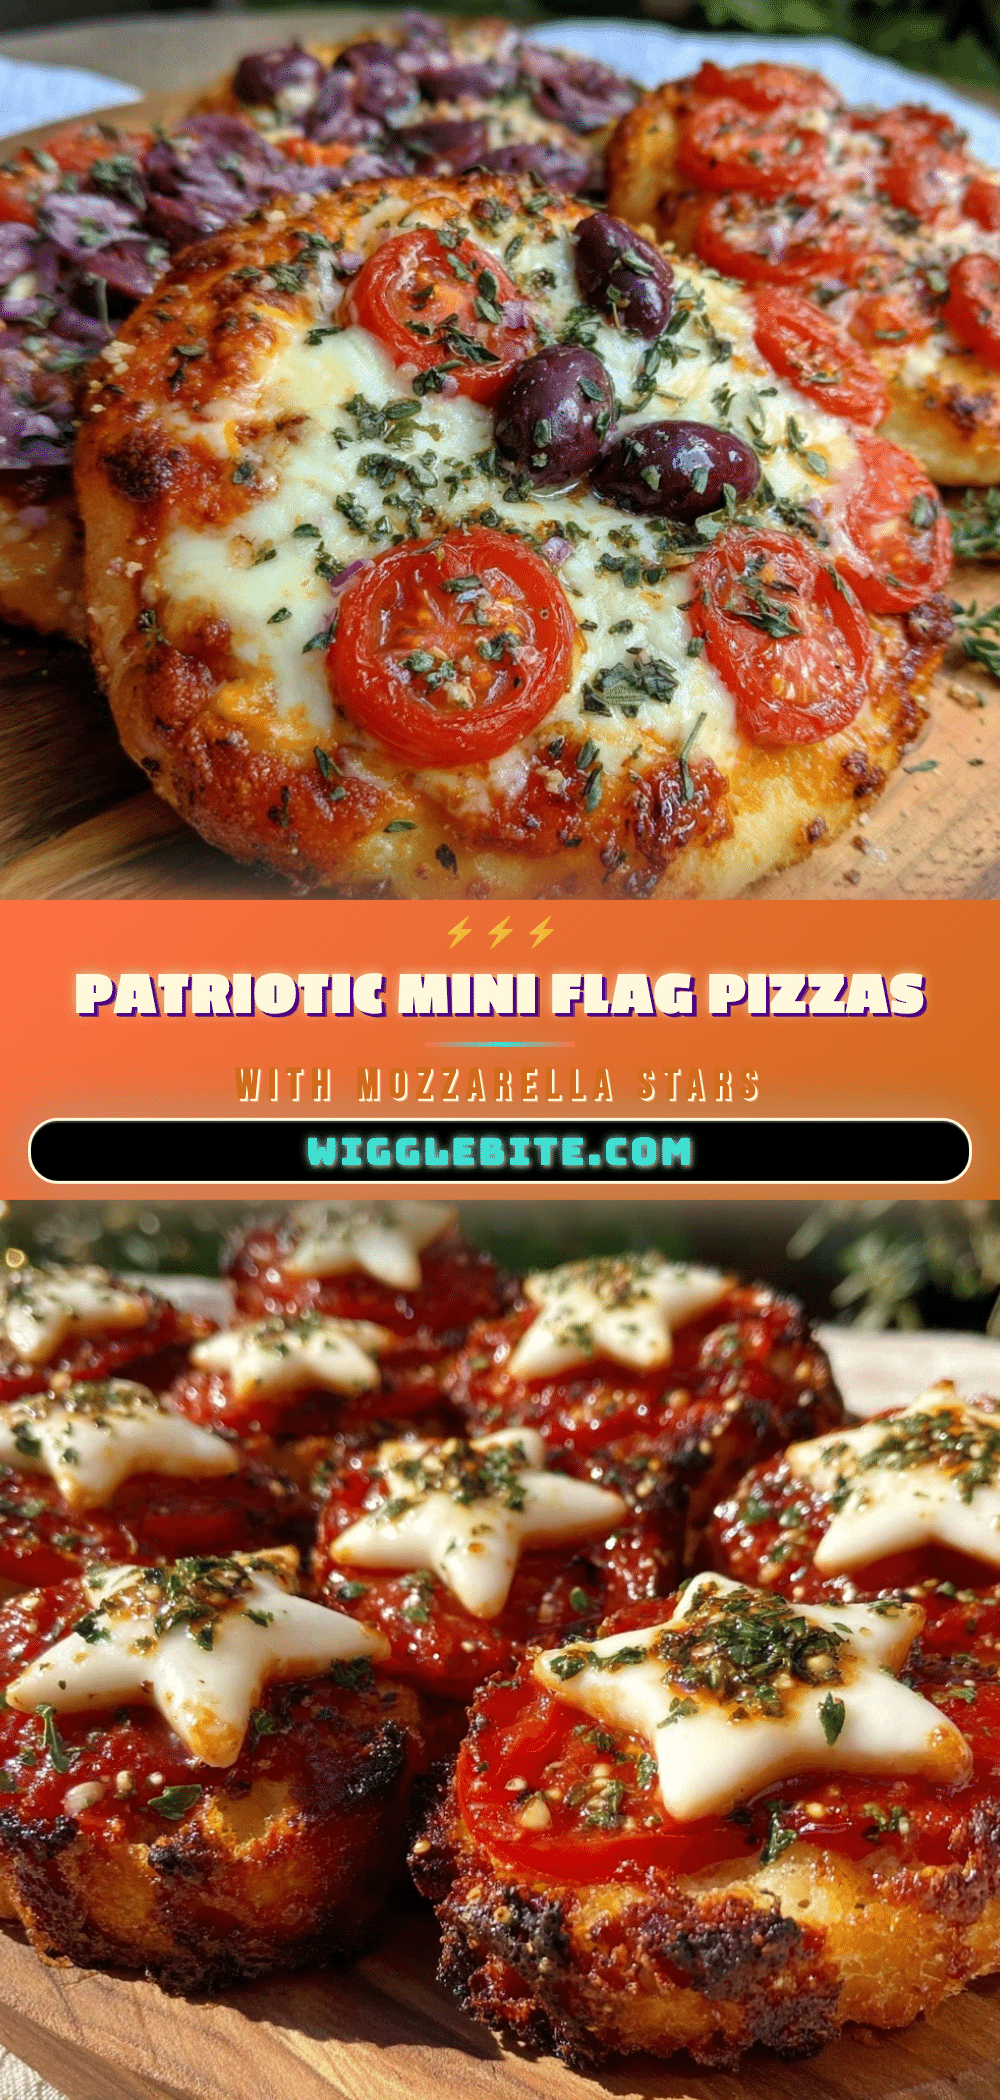
Flavorful Mini Flag Pizzas Recipe Easy Homemade Tomato Mozzarella Olive Stars
These mini flag pizzas are quick, easy, and festive with fresh tomato, mozzarella, and decorative olive stars. Perfect for casual gatherings or a quick snack.
- Prep Time: 15 minutes
- Cook Time: 12 minutes
- Total Time: 27 minutes
- Yield: 12 mini pizzas 1x
- Category: Appetizer
- Cuisine: Italian
Ingredients
- 1 pound (450 g) pizza dough, store-bought or homemade
- ½ cup (120 ml) tomato sauce (marinara or crushed tomato)
- 8 ounces (225 g) fresh mozzarella, sliced or torn
- 1 cup (150 g) cherry tomatoes, halved or sliced thin
- ½ cup (75 g) black olives, pitted and sliced
- ¼ cup (40 g) green olives, pitted and sliced
- A handful fresh basil leaves, torn
- 2 tablespoons (30 ml) extra virgin olive oil
- Salt and pepper to taste
- ¼ teaspoon garlic powder (optional)
Instructions
- Preheat your oven to 475°F (245°C). If using a pizza stone, place it in the oven to heat up at least 30 minutes before baking.
- Roll out the pizza dough on a lightly floured surface into a rectangle about ¼-inch (6 mm) thick, roughly 12 x 10 inches (30 x 25 cm).
- Cut the dough into about 12 mini rectangles, each roughly 3 x 2.5 inches (7.5 x 6.5 cm).
- Prepare the olive stars by slicing black and green olives thinly and cutting out star shapes using a small star-shaped cookie cutter.
- Spread about 1 tablespoon (15 ml) of tomato sauce evenly on each mini pizza, leaving a small border around the edges.
- Add small pieces of fresh mozzarella evenly on each pizza, followed by halved cherry tomatoes. Sprinkle with salt, pepper, and optional garlic powder.
- Arrange the olive stars on top of the pizzas in a flag-like pattern, alternating black and green stars.
- Lightly brush olive oil over the dough edges.
- Bake the mini pizzas on a baking sheet or pizza stone for 10-12 minutes until the crust is golden and cheese is bubbly and slightly browned.
- Remove from the oven and immediately scatter torn fresh basil leaves over the hot pizzas.
- Let the pizzas cool for a minute or two, then serve warm.
Notes
If dough feels sticky, dust lightly with flour but avoid over-flouring to prevent drying out the crust. Use small cookie cutters for neat olive stars and chill olives briefly for easier cutting. Brush crust edges with olive oil for golden color and crisp texture. Avoid overloading toppings to prevent soggy crust. Reheat leftovers in toaster or conventional oven to keep crust crisp; avoid microwave.
Nutrition
- Serving Size: 1 mini pizza (1/12 o
- Calories: 130
- Sugar: 2
- Sodium: 250
- Fat: 8
- Saturated Fat: 3
- Carbohydrates: 11
- Fiber: 1.5
- Protein: 6.5
Keywords: mini pizzas, flag pizzas, tomato mozzarella pizza, olive stars, easy pizza recipe, party appetizer, homemade pizza, quick snack